If you want to give your pet more freedom and make your life easier, installing a Petsafe pet door is a smart move. Imagine your furry friend coming and going whenever they please, without you having to open the door every time.
Sounds great, right? But you might be wondering how to get started and whether it’s something you can do yourself. Don’t worry – this guide will walk you through every step, making the process simple and stress-free. By the end, you’ll have a secure, easy-to-use pet door that fits your home perfectly.
Ready to make your pet’s day? Let’s dive in!
Credit: support.petsafe.net
Choosing The Right Pet Door
Choosing the right pet door is important for your pet’s safety and comfort. A well-fitted door lets your pet move freely without stress. It also protects your home from weather and unwanted animals.
Consider your pet’s size, the door location, and the material. These factors help you pick the perfect door for your needs.
Measuring Your Pet
Measure your pet’s height and width carefully. Measure from the ground to the top of the shoulders. Also, measure the widest part of your pet’s body. Add a few inches for comfort. This ensures your pet can pass through easily without getting stuck.
Selecting Door Type
Choose a door type based on your home’s setup. Wall-mounted doors fit in exterior walls. Sliding glass doors have special panels for pet doors. Door-mounted options attach to regular doors. Think about where your pet will use the door most.
Material Options
Pet doors come in plastic, metal, and wood materials. Plastic doors are lightweight and affordable. Metal doors offer durability and security. Wooden doors blend well with home decor. Pick a material that suits your climate and home style.
Gathering Tools And Materials
Before installing your Petsafe pet door, gather all necessary tools and materials. Having everything ready makes the process smooth and quick. It also helps avoid delays or mistakes during installation.
Get familiar with the tools needed. Check each item carefully to ensure it is in good condition. Preparing safety gear is also important to protect yourself while working.
Essential Tools List
- Measuring tape for accurate sizing
- Pencil to mark cutting lines
- Power drill with drill bits
- Jigsaw or handsaw for cutting
- Screwdriver for fastening screws
- Level to ensure straight installation
- Sandpaper to smooth edges
- Caulking gun and sealant for weatherproofing
Safety Gear
- Safety goggles to protect eyes
- Work gloves to protect hands
- Ear protection if using loud power tools
- Dust mask to avoid inhaling particles
Preparing The Installation Site
Preparing the installation site is an important step before fitting a Petsafe pet door. It helps ensure the door fits well and works smoothly. Taking time to prepare the area makes the process faster and safer. Careful planning also prevents damage to your door or wall.
Follow these steps to get your site ready for installation.
Selecting Door Location
Choose a spot that is easy for your pet to reach. The location should be at your pet’s shoulder height. Avoid places near stairs or busy areas. Check that the door opens without hitting furniture or walls. Also, consider weather exposure and security.
Marking Cut Lines
Use a pencil to mark where you will cut. Measure your pet door carefully and trace its outline. Double-check the measurements to avoid mistakes. Mark clear, straight lines for a clean cut. This step ensures the pet door fits perfectly.
Checking For Obstacles
Look inside the wall or door for wires, pipes, or studs. Avoid cutting into electrical wires or plumbing. Use a stud finder or tap the surface to find hidden obstacles. Remove or work around anything that blocks the cut area. Safety is key during installation.

Credit: www.ifixit.com
Cutting The Opening
Cutting the opening for your Petsafe pet door requires care and precision. This step creates the exact space where your pet will pass through. A clean and well-measured cut ensures the door fits perfectly and works smoothly. Follow these tips to make the process safe and efficient.
Using The Right Saw
Select a saw that suits your door’s material. A jigsaw works well for most wooden and metal doors. Use a fine-toothed blade for clean cuts. Avoid using a saw that can splinter or damage the door. Check the blade condition before starting to ensure smooth cutting.
Creating A Clean Cut
Mark the opening clearly using the template provided. Double-check the measurements before cutting. Cut slowly and steadily along the marked lines. Avoid rushing to prevent mistakes or jagged edges. Keep the saw blade perpendicular to the door surface for a straight cut.
Sanding Edges
After cutting, smooth the edges with sandpaper. This removes splinters and rough spots. Use medium-grit sandpaper first, then fine-grit for a soft finish. Sanding helps protect your pet from sharp edges. It also improves the door’s appearance and fit.
Installing The Pet Door Frame
Installing the PetSafe pet door frame is a key step in setting up your pet door. A well-fitted frame ensures your pet door works smoothly and stays secure. This section guides you through fitting the frame, securing it with screws, and sealing any gaps. Follow these steps carefully for a neat and durable installation.
Fitting The Frame
Place the pet door frame into the opening. Check that it fits snugly without forcing it. Align the frame so it sits straight and level. Use a level tool for best results. Adjust the frame as needed to avoid any tilt or gaps. Proper fitting makes the door easy for your pet to use.
Securing With Screws
Once the frame fits well, start securing it with screws. Use the screws provided in the kit. Drive screws into the pre-drilled holes in the frame. Tighten the screws evenly to hold the frame firmly. Avoid over-tightening to prevent damaging the frame or door. Secure screws keep the frame stable and safe.
Sealing Gaps
Check for any gaps between the frame and the door opening. Use weatherproof sealant or foam to fill these gaps. Sealing stops drafts, dust, and moisture from entering. It also keeps your home insulated. Smooth the sealant for a clean finish. Proper sealing improves energy efficiency and door durability.

Credit: www.youtube.com
Attaching The Flap And Accessories
Attaching the flap and accessories is a key step in installing your Petsafe pet door. This part ensures your pet can enter and exit safely and comfortably. Proper attachment protects your home from drafts and keeps the door secure.
Follow each step carefully to get the best results. Focus on hanging the flap, adding weather stripping, and testing the locking mechanism.
Hanging The Flap
Start by aligning the flap with the top hinge on the door frame. Make sure the flap fits snugly within the frame. Attach the flap by securing the screws provided. Check that the flap swings freely without sticking. A smooth flap helps your pet move easily.
Adding Weather Stripping
Weather stripping helps keep cold air and rain out. Peel off the backing from the weather stripping tape. Press it firmly around the flap edges and door frame. Make sure the strip seals gaps without blocking the flap. This step improves insulation and saves energy.
Testing The Locking Mechanism
Lock the pet door using the built-in locking feature. Move the lock several times to ensure it works smoothly. Try locking and unlocking the flap from both sides. Confirm the lock holds the flap in place when closed. A secure lock keeps your home safe.
Training Your Pet
Training your pet to use a Petsafe pet door is an important step. It helps your pet feel safe and confident. The process takes patience and positive reinforcement. Follow simple steps to guide your pet through the change.
Introducing The Door
Let your pet see and sniff the door first. Keep the door open or unlocked at the start. Show your pet how to push the flap with its nose or paw. Use treats to encourage your pet near the door. Repeat this several times over a few days.
Encouraging Use
Stand on the other side of the door and call your pet. Reward your pet with treats and praise after passing through. Practice short sessions daily to build comfort. Use a favorite toy to lure your pet through the door. Keep training positive and calm to avoid fear.
Troubleshooting Common Issues
Some pets may hesitate or avoid the door. Try using more treats or a gentle push on the flap. Avoid forcing your pet through the door. Make sure the door is the right size and easy to open. If needed, slow down the training pace. Watch for signs of stress and adjust accordingly.
Maintenance Tips
Keeping your Petsafe pet door in good shape helps it last longer and work well. Regular care stops small issues from becoming big problems. Spend some time checking and cleaning the door. It will make a big difference in how smoothly your pet uses it every day.
Cleaning The Door
Wipe the door frame and flap often. Use a damp cloth and mild soap. Remove dirt, dust, and pet hair. Clean both sides of the flap to avoid sticky buildup. This keeps the door clear and easy for your pet to open.
Checking For Wear
Look at the flap and frame carefully. Check for cracks or tears in the flap. Inspect the seals and hinges for damage. Early fixes prevent leaks and drafts. Replace worn parts to keep the door safe and secure.
Seasonal Adjustments
Change settings based on weather changes. In winter, tighten seals to keep cold air out. In summer, loosen seals for better airflow. Adjust locking mechanisms to match your pet’s needs. These small changes keep your home comfortable year-round.
Frequently Asked Questions
How Do I Choose The Right Petsafe Pet Door Size?
Measure your pet’s height and width accurately. Choose a door that fits comfortably to ensure easy access and safety. Petsafe offers various sizes, so match the door size with your pet’s measurements for the best fit.
What Tools Are Needed To Install A Petsafe Pet Door?
You need a drill, screwdriver, jigsaw, measuring tape, pencil, and safety glasses. These tools help you mark, cut, and secure the pet door properly. Having the right tools ensures a smooth and safe installation process.
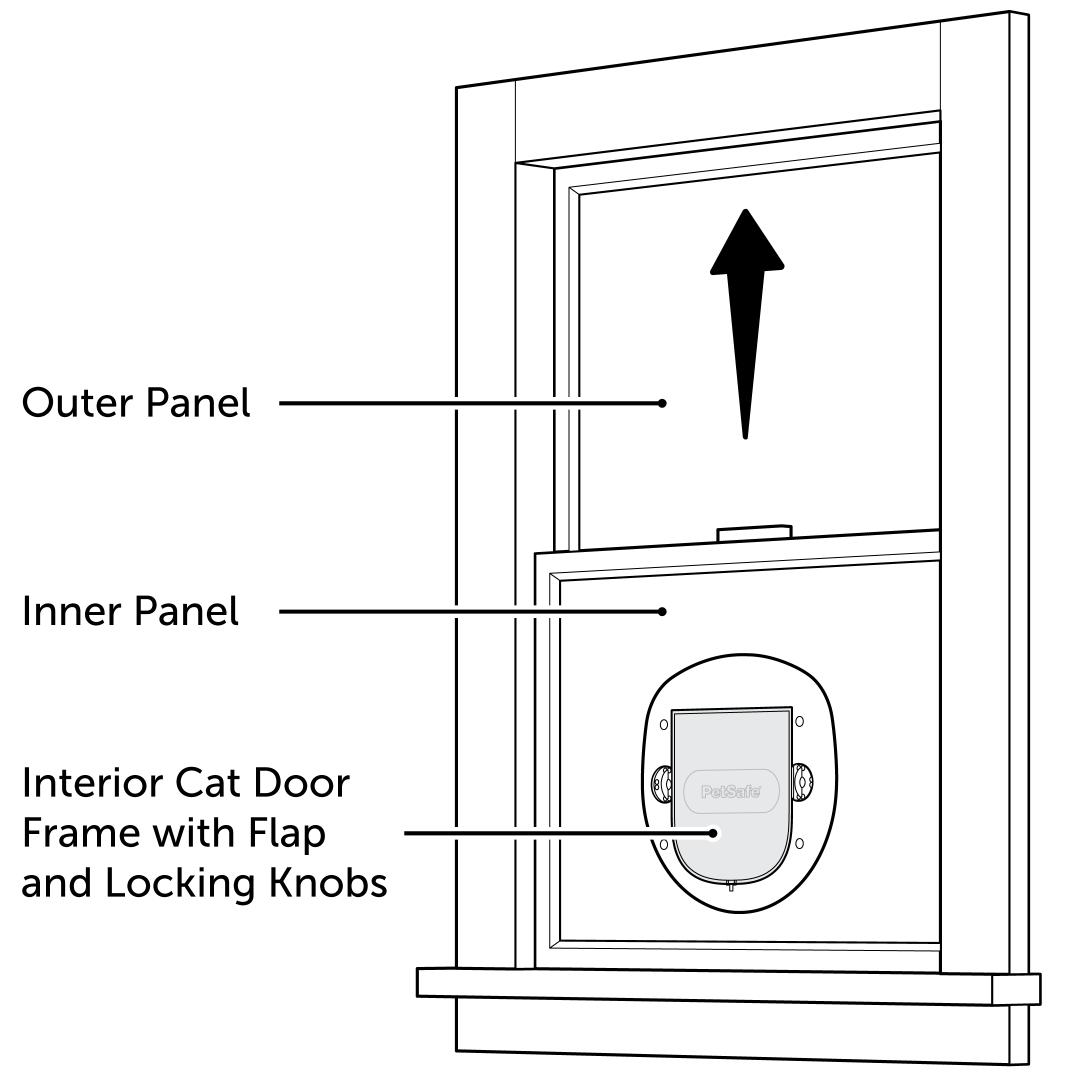
Can I Install A Petsafe Pet Door On Glass Doors?
Yes, but you must use a Petsafe model designed for glass doors. Installation involves specialized templates and may require professional help. Always follow the manufacturer’s instructions for secure and damage-free fitting.
How Long Does It Take To Install A Petsafe Pet Door?
Installation typically takes between 1 to 2 hours. Time varies based on door type and your DIY experience. Following clear instructions speeds up the process and ensures proper fitting.
Conclusion
Installing a Petsafe pet door makes life easier for you and your pet. Follow each step carefully to avoid mistakes. Measure your pet and door space before cutting. Use the right tools and take your time. Your pet will enjoy more freedom and fresh air.
A well-installed door keeps your home safe and comfortable. Regular checks help keep the door working well. Enjoy the convenience and happy pet moments ahead.