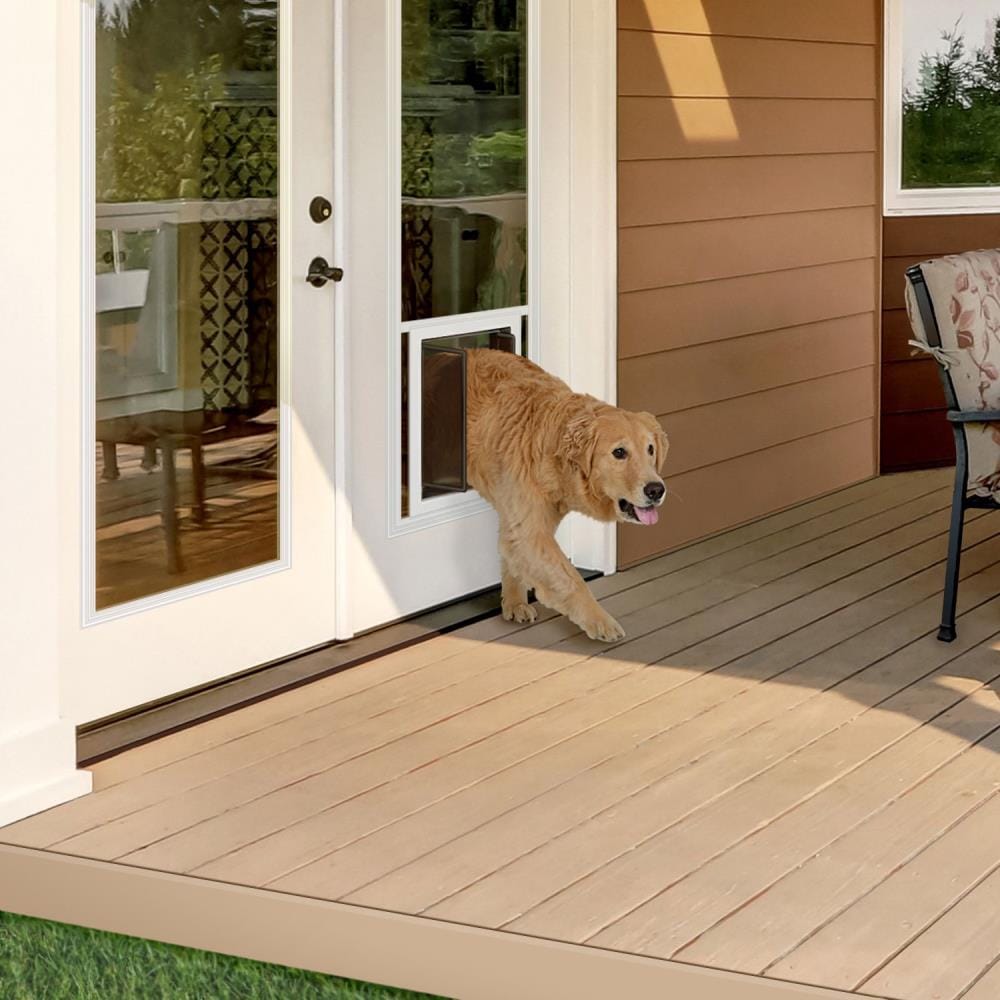
Are you tired of constantly opening the door for your pet? Installing a pet door into a sidelight can give your furry friend the freedom they deserve.
Imagine your pet coming and going without you having to lift a finger. This simple upgrade not only saves you time but also keeps your home secure and energy-efficient. In this guide, you’ll discover easy steps to install a pet door into your sidelight, even if you’ve never done a project like this before.
Keep reading, and soon your pet will enjoy their new gateway to the outdoors!

Credit: www.petdoors.com
Choosing The Right Pet Door
Choosing the right pet door is a key step before installing it in a sidelight. It affects your pet’s comfort and safety. Picking a door that fits your pet and your home is important. The right choice saves time and money.
Measuring Your Pet
Measure your pet’s height and width carefully. Measure from the ground to the top of the shoulders. Also, check the width of your pet’s body. These numbers help find a door that fits well. A door too small will block your pet. A door too big can let in cold air or bugs.
Selecting Door Materials
Choose materials that match your home’s style and weather. Plastic doors are light and easy to clean. Metal doors are strong and last longer. Glass doors look nice and keep light in. Consider how weatherproof the material is. Strong materials help protect your home from wind and rain.
Considering Security Features
Security matters to keep your home safe. Look for doors with locks or covers. Some doors have electronic locks that open only for your pet. Others have manual flaps you can close at night. A secure door stops unwanted animals from entering. It also keeps your pet safe inside.

Credit: kdfoundation.org
Tools And Materials Needed
Installing a pet door into a sidelight requires specific tools and materials. Having the right items ready makes the job easier and safer. This section lists everything you need before starting the installation. Proper preparation saves time and prevents mistakes.
Essential Tools List
- Measuring tape for precise cuts
- Pencil or marker to outline the cut area
- Drill with various drill bits
- Jigsaw or reciprocating saw to cut glass or frame
- Screwdriver set for fastening screws
- Utility knife to trim excess material
- Clamps to hold materials steady
- Caulking gun for sealing edges
Recommended Safety Gear
- Safety glasses to protect your eyes
- Work gloves for hand protection
- Dust mask to avoid inhaling particles
- Ear protection if using loud power tools
- Long sleeves to guard your arms
Materials For Installation
- Pet door kit designed for sidelight installation
- Weather stripping for sealing gaps
- Silicone caulk to waterproof edges
- Wood filler or putty for frame touch-ups
- Sandpaper for smoothing rough cuts
- Mounting screws included with the pet door
Preparing The Sidelight
Preparing the sidelight is a key step before installing a pet door. Proper preparation ensures a clean and secure fit for the door. It also helps avoid damage to the glass and frame. Follow each step carefully to make the process easier and safer.
Removing The Glass Panel
Start by removing the glass panel from the sidelight frame. Use a screwdriver to take out any screws or fasteners. Gently lift the glass out to prevent cracks or breaks. Place the glass on a soft surface to keep it safe during the work.
Cleaning And Marking The Cut Area
Clean the glass panel with a mild cleaner and a soft cloth. Remove dirt and dust for clear visibility. Measure the pet door size and mark the cut area with a non-permanent marker. Double-check the marks to ensure accuracy before cutting. This step helps avoid mistakes and ensures a perfect fit.
Cutting The Opening
Cutting the opening for a pet door in a sidelight is a key step. It requires careful work to avoid damage. Precise cutting ensures the pet door fits well and works smoothly. Follow clear steps to make this task easier and safer.
Measuring And Marking The Door Size
Start by measuring your pet door size accurately. Use a tape measure for precise dimensions. Mark the outline on the sidelight glass or panel. Use a pencil or marker that can be wiped off later. Double-check your measurements before cutting. Accurate marks help avoid mistakes and waste.
Using The Right Cutting Tools
Select tools that suit your sidelight material. For glass, a glass cutter works best. For wood or plastic panels, use a jigsaw or handsaw. Wear safety goggles and gloves to protect yourself. Cut slowly and steadily along the marked lines. A clean cut prevents cracks and rough edges.
Ensuring Smooth Edges
After cutting, check the edges carefully. Use sandpaper or a file to smooth rough spots. Smooth edges protect your pet from sharp surfaces. Clean the area to remove dust and debris. A neat finish helps the pet door fit perfectly and look good.
Installing The Pet Door
Installing a pet door into a sidelight allows your pet to come and go freely. The process needs care to avoid damage and ensure a tight fit. Follow these steps to install the pet door securely and smoothly.
Fitting The Door Frame
Start by placing the pet door frame into the cutout in the sidelight. Check that the frame fits snugly without gaps. Adjust the position so the door swings open easily. Use a level to keep the frame straight and even.
Securing With Screws And Sealant
Fasten the frame using the screws provided with the pet door kit. Tighten the screws evenly to hold the frame in place. Apply sealant around the edges to prevent drafts and water leaks. Smooth the sealant for a clean finish and better protection.
Testing The Door Operation
Open and close the pet door several times to test its movement. Ensure the flap swings freely and seals properly when closed. Check that the locking mechanism works if your door has one. Make adjustments if the door sticks or does not close fully.
Credit: vixencomposites.com
Finishing Touches
Finishing touches make your pet door look neat and work well. These steps protect your home and give the installation a clean look. Take time to complete these details for a better result.
Weatherproofing The Installation
Seal edges around the pet door using waterproof caulk. This stops rain, wind, and bugs from entering. Check for gaps and fill them carefully. Weatherproofing keeps your home dry and saves energy.
Adding Decorative Trim
Attach trim around the pet door to hide rough cuts. Choose trim that matches the sidelight frame color. Use small nails or adhesive to fix the trim in place. This step makes the door look finished and stylish.
Cleaning Up The Work Area
Remove dust, wood chips, and leftover materials from the site. Wipe the sidelight glass and frame with a damp cloth. Dispose of waste properly to keep your space safe. A clean area shows a job well done.
Maintenance Tips
Maintaining your pet door in a sidelight keeps it working well for years. Simple care helps avoid problems and keeps pets happy. Follow these tips to keep the door clean, safe, and easy to use.
Regular Cleaning
Clean the pet door regularly to remove dirt and debris. Use a soft cloth and mild soap with water. Avoid harsh chemicals that can damage the door’s materials. Make sure to clean both sides of the door. Dry the door completely to prevent rust or mold buildup.
Checking For Wear And Tear
Inspect the pet door often for any damage or wear. Look for cracks, loose parts, or broken seals. Check the flap for holes or tears. Replace worn parts quickly to keep the door secure and functional. Early fixes prevent bigger problems later on.
Adjusting The Door As Needed
Adjust the door if it does not close or open smoothly. Tighten screws or hinges if they become loose. Ensure the flap swings freely without sticking. Proper adjustment keeps the door energy-efficient and safe for pets. Test the door regularly to keep it working well.
Frequently Asked Questions
What Tools Are Needed To Install A Pet Door Into A Sidelight?
You need a drill, jigsaw, measuring tape, screwdriver, and sealant. These tools help cut and secure the pet door properly. Always use safety gear like goggles and gloves to protect yourself during installation.
Can I Install A Pet Door In Any Sidelight Glass?
Not all sidelight glass is suitable. Tempered or laminated glass may require professional cutting. Check your sidelight type before installation to avoid damage or safety hazards.
How Do I Measure The Sidelight For The Pet Door?
Measure the height and width where you want the door. Ensure it fits your pet’s size for easy access. Mark the area clearly before cutting to avoid mistakes.
Is It Possible To Install A Pet Door Without Damaging The Sidelight?
Proper tools and careful cutting reduce damage risks. Use protective tape and follow instructions precisely. If unsure, hire a professional to avoid costly repairs.
Conclusion
Installing a pet door into a sidelight is a smart way to help your pet move freely. Follow each step carefully for a clean, safe fit. Use the right tools and measure twice before cutting. Take your time and check your work often.
Your pet will enjoy the new freedom, and you will save time on trips outside. This simple project adds convenience and comfort to your home. Try it yourself and see the benefits firsthand.