Are you ready to upgrade your bathroom with a sleek and practical Moen Showhouse Organic Towel Rack? Installing this stylish towel rack can instantly add both function and charm to your space.
But if you’ve never tackled a home project like this before, it might feel a bit overwhelming. Don’t worry—this guide breaks down every step in a simple, clear way so you can get it done quickly and confidently. Keep reading, and you’ll have your new towel rack up and ready to use before you know it!
Tools And Materials Needed
Gathering the right tools and materials is the first step. This makes the installation smooth and fast. Having everything ready saves time and reduces frustration. It also helps avoid trips to the store in the middle of the project.
Below are the essential tools and materials needed to install the Moen Showhouse Organic Towel Rack. Each item plays an important role in the process.
Tools Needed
- Power drill with drill bits
- Phillips screwdriver
- Measuring tape
- Level
- Pencil
- Stud finder
- Safety glasses
Materials Needed
- Moen Showhouse Organic Towel Rack kit
- Wall anchors (if not included)
- Screws (usually included)
- Cleaning cloth
Using the right tools and materials ensures a secure and neat installation. It also protects your wall and the towel rack from damage. Prepare these items before starting to install your towel rack.

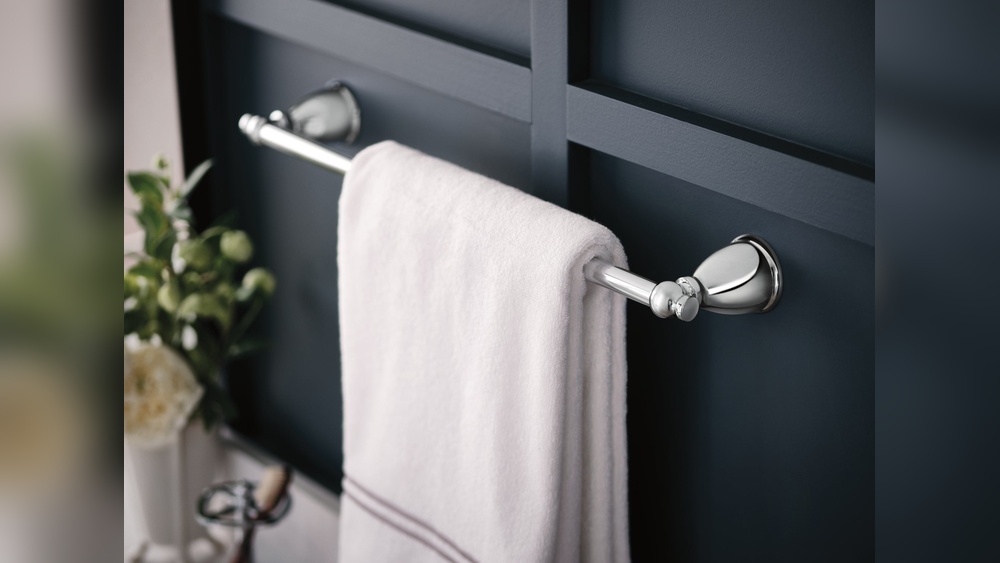
Credit: www.affordablefaucets.com
Preparing The Installation Area
Preparing the installation area is the first step to a smooth Moen Showhouse Organic towel rack setup. This stage ensures safety and accuracy during installation. It helps avoid mistakes and saves time.
Clear the space where the towel rack will go. Remove any items or decorations that might block your work. Make sure the wall is clean and dry. A clean surface helps the rack stick better.
Gather The Necessary Tools And Materials
Collect all tools before starting. You will need a drill, screws, a screwdriver, a level, and a measuring tape. Check the towel rack package for included parts. Having everything ready prevents delays.
Choose The Right Wall Location
Pick a spot that is easy to reach and near the sink or shower. Avoid placing the rack too close to corners or doors. Make sure the wall can support the rack’s weight. Solid walls work best.
Check For Hidden Pipes Or Wires
Use a stud finder or wall scanner to locate pipes and wires. Avoid drilling into these to prevent damage or injury. Mark safe areas clearly before drilling. Safety first.
Marking The Mounting Points
Marking the mounting points is a key step in installing your Moen Showhouse Organic Towel Rack. This step ensures the rack will be secure and level on your wall. Careful marking prevents mistakes that could lead to damage or a crooked rack.
Take your time. Measure twice and mark once. Accuracy now saves time later.
Gather Your Tools
Start by collecting a pencil, tape measure, level, and the towel rack mounting template. These tools help you mark the exact points on the wall. Having everything ready makes the process smoother.
Use The Mounting Template
Most Moen towel racks include a paper template. Hold the template against the wall at the height you want. Make sure it is straight using the level. Then, mark the holes with a pencil through the template.
Check The Marks For Level
After marking, use a level to double-check the points. This ensures the towel rack will be straight. Adjust the marks if needed before drilling.
Confirm Stud Or Anchor Placement
Use a stud finder to locate wall studs near your marks. Mounting on studs gives the rack strong support. If no studs are found, plan to use wall anchors for stability.
Credit: www.homedepot.com
Drilling Holes And Installing Anchors
Drilling holes and installing anchors are key steps in mounting your Moen Showhouse Organic Towel Rack securely. These steps ensure the rack stays stable and supports the weight of towels without damage to your wall.
Careful measuring and proper tools make this task easier. Accurate drilling prevents unnecessary wall damage. Anchors provide extra support, especially on drywall or hollow walls.
Choosing The Right Drill Bit Size
Select a drill bit that matches the anchor size. Too small or too large a bit can weaken the hold. Check the anchor package for the recommended drill bit diameter. Use a sharp drill bit for clean holes.
Marking The Drill Points
Use a pencil to mark where the holes go. Measure the towel rack’s mounting holes carefully. Double-check alignment with a level. Mark both points before drilling to avoid mistakes.
Drilling The Holes
Hold the drill steady at the marked spots. Drill straight into the wall to keep holes clean. Drill slowly and stop once you reach the correct depth. Avoid pushing too hard to prevent wall damage.
Installing The Wall Anchors
Push or tap anchors gently into the drilled holes. They should fit snugly without forcing. Use a hammer softly if needed. Anchors expand inside the wall to hold screws tightly.
Attaching The Towel Rack Brackets
Attaching the towel rack brackets is a key step in installing the Moen Showhouse Organic Towel Rack. This process ensures the rack stays secure and looks great on your wall. Proper bracket installation helps the towel rack hold weight without slipping or falling.
Take your time during this step. Accurate placement and firm attachment make a big difference. Follow the instructions carefully for the best results.
Gather Your Tools And Materials
Before starting, prepare a drill, screwdriver, level, pencil, and anchors. These tools help you attach the brackets firmly. Make sure you have the screws that came with your towel rack kit.
Mark The Bracket Positions
Hold each bracket where you want to install it. Use a pencil to mark the screw holes on the wall. Check the marks with a level to keep brackets straight and even.
Drill Pilot Holes And Insert Anchors
Drill small pilot holes on the pencil marks. The holes guide screws and prevent wall damage. Insert wall anchors into the holes if you install brackets on drywall.
Attach The Brackets To The Wall
Align each bracket with the drilled holes. Use a screwdriver to drive screws into anchors or studs. Tighten screws until brackets feel solid and do not move.
Double-check Bracket Alignment
Use a level to verify the brackets remain straight. Adjust screws if needed to fix any tilting. Proper alignment makes your towel rack look neat and professional.

Credit: www.ebay.com
Securing The Towel Rack
Securing the Moen Showhouse Organic towel rack is a key step. A well-secured rack stays firm and holds towels safely. This part is simple but important. Follow each step carefully for strong support.
Preparing The Mounting Surface
Start by cleaning the wall area where the rack will go. Remove dust and dirt for better grip. Check for any loose paint or wallpaper and fix it. A smooth, dry surface ensures the rack sticks well.
Marking The Drill Holes
Hold the rack against the wall at the right height. Use a pencil to mark the spots for screws. Make sure the marks are level for a straight rack. Double-check measurements before drilling.
Drilling And Installing Anchors
Use a drill bit that matches the size of wall anchors. Drill holes at the marked spots carefully. Insert anchors into the holes until flush with the wall. Anchors provide strong hold, especially in drywall.
Attaching The Towel Rack
Align the towel rack with the anchors. Insert screws through the rack’s mounting holes into anchors. Tighten screws firmly, but do not overtighten. Check the rack to ensure it is stable and even.
Final Adjustments And Checks
The final step in installing your Moen Showhouse Organic Towel Rack is crucial. This step ensures your towel rack is secure and works perfectly. Taking time for these checks prevents future problems.
Focus on stability and alignment. Check if the rack holds towels firmly. Make small tweaks if needed.
Check The Stability Of The Towel Rack
Push gently on the towel rack. It should not wobble or move. Tighten screws if the rack feels loose. Use a screwdriver to secure all fasteners firmly.
Verify The Alignment And Level
Use a level tool to check the rack’s position. The rack must be straight and even. Adjust brackets slightly if the rack tilts. Proper alignment keeps towels from slipping off.
Test The Weight Capacity
Hang a few towels on the rack. Make sure it supports the weight well. The rack should not bend or pull away from the wall. This test confirms a safe installation.
Clean The Rack And Surrounding Area
Wipe the rack with a soft cloth. Remove fingerprints and dust for a neat look. Clean around the installation site to finish the job well. A tidy area shows a job well done.
Maintenance Tips For Longevity
Keeping your Moen Showhouse Organic Towel Rack in good shape helps it last longer. Regular care stops rust and wear. It also keeps the rack looking new and fresh.
Simple maintenance steps protect your investment. These tips are easy to follow and save time in the long run.
Cleaning Your Towel Rack Regularly
Wipe the rack with a soft cloth. Use warm water and mild soap. Avoid harsh cleaners that can damage the finish. Dry the rack fully to stop water spots.
Checking For Loose Screws
Look for any loose screws every few months. Tighten them with the right screwdriver. Loose screws can cause the rack to wobble or fall.
Protecting Against Moisture
Keep the rack dry after showers. Excess moisture can cause rust or weaken the mounting. Use a towel to dry the rack if needed.
Avoiding Heavy Loads
Do not hang heavy items on the rack. Overloading can bend or break it. Stick to towels and light clothing only.
Using Rust-resistant Products
Apply a rust-resistant spray if you live in a humid area. This adds a layer of protection. Follow the product instructions carefully.
Frequently Asked Questions
How Do I Install A Moen Showhouse Towel Rack?
First, mark drill points on the wall using the rack’s mounting bracket. Drill holes and insert anchors. Secure the bracket with screws, then attach the towel rack onto the bracket. Ensure it’s level and tight for a sturdy installation.
What Tools Are Needed For Towel Rack Installation?
You will need a drill, screwdriver, level, pencil, measuring tape, and wall anchors. These tools help you securely mount the Moen Showhouse towel rack on drywall or tile surfaces.
Can I Install The Rack On Tile Walls?
Yes, you can. Use a masonry or tile drill bit to carefully drill holes without cracking the tile. Insert anchors designed for tile, then follow the usual installation steps to secure the rack.
How High Should I Mount The Towel Rack?
Mount the towel rack 48 inches from the floor for easy reach. Adjust the height based on your bathroom’s layout or personal preference for optimal convenience.
Conclusion
Installing a Moen Showhouse Organic Towel Rack is simple and quick. Follow the steps carefully for a secure fit. Use the right tools and measure twice to avoid mistakes. A well-installed towel rack keeps your bathroom organized and tidy. Enjoy the neat look and easy access to your towels every day.
This small project adds comfort and style to your space. Try it yourself and see how easy home upgrades can be.

