
Setting up your Arlo Wired Video Doorbell might seem tricky at first, but you’re closer to securing your home than you think. Imagine seeing who’s at your door from anywhere, anytime, with crystal-clear video right on your phone.
In this guide, you’ll discover simple steps to install and connect your Arlo doorbell quickly and easily. By the end, you’ll have a smart, reliable way to protect your home and stay connected with visitors—no hassle, no confusion. Ready to make your front door smarter?
Let’s dive in.
Choosing The Right Tools
Choosing the right tools makes installing your Arlo Wired Video Doorbell easier. The right tools help you work faster and avoid mistakes. It ensures your doorbell works well from the start. Preparation saves time and stress during installation.
Essential Tools And Materials
Gather these items before you start. A drill is needed for making holes in the wall. Use a screwdriver to fix screws securely. Wire strippers help prepare the wires for connection. A voltage tester checks if power is off before working. Have the mounting screws and anchors ready. Keep the Arlo doorbell and its manual nearby.
Safety Precautions
Turn off the power at the circuit breaker before starting. Test wires with a voltage tester to confirm no electricity flows. Wear insulated gloves for extra protection. Avoid working in wet conditions or rain. Use a sturdy ladder if your doorbell is high. Take time to follow safety steps carefully to prevent accidents.

Credit: www.youtube.com
Preparing Your Doorbell Location
Preparing your doorbell location is an important first step in installing the Arlo Wired Video Doorbell. It ensures your doorbell works properly and captures clear video. This process involves checking your current doorbell setup and choosing the right spot for mounting. Taking time here prevents issues later and makes installation easier.
Checking Existing Doorbell Wiring
Start by turning off the power at your circuit breaker. This keeps you safe during the process. Next, remove your old doorbell to see the wiring behind it. Look for two wires connected to the doorbell terminals. These wires carry power and signal to your doorbell.
Use a voltage tester to check if the wires have power. The Arlo Wired Video Doorbell needs 16-24 volts AC to work well. If your wiring does not match, you might need an electrician’s help. Confirm the wires are in good condition and long enough to connect the new doorbell.
Selecting The Best Mounting Spot
Choose a spot near your front door where visitors usually stand. The camera should capture faces clearly. Mount the doorbell 48 inches from the ground for the best view. Avoid places with direct sunlight on the camera to reduce glare.
Pick a flat surface to attach the doorbell securely. Make sure the spot is close to your existing wiring. Check there are no obstacles blocking the camera’s view. The location should be easy to reach for installation and future maintenance.
Installing The Arlo Wired Video Doorbell
Installing the Arlo Wired Video Doorbell is a straightforward process. It requires careful steps to ensure safety and proper functioning. Follow each step to set up your doorbell correctly.
Turning Off Power Safely
First, turn off power at the circuit breaker. This stops electricity from flowing to the doorbell wires. Use a voltage tester to check wires are not live. Safety is crucial before touching any wiring. Never skip this step to avoid electric shock.
Wiring The Doorbell
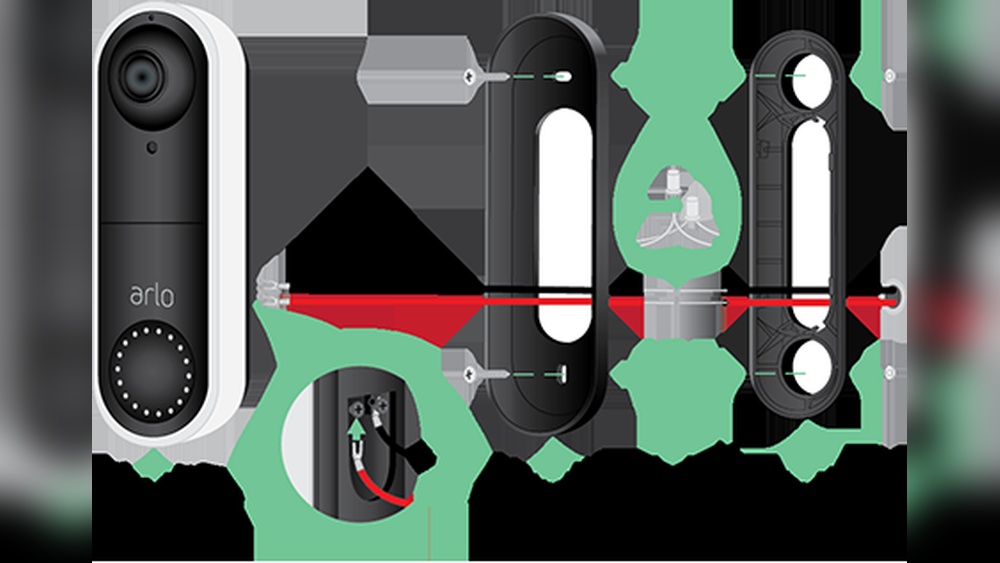
Connect the doorbell wires to the Arlo device terminals. Match the wires carefully—usually two wires are enough. Tighten the screws to hold wires firmly. Do not let wires touch each other. Proper wiring ensures the doorbell works well and rings correctly.
Mounting The Device
Choose a spot near your door at eye level. Use the mounting bracket that comes with the doorbell. Mark the screw holes, then drill carefully. Attach the bracket with screws tightly. Snap the Arlo doorbell onto the bracket until it clicks. The device should fit snugly and not move.

Credit: kb.arlo.com
Setting Up The Arlo App
Setting up the Arlo app is the first step to using your Arlo Wired Video Doorbell. The app lets you control and view your doorbell from anywhere. It helps you receive alerts and check video feeds with ease. Follow these simple steps to get started with the app.
Downloading And Installing
Go to the App Store or Google Play Store on your phone. Search for “Arlo” and find the official app. Tap “Download” or “Install” to add it to your device. The app is free and takes only a few moments to install.
Creating Or Logging Into An Account
Open the Arlo app after installation. If you already have an account, enter your email and password. If not, tap “Sign Up” to create a new account. Use a valid email to register. Follow the instructions to complete your profile.
Connecting The Doorbell To Wi-fi
Make sure your phone is connected to your home Wi-Fi network. In the app, select “Add Device” and choose “Video Doorbell.” Follow the prompts to connect the doorbell to your Wi-Fi. Enter your Wi-Fi password carefully. The doorbell will now link to your network and app.
Configuring Doorbell Settings
Configuring your Arlo Wired Video Doorbell settings is essential for a smooth experience. Proper setup helps you control how the doorbell reacts and notifies you.
Adjust these settings to fit your daily needs. This part focuses on motion detection, notifications, and video recording options.
Adjusting Motion Detection
Open the Arlo app and select your doorbell device.
Find the motion detection settings in the device menu.
Set the motion sensitivity to low, medium, or high based on your preference.
Adjust the motion zones to focus on important areas only.
This helps reduce false alerts from passing cars or trees.
Setting Notification Preferences
Go to the notifications section in the app.
Choose how you want to be alerted: push notifications, emails, or both.
Turn on notifications for motion, doorbell presses, or both.
Set quiet hours to avoid alerts during specific times.
This keeps your phone from ringing at night or during meetings.
Enabling Video Recording
Navigate to the video settings in your Arlo app.
Enable continuous recording or recording triggered by motion or doorbell press.
Select the video quality for recording to save storage space.
Make sure cloud recording is activated if you want to save videos online.
This ensures you can review footage anytime, even if the device is offline.

Credit: community.arlo.com
Testing And Troubleshooting
Testing and troubleshooting your Arlo Wired Video Doorbell is vital for a smooth experience. This step ensures the device works correctly. It helps catch issues early before they become bigger problems. Follow the simple checks below to confirm your doorbell functions well.
Verifying Video And Audio Quality
Start by checking the video feed on your app. The picture should be clear and bright. Test the night vision too, to see if it works in low light. Speak through the doorbell and listen for clear audio. Ask someone to respond from the other side. Make sure the sound is loud and without distortion.
Common Issues And Fixes
The doorbell may not show video. Check the Wi-Fi connection strength first. Weak signal can cause video lag or no video. Restart the doorbell and the router to fix this. If audio is missing, check microphone and speaker settings. Make sure the doorbell is properly wired to power. Loose wires cause power interruptions and device failure.
App notifications might not arrive. Confirm app permissions and notifications are enabled. Update the Arlo app to the latest version. Factory reset the doorbell if problems persist. This restores default settings and clears bugs.
Frequently Asked Questions
How Do I Install The Arlo Wired Video Doorbell?
To install, turn off your power first. Remove the old doorbell, connect wires to Arlo’s terminals, mount the doorbell, and restore power. Follow the Arlo app instructions for setup and Wi-Fi connection.
What Tools Are Needed For Arlo Doorbell Setup?
You need a screwdriver, drill, wire stripper, and voltage tester. These tools help safely remove old equipment, mount the doorbell, and connect wires correctly.
Can I Use Arlo Doorbell Without Existing Wiring?
No, the Arlo Wired Video Doorbell requires existing doorbell wiring for power. Without wiring, it won’t function properly or connect to the system.
How Do I Connect Arlo Doorbell To Wi-fi?
Use the Arlo app to scan the QR code on the doorbell. Follow the app prompts to select your Wi-Fi network and enter the password for connection.
Conclusion
Setting up the Arlo Wired Video Doorbell is simple and quick. Follow the steps carefully for the best results. Check your wiring and tools before starting the installation. Test the doorbell after setup to ensure it works well. Enjoy better security and clear video at your doorstep.
Stay safe and keep your home connected with ease. You now have a reliable way to see visitors anytime. Keep the instructions handy for future reference or troubleshooting.