Want to make your home safer and smarter? Installing a doorbell video camera is one of the easiest ways to do just that.
But if you’re wondering how to install a doorbell video czmera without hassle, you’re in the right place. In this guide, you’ll get simple, step-by-step instructions that anyone can follow. By the end, you’ll know exactly how to set up your device so you can see who’s at your door anytime, anywhere.
Keep reading to protect your home and gain peace of mind with your new doorbell video camera!
Choosing The Right Doorbell Camera
Choosing the right doorbell camera is important for your home’s security. This device lets you see who is at your door from anywhere. Picking one that fits your needs makes installation easier and improves safety. Understanding the types, features, and compatibility helps find the best option for you. Also, keeping budget in mind ensures you get good value without overspending.
Types Of Doorbell Cameras
There are two main types: wired and wireless doorbell cameras. Wired models connect to your existing doorbell system. They offer constant power but need professional installation. Wireless cameras run on batteries and use Wi-Fi to connect. They are easy to install but need battery changes. Some models include video only, while others have two-way audio to talk to visitors.
Features To Consider
Look for clear video quality, ideally HD or better. Night vision is important for low light conditions. Motion detection alerts you when someone approaches your door. Two-way audio lets you speak with visitors remotely. Cloud storage or local storage options keep video recordings. Some cameras offer smart home integration for voice control and automation.
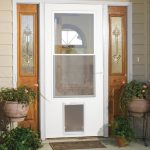
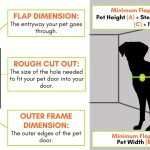
Compatibility With Your Door
Check the size and shape of your doorbell space. Some cameras require specific mounting sizes. Make sure your Wi-Fi signal reaches the door location. Wired cameras need compatible doorbell wiring and voltage. Confirm your doorbell chime works with the new camera. Proper fit ensures easy installation and reliable performance.
Budget Tips
Set a clear budget before shopping. Basic models cost less but may lack features. Mid-range cameras balance price and quality well. Think about extra costs like subscriptions for cloud storage. Look for sales or bundles to save money. Spending wisely gets a camera that protects your home without overspending.
Credit: goabode.com
Tools And Materials Needed
Gathering the right tools and materials makes doorbell camera installation easier and faster. Having everything ready helps avoid interruptions. This section lists what you need for a smooth setup.
Basic Installation Tools
You need a drill to make holes in the wall. A screwdriver is essential to fix screws tightly. A level helps keep the camera straight. Wire cutters trim excess cables. A tape measure checks the correct height for the camera.
Safety Equipment
Wear safety glasses to protect your eyes from dust and debris. Use gloves to avoid cuts or scrapes. A sturdy ladder ensures you reach high places safely. Make sure the ladder is stable before climbing.
Additional Accessories
Extra screws and anchors help secure the camera firmly. Electrical tape protects wire connections. A voltage tester confirms no live current is present. You may need a smartphone or tablet to connect the camera to Wi-Fi.
Preparing For Installation
Preparing for the installation of your doorbell video camera is an important step. It ensures a smooth and safe setup. Taking time to prepare helps avoid common issues. Follow these simple steps before you start.
Checking Your Doorframe
First, inspect the doorframe where you will mount the camera. Make sure it is clean and dry. Check for any damage or cracks that could affect the installation. The surface should be flat and sturdy. This helps the camera stay secure and work properly.
Turning Off Power Supply
Safety is key. Turn off the power supply to the doorbell area before you begin. This prevents any risk of electric shock. Use your home’s circuit breaker to cut the power. Double-check by pressing the existing doorbell button to ensure it is off.
Reviewing Manufacturer Instructions
Read the instructions that come with your doorbell camera carefully. Each model may have specific steps and requirements. Understanding the instructions saves time and prevents mistakes. Keep the manual close during installation for quick reference.
:strip_icc()/BHG-how-to-install-video-doorbell-6833360-part-02-step-05-418dcd0ead7b415181d36f311ff079be.jpg)
Credit: centromedicoloira.com
Mounting The Doorbell Camera
Mounting the doorbell camera is an important step in your installation. Proper placement ensures clear video and reliable performance. Follow the instructions carefully to mount it securely on your wall or door frame.
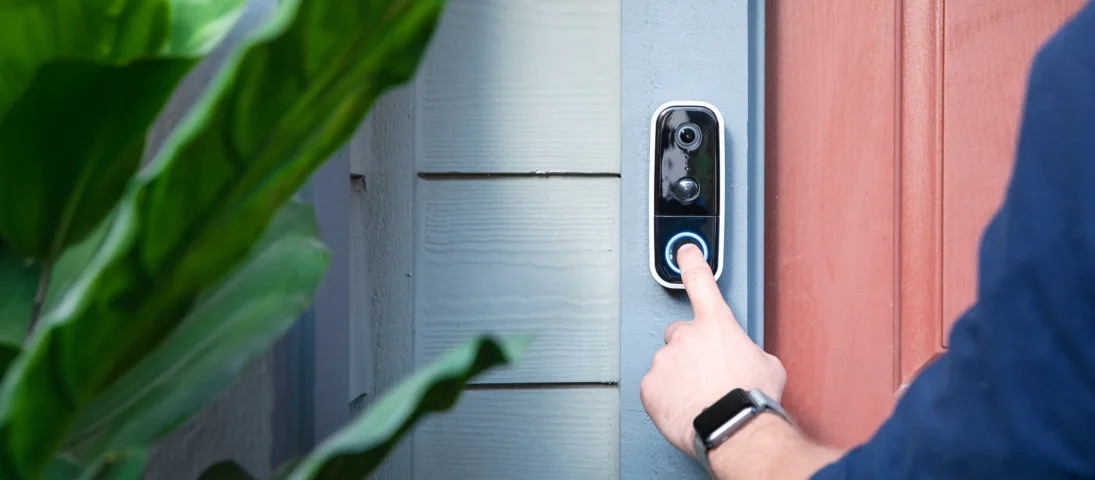
Marking The Position
Hold the camera against the wall at the desired height. Most doorbell cameras work best at about 4 feet from the ground. Use a pencil to mark the screw holes on the wall. Check the angle to make sure the camera will capture the entrance well.
Drilling And Anchoring
Choose a drill bit that matches the size of the wall anchors. Drill holes at the marked points carefully. Insert the wall anchors into the holes to provide a strong hold. Anchors help keep the camera steady and prevent it from falling.
Attaching The Camera
Align the camera with the drilled holes. Use the screws provided to attach the camera tightly to the wall. Make sure the camera is secure and does not move. Adjust the angle slightly to get the best view of your door.
Connecting The Wiring
Connecting the wiring is a key step in installing your doorbell video camera. It ensures the camera receives power and works properly. This process needs care and attention. Incorrect wiring can cause the camera to fail or even damage your home’s electrical system.
Follow simple steps to identify wires, connect to power, and secure connections. This will help your doorbell camera work smoothly and last longer.
Identifying Wires
Start by locating the wires from your existing doorbell. Usually, there are two wires: one for power and one for ground. These wires are often thin and may be labeled. Use a voltage tester to check if the wires carry current. Remember, the wires may look different in color depending on your home.
Connecting To Power Source
Connect the doorbell camera wires to the power source carefully. Most doorbell cameras work with low voltage, usually 16 to 24 volts. Attach the wires from the camera to the matching wires in your wall. Ensure the positive and negative wires match correctly to avoid damage. Turn off the power at the breaker before connecting wires for safety.
Ensuring Secure Connections
Secure connections prevent loose wires and signal loss. Use wire nuts or connectors to join wires tightly. Wrap connections with electrical tape for extra safety. Tuck wires neatly into the wall or mounting box. Loose or exposed wires may cause shorts or stop the camera from working.
Setting Up The Software
Setting up the software is the next step after installing your doorbell video camera. This process lets you control the camera from your phone. It also helps you see live video and get alerts easily.
Follow these simple steps to get your software ready. Each step is important for smooth operation.
Downloading The App
Find the app for your doorbell camera in the app store. It works on both Android and iPhone devices. Search by the camera brand or check the manual for the exact name. Download and install the app on your phone.
Creating An Account
Open the app and create a new account. Use a valid email address to sign up. Choose a strong password to keep your account safe. Some apps may ask for your phone number for extra security.
Pairing The Device
Turn on your doorbell camera and follow the app instructions to pair it. Usually, the app will ask you to scan a QR code on the camera or enter a code. Wait for the app to connect to the camera and your Wi-Fi network.
Once paired, test the camera by viewing the live feed on your phone. This confirms the connection is successful.
Testing The Doorbell Camera
Testing the doorbell camera is a key step after installation. It ensures the device works well and keeps your home safe. Proper testing helps catch any issues early. It also lets you set up the camera for the best performance.
Checking Video Quality
Start by checking the video quality on your phone or computer. Make sure the image is clear and bright. Test during the day and at night. Look for any blurriness or dark spots. Adjust the camera angle if needed. Good video quality helps identify visitors easily.
Testing Motion Detection
Next, test the motion detection feature. Walk near the camera to trigger alerts. Check if your device sends notifications quickly. Test different distances to find the best detection range. Motion detection keeps you informed about activity at your door.
Adjusting Settings
Finally, adjust the settings to fit your needs. Change sensitivity to avoid false alarms from pets or cars. Set notification preferences for quiet hours. Update video recording length if needed. Proper settings improve your experience and security.
Troubleshooting Common Issues
Installing a doorbell video camera is easy, but problems can occur. Troubleshooting helps fix these issues quickly. This saves time and frustration. Understanding common problems makes installation smoother.
Wi-fi Connectivity Problems
Wi-Fi issues are common with video doorbells. The camera needs a strong signal to work well. Check if your router is close enough. Walls and distance can block the signal. Restart your router to refresh the connection. Use a Wi-Fi extender if the signal is weak. Make sure your network password is correct. Avoid using public Wi-Fi for security reasons.
Power Supply Issues
Power problems stop the camera from working. Check if the doorbell wires are connected tightly. Use a voltage tester to confirm power flow. Some models need batteries; check if they are charged. Replace old batteries with new ones. If your camera uses a transformer, ensure it matches the required voltage. Power surges can damage the device; use a surge protector.
App Malfunctions
The app controls your doorbell camera. Sometimes it crashes or won’t connect. Restart your phone to clear temporary bugs. Update the app to the latest version. Clear the app cache if it runs slowly. Uninstall and reinstall the app if problems persist. Check your phone’s internet connection. Ensure app permissions are enabled for camera access.
Maintenance Tips
Maintaining your doorbell video camera ensures it works well every day. Simple care steps keep the video clear and the device reliable. These tips help you avoid common problems and extend the camera’s life.
Cleaning The Lens
Dirty lenses blur the video. Use a soft cloth to gently clean the lens. Avoid harsh chemicals that can damage the glass. Clean the lens weekly for the best picture quality.
Updating Firmware
Firmware updates fix bugs and add features. Check for updates in the camera’s app regularly. Install updates quickly to keep the camera secure and working smoothly.
Battery Replacement
Low battery causes poor performance or no video. Replace batteries as soon as the app warns you. Use the recommended battery type for longer life. Keep spare batteries handy for quick changes.
:strip_icc()/BHG-how-to-install-video-doorbell-6833360-part-01-step-05_30445-c97141832b6541158a12194e97fccded.jpg)
Credit: www.vicentetorns.com
Frequently Asked Questions
What Tools Do I Need To Install A Doorbell Video Camera?
You need a screwdriver, drill, level, and wire strippers. Some models may require a voltage tester or a smartphone for setup. Always check the manufacturer’s instructions for specific tools.
How Do I Connect The Doorbell Video Camera To Wi-fi?
Follow the app instructions to connect your camera to Wi-Fi. Ensure your router is nearby and the signal is strong for stable performance.
Can I Install A Doorbell Video Camera Myself?
Yes, most doorbell cameras are designed for easy DIY installation. Follow the step-by-step guide and safety precautions to avoid issues.
How Do I Mount The Doorbell Camera Securely?
Use the mounting bracket included in the package. Drill holes, insert anchors, and tighten screws to ensure a firm fit on the wall.
Conclusion
Installing a doorbell video camera is simple and quick. Follow each step carefully for the best results. Check the connections and test the camera before finalizing. A working video doorbell helps keep your home safe. Enjoy the peace of mind it brings every day.
Stay aware of who visits your home, even when away. This small device can make a big difference in security. Keep your family and property protected with ease.