Are your LED Christmas lights flickering or not lighting up at all? It’s frustrating when your festive decorations don’t work just as you planned.
But before you toss that light string away, there’s good news: you can fix it yourself. With a few simple steps, you’ll bring your holiday lights back to life and save money. Keep reading, and you’ll learn easy ways to troubleshoot and repair your LED Christmas light string quickly.
Your home will be glowing in no time!

Credit: www.cranchi.com
Common Issues With Led Christmas Lights
LED Christmas lights bring joy and brightness during the holidays. Sometimes, they stop working properly. Knowing common problems helps fix them fast. This saves money and keeps your decorations shining.
Burnt Out Bulbs
Bulbs that burn out cause parts of the string to go dark. LED bulbs last longer than old bulbs but can still fail. Replacing burnt out bulbs restores the light. Use the right type and size for your string.
Broken Wires
Wires can break from bending or rough handling. Broken wires stop electricity from flowing. Check the entire string for cuts or breaks. Repair small breaks with electrical tape or wire connectors.
Faulty Fuses
Fuses protect lights from power surges. A blown fuse means the lights won’t turn on. Open the plug to find the fuse. Replace it with one that matches the original fuse’s rating.
Loose Connections
Loose connections cause flickering or no light at all. Check all plugs and sockets carefully. Push connections firmly to secure them. Clean any dirt or rust for better contact.
Tools Needed For Repairs
Fixing LED Christmas light strings requires a few basic tools. These tools help identify problems and make quick repairs. Having the right tools saves time and effort. Here is a list of essential tools you need for LED light string repairs.
Multimeter
A multimeter checks electrical flow in the light string. It helps find broken wires or bulbs. Using a multimeter is simple and effective for troubleshooting.
Replacement Bulbs
LED light strings often have spare bulbs included. Keep extra bulbs on hand for quick swaps. Matching the bulb type ensures proper function and safety.
Electrical Tape
Electrical tape secures and insulates exposed wires. It prevents short circuits and keeps connections safe. Use tape after fixing or replacing wires.
Wire Cutters
Wire cutters trim damaged wires cleanly. They help remove broken sections before reconnecting. Sharp cutters make repairs easier and neater.
Identifying The Problem
Fixing a string of LED Christmas lights starts with finding the exact problem. Knowing what causes the lights to fail saves time and effort. It helps avoid replacing the whole string needlessly. Focus on simple checks first. These checks reveal common issues quickly.
Testing Bulbs Individually
Check each bulb one by one. Remove a bulb from the string. Replace it with a new or working bulb. If the new bulb lights up, the old one is faulty. If not, test the next bulb. This method finds broken or burned-out bulbs fast. It helps avoid guessing which bulb causes the issue.
Checking The Fuse
Look for a small fuse in the plug or control box. This fuse protects the lights from electrical damage. Open the fuse cover carefully. Remove the fuse and inspect it. A blown fuse will look black or broken inside. Replace the fuse with one of the same type. This often restores power to the whole string.
Inspecting The Wiring
Examine the wire along the entire light string. Look for cuts, frays, or exposed wires. Damaged wiring can stop electricity flow. Check connectors and plugs too. Loose or dirty connections cause lights to flicker or go out. Fix small wire issues with electrical tape or replace the string if damage is severe.

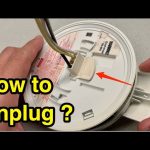
Credit: www.youtube.com
Fixing Burnt Out Bulbs
Burnt out bulbs can ruin the sparkle of your LED Christmas light string. Fixing them quickly brings back the festive glow. This task is simple with the right steps and tools. Learning how to remove and replace bulbs correctly helps maintain your lights for many holidays.
Removing And Replacing Bulbs
Start by unplugging the light string for safety. Find the burnt out bulb by looking for a dim or dark spot. Gently twist the bulb counterclockwise to remove it from its socket. Avoid pulling hard to prevent damage.
Take the old bulb to match the replacement size. Insert the new bulb by pushing it into the socket. Twist it clockwise until it fits snugly. Check the light string by plugging it back in. The new bulb should light up immediately.
Using Compatible Replacements
Choose bulbs that match the voltage and size of the original ones. Using the wrong type can cause more failures or damage. Buy replacements from trusted brands or the original manufacturer.
LED bulbs come in different colors and brightness levels. Pick the exact match to keep the display uniform. Proper bulbs ensure safety and longer life for your light string.
Repairing Broken Wires
Repairing broken wires is a common task when fixing LED Christmas light strings. Wires can break due to bending, pulling, or storage damage. Fixing these wires helps your lights glow again without buying new strings.
Broken wires stop electricity flow. Repairing these wires restores the connection and power. This section explains how to find the break, strip and reconnect wires, and secure the repair safely.
Locating The Break
Start by checking the entire light string. Look for visible cuts, frays, or damaged spots on the wire. Gently bend the wire to hear a crack or see where the light flickers. This helps find hidden breaks inside the wire.
Use a multimeter if you have one. Test continuity to find where the circuit stops. Mark the break spot clearly before moving to the next step.
Stripping And Reconnecting Wires
Cut out any damaged wire section using wire cutters. Strip about half an inch of insulation from both ends. Use a wire stripper or a sharp knife carefully. Avoid damaging the copper wire inside.
Twist the exposed copper wires together tightly. This makes a strong electrical connection. Make sure no loose strands stick out. A good connection ensures the lights work well.
Securing With Electrical Tape
Wrap the twisted wire joint with electrical tape. Cover the exposed wire completely to avoid shorts. Wrap tightly and overlap the tape for extra protection. This keeps the repair safe from moisture and movement.
Test the lights before finishing. If the lights work, secure the tape further. Proper taping prevents future breaks and keeps your Christmas lights shining.
Replacing Blown Fuses
Replacing blown fuses in LED Christmas light strings is a simple fix that can save your lights. Fuses prevent electrical damage by stopping too much current. When a fuse blows, the lights may stop working or flicker. Knowing how to replace the fuse will get your lights back on quickly.
Accessing The Fuse Holder
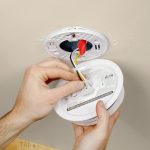
Locate the plug end of your light string. The fuse holder is usually inside the plug or near it. Look for a small sliding door or a plastic cover. Carefully open the fuse holder using your fingernail or a small tool. Be gentle to avoid breaking the holder. Inside, you will find one or two small glass fuses.
Choosing The Right Fuse
Check the old fuse for numbers or letters on its side. These indicate the fuse’s rating and size. Your replacement fuse must match these numbers exactly. Using the wrong fuse may cause damage or stop your lights from working. Buy fuses designed for Christmas lights at hardware stores or online.
Installing The New Fuse
Place the new fuse in the holder, matching the old fuse’s position. Make sure it fits snugly and is seated properly. Close the fuse holder cover securely. Plug in the lights and test them. If they light up, you fixed the problem. If not, check the fuse again or try another one.
Preventive Maintenance Tips
Preventive maintenance helps keep LED Christmas light strings working longer. Simple habits reduce the risk of damage and save time on repairs. Taking care of lights ensures bright, safe displays every season.
Proper Storage
Store LED light strings in a dry, cool place after use. Avoid tangled wires by wrapping them neatly around a spool or cardboard. Use a plastic container to protect lights from dust and moisture. Proper storage prevents wire breaks and bulb damage.
Regular Inspections
Check lights before each use for frayed wires or broken bulbs. Replace any damaged bulbs or sections to avoid short circuits. Look for loose connections and tighten plugs gently. Regular checks catch problems early and keep lights safe.
Avoiding Overloading
Do not connect too many light strings together. Follow the manufacturer’s recommended limit for the number of sets. Overloading causes wires to overheat and may lead to failure. Use a power strip with a built-in circuit breaker for extra safety.

Credit: georgesworkshop.blogspot.com
Frequently Asked Questions
How Do I Identify The Faulty Bulb In Led Christmas Lights?
Check each bulb by gently pressing and inspecting for dimness or damage. Replace any dark or broken bulbs to restore the string’s function quickly.
What Tools Are Needed To Fix Led Christmas Light Strings?
You need a multimeter, replacement bulbs, electrical tape, and wire cutters. These tools help diagnose and repair faults efficiently.
Can I Fix Led Christmas Lights Without Replacing Bulbs?
Yes, sometimes cleaning bulb contacts or tightening connections solves issues. Try these steps before purchasing new bulbs.
How To Test Led Christmas Lights With A Multimeter?
Set the multimeter to continuity mode, then test each bulb socket. A beep indicates a good connection; no beep shows a fault.
Conclusion
Fixing LED Christmas light strings saves money and stress. Check bulbs and connections carefully. Replace damaged parts with care and patience. Test lights often to find issues early. Simple steps can bring your decorations back to life. Enjoy bright, festive lights without hassle.
Keep tools handy for quick repairs next season. Small fixes make a big difference in holiday cheer.