
Looking for a stylish and sturdy way to organize your towels? Making a towel rack from pipe is easier than you think.
You’ll get a unique piece that fits perfectly in your bathroom or laundry room. Plus, it’s a fun project that saves you money and adds a personal touch to your space. Ready to learn how to build one yourself? Keep reading—you’re just a few simple steps away from creating a towel rack that stands out and works perfectly for your needs.

Credit: ninered.blogspot.com
Materials And Tools Needed
Gathering the right materials and tools is key to making a sturdy towel rack from pipe. The right items make the process smooth and the result durable. This list covers what you need to start your project with confidence.
Types Of Pipes To Use
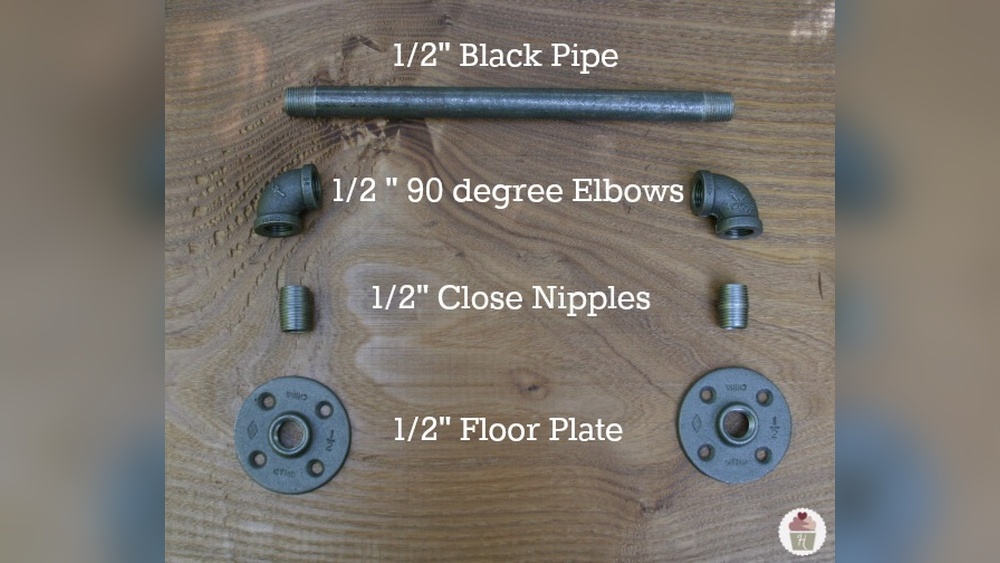
Black steel pipes are popular for towel racks. They offer strength and a rustic look. Galvanized pipes resist rust and last longer in moist rooms. Copper pipes add a sleek, shiny finish but cost more. Choose pipe size around 1/2 inch for a balanced feel and support.
Additional Supplies
You will need flanges to attach pipes to the wall securely. Threaded pipe nipples connect sections of pipe together. Use pipe caps to finish open ends for a clean look. Don’t forget wall anchors and screws to hold the rack firmly in place. Sandpaper helps smooth rough edges before assembly.
Essential Tools
A pipe wrench or adjustable wrench is necessary to tighten pipe joints. A drill makes holes for screws and anchors in the wall. A measuring tape ensures correct pipe lengths and spacing. A level guarantees your towel rack hangs straight. Safety gloves protect your hands while working with metal parts.

Credit: citygirlmeetsfarmboy.com
Planning Your Towel Rack
Planning your towel rack is the first step to a successful project. Careful planning saves time and avoids mistakes. Think about size, style, and where to place it. This helps build a rack that fits your space and needs. Start with clear ideas about what you want.
Choosing The Right Size
Pick a towel rack size that fits your towels and space. Too small means towels won’t dry well. Too big wastes space and looks odd. Consider how many towels you want to hang. Measure your towels to know the needed length. Keep a few extra inches for easy hanging.
Design Ideas And Styles
Pipe towel racks come in many styles. Choose a simple, modern look or a rustic, vintage feel. Think about pipe shapes and finishes. Black iron pipes add an industrial touch. Copper pipes create warmth and charm. Decide if you want a wall-mounted or free-standing rack. Match the rack style to your bathroom decor.
Measuring Your Space
Measure the wall or area for your towel rack carefully. Use a tape measure for accuracy. Note the height, width, and depth available. Check for obstacles like light switches or shelves. Make sure towels will hang without touching the floor. Mark the spot where you will install the rack. Proper measurements help the rack fit perfectly.
Preparing The Pipes
Preparing the pipes is a key step in making a sturdy towel rack. Proper preparation ensures the pipes fit well and last long. This process includes cutting, cleaning, and finishing the pipes before assembling them. Taking time here will make your project look neat and professional.
Cutting To Size
Measure the length needed for your towel rack carefully. Use a pipe cutter or hacksaw to cut the pipes. Cut slowly to keep the edges smooth and straight. Check each piece twice before cutting to avoid mistakes. Proper cuts help the rack fit perfectly on your wall.
Cleaning And Finishing
Clean the pipes to remove dirt and oil. Use a cloth and mild detergent for cleaning. Dry the pipes completely to stop rust forming. Smooth the cut edges with sandpaper to avoid sharp bits. This step protects your hands and improves the rack’s look.
Painting And Sealing
Choose paint made for metal surfaces to cover the pipes. Apply a thin, even coat using a brush or spray. Let the paint dry fully before handling the pipes. Seal the paint with a clear coat to protect against moisture. Proper painting and sealing increase the towel rack’s durability.
Assembly Steps
Building a towel rack from pipes is a rewarding project. The assembly steps turn your materials into a sturdy rack. Follow these clear instructions to put the pieces together easily. The process involves connecting pipes, securing joints, and adding mounting hardware. Each step ensures your towel rack is strong and ready to use.
Connecting Pipe Pieces
Start by arranging the pipe pieces as planned. Join the pipes using the correct fittings. Push each pipe firmly into its connector. Make sure the pipes fit snugly to avoid wobbling. Check the alignment before moving to the next step.
Securing Joints
Use pipe thread sealant or tape on threaded joints. This prevents leaks and loosens connections. Tighten each joint with a pipe wrench or pliers. Avoid overtightening to protect the fittings. Double-check that all joints feel secure and stable.
Adding Mounting Hardware
Attach mounting brackets to the rack’s frame. Position them where the rack will hold best on the wall. Use screws that match your wall type for a strong hold. Drill pilot holes before inserting screws. Confirm the rack stays firmly in place after mounting.
Installing The Rack
Installing the towel rack made from pipe is a simple process. It takes some careful measuring and steady hands. Following the right steps ensures the rack stays strong and looks great. This section guides you through the key steps to install your pipe towel rack.
Marking Wall Positions
Start by holding the rack against the wall. Use a pencil to mark where the screws will go. Check that the rack is level before marking. Measure twice to avoid mistakes. Proper marks make drilling easier and more accurate.
Drilling And Anchoring
Drill holes where you marked on the wall. Use a drill bit suitable for your wall type. Insert wall anchors to support the screws. Anchors stop the rack from pulling out. This step is important for safety and durability.
Mounting The Rack
Align the rack with the drilled holes. Use screws to fix the rack to the wall anchors. Tighten screws firmly but do not over-tighten. Check the rack is stable and straight. Your towel rack is ready to use.
Customization Tips
Customization makes your pipe towel rack unique and practical. It helps fit your space and style perfectly. Small changes can turn a simple rack into a useful and attractive piece.
Adding Hooks Or Shelves
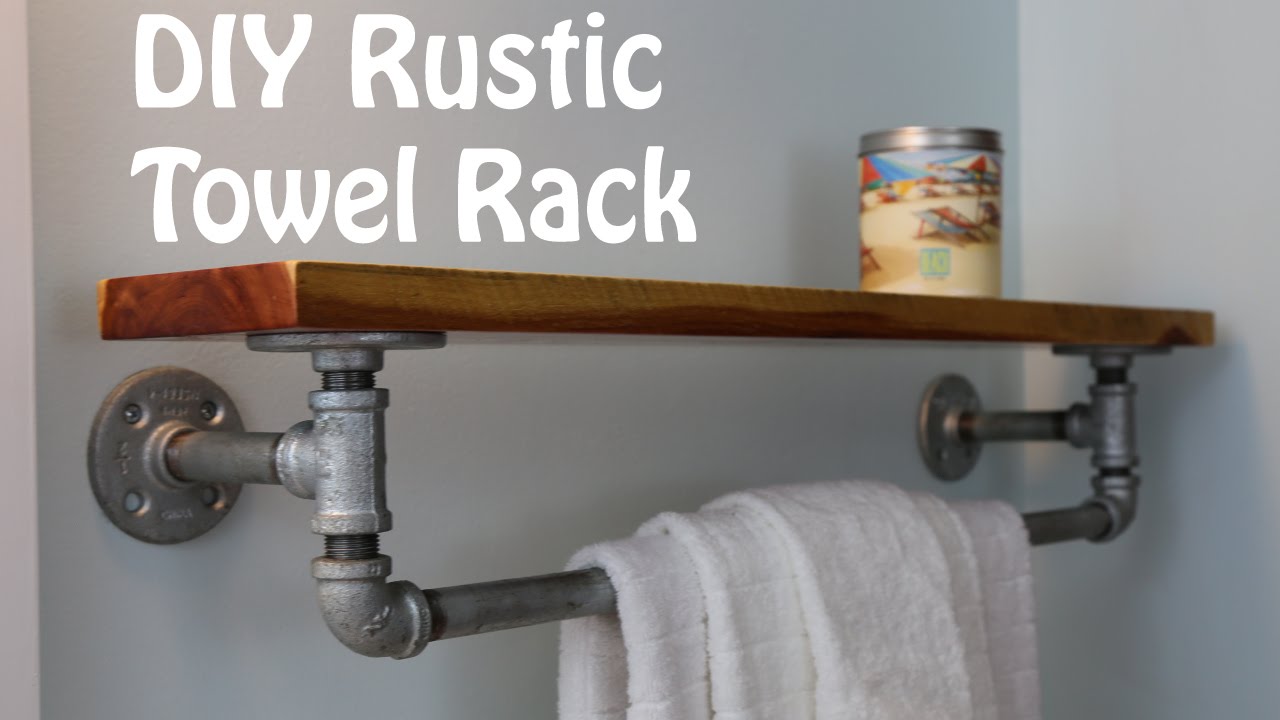
Hooks add extra space for hanging robes or small towels. You can screw them onto the pipes at any spot. Shelves give room for toiletries or decorations. Use wooden boards or metal trays to create shelves between pipes.
Incorporating Wood Or Other Materials
Wood adds warmth and contrast to the metal pipes. Use reclaimed wood for a rustic look or smooth planks for modern style. You can also add rope or leather straps for a soft touch. These materials make the rack more interesting and sturdy.
Personalizing With Finishes
Paint the pipes with colors that match your bathroom theme. Matte black, white, or metallic paints work well. Use clear sealant to protect against rust and water. Finishes improve the look and increase the rack’s life.
Maintenance And Care
Taking care of your pipe towel rack helps it last longer and look better. Proper maintenance keeps the rack strong and clean. It also stops damage like rust and wear. Follow simple steps to keep your rack in great shape.
Cleaning Tips
Use a soft cloth to wipe dust and dirt. Mild soap and water work best for cleaning. Avoid harsh chemicals that can damage the pipe surface. Dry the rack well after cleaning to stop moisture buildup.
Preventing Rust
Rust can ruin your towel rack quickly. Apply a clear coat of rust-resistant spray to protect the metal. Keep the rack dry and avoid water sitting on the pipes. Use a towel to wipe off any water after shower use.
Regular Checks
Look over your towel rack every few weeks. Check for loose screws or weak joints. Tighten any loose parts to keep the rack stable. Inspect for signs of rust or damage and fix issues early. Regular care saves time and money later.
Credit: www.youtube.com
Frequently Asked Questions
What Materials Are Needed For A Pipe Towel Rack?
You need metal pipes, flanges, elbow joints, pipe caps, screws, a drill, and a level. These materials ensure a sturdy, industrial-style towel rack. Choose pipe sizes based on the towel rack length you want.
How Do I Mount A Pipe Towel Rack On The Wall?
Mark wall spots for flanges, drill holes, insert anchors, and screw flanges securely. Attach pipes and fittings tightly. Use a level to ensure the rack is straight before final tightening.
Can I Customize The Size Of The Pipe Towel Rack?
Yes, pipe towel racks are highly customizable. Cut pipes to your desired length. Add or remove sections to fit your space perfectly. Customizing lets you create a rack that suits your needs and decor.
Is It Necessary To Seal Or Paint The Pipe Rack?
Sealing or painting is optional but recommended. It prevents rust and enhances the look. Use spray paint or pipe sealant for durability. Choose colors that match your bathroom decor for a polished finish.
Conclusion
Making a towel rack from pipe is simple and fun. You only need basic tools and materials. This project saves money and adds a cool look to your bathroom. You can customize the size and style to fit your space.
It also helps keep towels organized and dry. Try this DIY project to add a personal touch at home. Small changes can make a big difference. Ready to start? Grab your pipes and get building!