
If you want your Ring Video Doorbell to work without worrying about battery life, hardwiring it is the best solution. Hardwiring keeps your doorbell powered all the time, so you never miss a visitor or an important alert.
But maybe you’re unsure how to do it safely and correctly. Don’t worry—you’re in the right place. This guide will walk you through simple steps to hardwire your Ring Video Doorbell, even if you’re not an expert. By the end, you’ll have a reliable, always-on doorbell that keeps your home connected and secure.
Keep reading to find out how easy it can be!
:strip_icc()/BHG-how-to-install-video-doorbell-6833360-part-01-step-05_30445-c97141832b6541158a12194e97fccded.jpg)
Credit: privin.net
Tools And Materials Needed
Hardwiring a Ring Video Doorbell needs specific tools and materials. Having the right items ready makes the job easier and safer. This list covers everything required for a smooth installation.
Basic Hand Tools
You need a screwdriver set. A Phillips head screwdriver works for most screws. A flat-head screwdriver helps with wiring terminals. Needle-nose pliers make handling small wires easier.
Wire Strippers And Cutters
Wire strippers remove insulation from wires cleanly. Cutters trim wires to the right length. Using these tools prevents wire damage during installation.
Voltage Tester
A voltage tester checks if wires carry electricity. It ensures power is off before touching wires. Safety first to avoid electric shock.
Drill And Drill Bits
A drill makes holes for mounting the doorbell. Use appropriate drill bits for your wall type. This step helps secure the doorbell firmly.
Electrical Tape And Wire Connectors
Electrical tape insulates wire connections to prevent shorts. Wire connectors join wires safely and securely. They keep the wiring tidy and protected.
Mounting Hardware
Mounting screws and anchors come with the doorbell. Use anchors for drywall or masonry walls. Proper mounting hardware keeps the doorbell stable.
Safety Gear
Wear safety glasses to protect your eyes. Gloves protect your hands from sharp edges. Safety gear helps prevent accidents during installation.
Safety Precautions
Working with electrical devices can be risky. Safety precautions protect you from shocks and damage. Before hardwiring your Ring Video Doorbell, take time to prepare. Follow clear steps to keep the process safe and smooth.
Turn Off Power At The Breaker
Always switch off the power to the doorbell circuit. Use the main breaker panel to cut electricity. Test the wires with a voltage tester to confirm no power flows. This step stops electric shocks and accidents.
Use Proper Tools And Equipment
Select insulated tools designed for electrical work. Avoid metal tools without protective covers. Wear rubber gloves to reduce shock risk. Use a sturdy ladder if needed for high places.
Read Manufacturer Instructions Carefully
Follow the Ring Video Doorbell manual step-by-step. Check the wiring diagram and safety notes. Using the right instructions helps avoid mistakes. It also ensures your device works correctly.
Handle Wires With Care
Do not touch exposed wire ends. Keep wires away from water and wet surfaces. Strip wire insulation gently to avoid damage. Connect wires tightly to avoid loose contacts.
Keep Children And Pets Away
Work in a safe area free from distractions. Prevent children and pets from entering the workspace. This reduces the chance of accidents or interruptions.
Test The Installation Safely
After wiring, turn power back on carefully. Use the voltage tester to check connections. Test your doorbell from a safe distance. Watch for sparks or unusual sounds to stop work immediately.
Check Existing Doorbell Wiring
Before hardwiring your Ring Video Doorbell, check the current doorbell wiring. This step is important to ensure a smooth installation. It helps you know if your wiring is compatible with the Ring doorbell.
Start by turning off the power at the breaker. This keeps you safe while working with wires. Then, remove your old doorbell button from the wall.
Locate The Doorbell Transformer
Find the doorbell transformer, usually near the main electrical panel. It changes high voltage to low voltage for your doorbell. Check the voltage rating; Ring doorbells need 16 to 24 volts AC.
Inspect The Doorbell Wires
Look at the wires coming from your old doorbell button. Most homes have two wires, either copper or coated in white or red. Check for any damage or corrosion on the wires.
Test The Voltage
Use a voltage tester to check the power in the doorbell wires. The voltage should be between 16 and 24 volts AC. If the voltage is too low or missing, the Ring doorbell may not work properly.
Identify Wire Labels
Label the wires for easy connection later. Usually, one wire is positive and the other negative. This helps avoid mistakes during installation and ensures your doorbell functions well.
Turn Off Power At Circuit Breaker
Turning off the power at the circuit breaker is a key safety step before starting any electrical work. It stops electricity from flowing to the wires you will handle. This reduces the risk of electric shock or damage to your Ring Video Doorbell.
Always take this step seriously. Even a small mistake can cause serious injury. Make sure you know which breaker controls the doorbell circuit. Double-checking helps prevent accidents.
Locate The Correct Circuit Breaker
Find your home’s electrical panel, usually in the basement or garage. Open the panel door and look for labels next to each breaker. These labels tell you what each breaker controls. Find the one for your front door or doorbell.
Switch Off The Breaker
Flip the correct breaker to the OFF position. You will feel a small click. This stops power to the doorbell wires. Do not guess. If unsure, turn off the main breaker to cut all power safely.
Test The Power Is Off
Use a voltage tester or a simple tool like a non-contact voltage detector. Place it near the doorbell wires. If it does not detect electricity, the power is off. This step confirms your safety before touching wires.
Remove Old Doorbell
Removing the old doorbell is the first step in hardwiring your Ring Video Doorbell. This step clears the way for the new device. It also ensures safety during installation.
Turn off the power at the circuit breaker. This prevents any electrical shocks while you work. Safety first.
Gather Tools And Materials
Before starting, collect a screwdriver, voltage tester, and a small container. The container holds screws and small parts. A voltage tester checks if wires have power.
Remove The Doorbell Cover
Unscrew the cover gently. Keep the screws safe for later use. Removing the cover exposes the wiring behind the doorbell.
Test For Electrical Power
Use the voltage tester on the wires. Confirm no electricity flows through. This step protects you from shocks during removal.
Disconnect The Doorbell Wires
Loosen the screws holding the wires. Carefully pull the wires away from the doorbell. Avoid touching the wire ends together.
Remove The Doorbell Base
Unscrew the doorbell base from the wall. Take it off gently to avoid damage. The wall should be clear for the new device.
Credit: www.youtube.com
Prepare The Ring Video Doorbell
Preparing your Ring Video Doorbell is an important step before hardwiring. It ensures the device works correctly and lasts longer. Taking time to prepare helps avoid issues during installation.
Follow simple steps to get your Ring Video Doorbell ready for hardwiring. These steps focus on safety and device readiness.
Charge The Doorbell Battery
Start by fully charging the doorbell battery. Use the USB charging cable included with your Ring device. A full charge improves performance during installation.
Charging takes about 5 hours. Do not skip this step. A charged battery prevents shutdowns during wiring.
Remove The Old Doorbell
Turn off power at the breaker to avoid electric shock. Carefully remove the existing doorbell from the wall. Detach the wires and keep them safe.
Check the wires for damage. Replace damaged wires before connecting your Ring doorbell.
Test The Doorbell Wires
Use a voltage tester to check the wires. The wires should have 16-24 volts AC for the Ring doorbell. If no power, inspect your home’s transformer.
Proper voltage ensures your Ring doorbell works well after installation.
Download The Ring App
Install the Ring app on your smartphone. Create an account or log in. The app guides you through setup and controls the doorbell.
Keep your phone near during installation for quick access and updates.
Gather Necessary Tools
Collect tools like a screwdriver, drill, and voltage tester. Having tools ready saves time. Check that you have the mounting screws and anchors from the box.
Preparation avoids delays and frustration during the hardwiring process.
Connect Wires To Ring Doorbell
Connecting the wires to your Ring Video Doorbell is a key step for hardwiring. It ensures the device receives power continuously. This connection allows your doorbell to work without changing batteries. The process is simple with the right tools and careful handling.
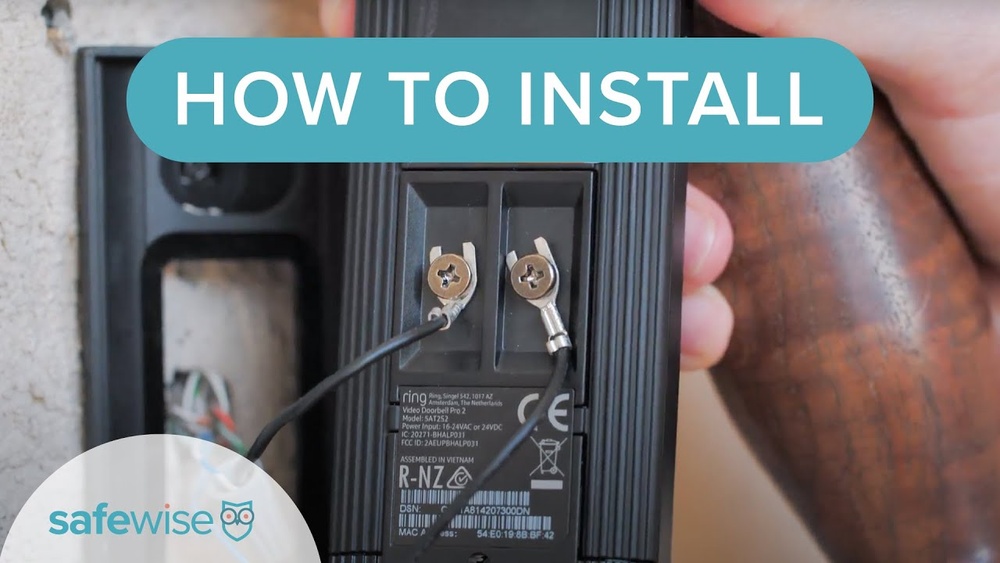
Follow the steps carefully to avoid any damage. Turn off the power at the breaker before starting. Safety first. Use a screwdriver to access the doorbell’s back panel. You will see two terminals for the wires. These connect your existing doorbell wiring to the Ring device.
Identify The Doorbell Wires
Locate the wires coming from your doorbell chime. Usually, two thin wires will be present. One wire carries the power, and the other completes the circuit. Check for any exposed or damaged wire ends. Use wire strippers to remove insulation if needed. Both wires should be clean and ready to connect.
Attach Wires To The Ring Doorbell Terminals
Loosen the screws on the Ring doorbell terminals. Insert one wire under each screw. Tighten the screws to secure the wires firmly. Do not over-tighten, as this can damage the wires. Make sure there is no loose wire hanging out. The connection must be solid for proper power flow.
Test The Connection Before Final Installation
Turn the power back on at the breaker. Check if the Ring doorbell powers up. If it lights up or shows signs of life, the wiring is correct. If not, turn the power off again and recheck your connections. Proper wiring ensures your doorbell will work all the time.
Mount The Ring Doorbell
Mounting the Ring Video Doorbell is a key step to ensure it works well. Proper placement affects video quality and motion detection. The doorbell should be easy to reach and see the entrance clearly.
Prepare the mounting area by cleaning the surface. A smooth, dry surface helps the doorbell stay firmly attached. Use the right tools to avoid damage to walls or door frames.
Choose The Best Height For Your Ring Doorbell
Place the doorbell about 48 inches from the ground. This height captures faces clearly and covers most visitors. Avoid placing it too high or too low.
Mark The Screw Holes
Use the mounting bracket as a guide. Hold it against the wall and mark the screw holes with a pencil. This step ensures proper alignment and easy installation.
Drill Pilot Holes
Drill small holes where you marked. Pilot holes make screwing easier and prevent wall cracks. Use a drill bit suitable for your wall type.
Attach The Mounting Bracket
Secure the bracket with screws and anchors. Tighten screws firmly, but avoid over-tightening. The bracket must be stable to support the doorbell.
Connect The Doorbell And Snap It Into Place
Connect the wires to the doorbell terminals if hardwiring. Align the doorbell with the bracket and snap it on. Check it fits snugly and does not wiggle.
Restore Power And Test
After hardwiring your Ring Video Doorbell, restoring power is the next key step. This step makes sure your device gets electricity and starts working properly. Testing confirms the installation success and checks for any issues.
Restoring power is simple but important. It brings your doorbell to life. Testing helps you see if it connects well and records as expected.
Restore Power To Your Doorbell
Turn the circuit breaker back on. This sends power to the doorbell wiring. Wait a few seconds for the device to boot up. Look for lights or sounds from the doorbell. These signs show it is getting power.
Check The Doorbell’s Connection
Open the Ring app on your phone. See if the doorbell appears online. Try live view to check video feed. If the video works, the connection is good. If not, check your Wi-Fi and wiring again.
Test The Doorbell Button
Press the doorbell button once. Notice if your phone rings or sends a notification. The button should trigger an alert quickly. If no alert happens, check the wiring and app settings.
Ensure Proper Charging
Hardwired power also charges the battery. Check the app for battery status. It should show charging or full. Low battery after hardwiring means a wiring issue.

Credit: centromedicoloira.com
Troubleshooting Common Issues
Troubleshooting common issues with your hardwired Ring Video Doorbell helps keep it working well. Problems may arise during or after installation. This section covers typical problems and easy fixes. Clear, simple steps will save time and avoid frustration.
Checking Power Supply Problems
Power issues are a common cause of Ring Doorbell problems. Make sure the doorbell is connected to the right voltage. Use a multimeter to check the transformer voltage. It should match Ring’s requirements. Loose wires can cause power loss. Tighten all connections firmly. Replace damaged wires immediately.
Fixing Wi-fi Connectivity Issues
Wi-Fi problems can stop your doorbell from sending alerts. Position your router closer to the doorbell for better signal. Remove physical barriers like metal or thick walls. Restart your router and doorbell to refresh connections. Ensure your network uses 2.4 GHz, as Ring does not support 5 GHz only networks. Check your internet speed to confirm it is stable.
Resolving Video Quality Problems
Poor video quality affects your ability to see visitors clearly. Clean the camera lens with a soft cloth to remove dirt. Adjust the camera angle to avoid glare or shadows. Check your Wi-Fi signal strength; weak signals reduce video quality. Lower video resolution in the Ring app if bandwidth is limited. Update the doorbell’s firmware to fix bugs that affect video.
Addressing Doorbell Button Issues
The doorbell button may stop working or feel stuck. Remove the faceplate and inspect the button for dirt or damage. Clean around the button carefully. Test the button’s wiring for continuity using a multimeter. Replace the button if it does not respond. Reattach the faceplate securely to prevent moisture damage.
Tips For Optimal Performance
Hardwiring your Ring Video Doorbell helps keep it powered without frequent battery changes. To get the best from your doorbell, follow some simple tips. These tips help your device work smoothly and last longer.
Ensure Proper Voltage Supply
Check the voltage of your home wiring before installation. Ring Video Doorbells need 16-24 volts AC. Too much or too little voltage can cause problems. Use a multimeter to measure voltage accurately.
Use Quality Wiring Materials
Choose wires that fit your doorbell and home setup. Copper wires work best for steady power flow. Avoid old or damaged wires to prevent connection issues. Secure all wiring connections tightly.
Protect Against Weather Damage
Install your doorbell in a sheltered spot if possible. Use weatherproof covers for wires and connections. Moisture can cause shorts and damage the device. Regularly check for signs of wear or corrosion.
Keep Your Firmware Updated
Ring releases updates that improve performance and security. Connect your doorbell to Wi-Fi to receive updates automatically. Check the Ring app for update notifications regularly.
Test The Doorbell After Installation
Once wired, test the doorbell’s video and audio functions. Confirm the doorbell rings correctly inside your home. Fix any issues before finishing the installation fully.
Frequently Asked Questions
How Do I Hardwire A Ring Video Doorbell Safely?
To hardwire your Ring Video Doorbell safely, turn off power at the breaker first. Use the existing doorbell wires and connect them to the back of the Ring device. Secure connections with wire nuts, then mount the doorbell. Finally, restore power and test the device.
What Tools Are Needed To Hardwire A Ring Doorbell?
You need a screwdriver, wire stripper, drill, voltage tester, and wire nuts. These tools help you connect the doorbell wires securely and mount the device properly. Always use a voltage tester to ensure the power is off before working.
Can I Hardwire Ring Doorbell To Any Doorbell System?
Ring Doorbells work with most existing doorbell systems that supply 8-24 volts AC. If your system doesn’t meet this voltage, the Ring may not function correctly. Check your doorbell transformer’s voltage before installation for compatibility.
How Long Does It Take To Hardwire A Ring Doorbell?
Hardwiring a Ring Doorbell typically takes 15 to 30 minutes. This depends on your experience and existing doorbell wiring condition. Proper preparation and following instructions can speed up the installation process.
Conclusion
Hardwiring your Ring Video Doorbell keeps it powered all the time. This helps avoid battery charging and ensures constant security. Following the right steps makes the process safe and simple. Always check your wiring and tools before starting work. Taking time to do it correctly saves you future trouble.
Enjoy clear video and quick alerts without interruptions. Your home stays protected with steady power to your doorbell. Simple steps lead to lasting security and peace of mind.