Your home’s safety depends on quick alerts when smoke is detected. Interconnected smoke detectors do exactly that—they all sound an alarm if one detects smoke.
But how do you wire these life-saving devices correctly? If you want to protect your family and ensure every corner of your home is covered, you need to understand the wiring process. This guide will walk you through simple, clear steps to wire interconnected smoke detectors so you can feel confident your home is secure.
Keep reading to learn how to make your smoke alarms work together seamlessly.
Tools And Materials Needed
Wiring interconnected smoke detectors needs specific tools and materials. Getting these ready makes your work easier and safer. This section lists everything you need to start the job right.
Basic Tools
Gather simple tools like a screwdriver, wire stripper, and drill. A voltage tester is also important to check power safely. These tools help you connect wires and mount the detectors properly.
Electrical Supplies
Use electrical wire rated for smoke detectors, usually 14/3 gauge wire. You also need wire nuts to join wires securely. Electrical tape helps protect connections from damage.
Smoke Detectors
Choose smoke detectors designed to interconnect. They must be compatible with each other. Check the product details before buying to avoid problems.
Safety Gear
Wear safety glasses and gloves during installation. This protects your eyes and hands from sharp edges and debris. Always turn off power before starting any wiring work.

Credit: www.researchgate.net
Safety Precautions
Safety is the top priority when wiring interconnected smoke detectors. These devices protect your home from fire dangers. Taking the right precautions avoids accidents and ensures proper functioning.
Electricity and wiring work involve risks. Careful steps reduce hazards and keep you safe. Follow these safety measures before starting the installation.
Turn Off Power Supply
Always switch off the circuit breaker before starting. This stops electric shocks and injuries. Use a tester to confirm no power flows in the wires.
Use Proper Tools And Equipment
Choose insulated tools to prevent electric shock. Wear safety gloves and goggles for extra protection. Avoid using damaged or worn-out tools during the job.
Work In A Well-lit Area
Good lighting helps you see wires clearly. It reduces mistakes and accidents. Use a flashlight or portable lamp if the room is dark.
Follow Manufacturer Instructions
Read the smoke detector manual carefully before wiring. Each brand may have different wiring rules. Following instructions ensures the system works well and safely.
Avoid Overloading Circuits
Check the electrical circuit capacity before connecting detectors. Too many devices on one circuit can cause overheating. Spread detectors across circuits if needed for safety.
Test The System After Installation
Turn power back on and test each detector. Confirm they all sound together when one triggers. Proper testing guarantees your safety system works correctly.
Choosing Compatible Smoke Detectors
Choosing compatible smoke detectors is key for a safe and reliable system. Not all smoke detectors can connect with each other. Compatibility ensures they communicate properly during an emergency.
Using the right detectors helps the entire system work as one unit. It makes sure all alarms sound at the same time. This instant alert can save lives and reduce damage.
Understanding Different Types Of Smoke Detectors
Smoke detectors come in two main types: ionization and photoelectric. Ionization detectors react fast to flaming fires. Photoelectric detectors respond quickly to smoldering fires. Some models combine both types for better safety.
Checking Manufacturer Compatibility
Choose smoke detectors from the same brand. Manufacturers design their units to work together. Mixing brands can cause communication errors. Always read product details to confirm compatibility.
Wireless Vs. Hardwired Interconnected Detectors
Hardwired detectors connect through home wiring. They often require professional installation. Wireless detectors link using radio signals. Both types need compatible devices to function properly.
Considering Power Source And Backup Options
Power source affects compatibility and reliability. Hardwired units usually have battery backup. Battery-only detectors must be checked for interconnection features. Backup power keeps alarms working during outages.
Planning The Wiring Layout
Planning the wiring layout is a key step for installing interconnected smoke detectors. It sets the foundation for a safe and effective system. A clear plan helps you avoid mistakes and saves time.
Good planning ensures each detector connects properly. It also makes future maintenance easier. Prepare to draw a simple map of your home’s wiring paths.
Identify The Power Source
Start by finding a reliable power source. Usually, smoke detectors connect to your home’s electrical panel. Ensure it can handle the additional load safely.
Locate the breaker that controls the circuit you will use. Turn off power before starting any wiring work.
Map Out Detector Locations
Mark all smoke detector spots on your house plan. Place detectors in hallways, bedrooms, and near living areas. Avoid kitchens to reduce false alarms.
Keep detectors on each level of your home for full coverage. Proper placement improves safety and system response.
Plan The Wiring Path
Decide the route your wiring will follow. Use existing walls, attics, or basements to hide wires. Avoid running wires near heat or moisture sources.
Keep wiring as short and direct as possible. This reduces signal loss and keeps installation neat.
Choose The Right Cable Type
Select cables rated for smoke detector systems. Typically, 18/3 or 14/3 gauge cables work well. These cables have three wires: power, neutral, and interconnect.
Use cables approved for in-wall installation to meet safety codes. Check local regulations before purchasing.
Turning Off Power
Turning off power is the first and most important step before wiring interconnected smoke detectors. It ensures safety by preventing electrical shocks and damage. Always take this step seriously to avoid accidents during installation.
Power should be completely off in the area where you work. This way, you protect yourself and the devices. Never skip this step, even if you think the power is low or off.
Locate The Main Electrical Panel
Find the main electrical panel in your home. It is usually in the basement, garage, or utility room. The panel contains switches or circuit breakers for all electrical circuits.
Turn Off The Correct Circuit Breaker
Identify the breaker that powers the smoke detector circuit. Flip the switch to the “off” position. This cuts power to the smoke detectors and wiring.
Use A Voltage Tester
Check the wires with a voltage tester to confirm no power is present. Touch the tester to wires where you will work. If the tester shows no electricity, it is safe to proceed.
Inform Others In The House
Tell everyone in the house about the power shutdown. This prevents them from turning the breaker back on accidentally. Safety first for everyone in your home.
Credit: shopkidde.com
Removing Existing Smoke Detectors
Removing existing smoke detectors is the first step in wiring interconnected smoke detectors. This process ensures safety and prepares the wiring for new devices. Careful removal avoids damage to the wiring and ceiling.
Turn off power at the circuit breaker before starting. This prevents electric shock and protects the system.
Gather Necessary Tools
Get a screwdriver, voltage tester, and ladder. These tools help remove the smoke detector safely and efficiently.
Check For Power
Use the voltage tester to confirm no electricity flows to the smoke detector. This step is crucial for safety.
Remove The Smoke Detector Cover
Twist or unscrew the cover gently. This exposes the wiring and mounting plate.
Disconnect The Wiring
Note the wire connections before disconnecting. Label wires if needed to avoid confusion later.
Take Down The Mounting Plate
Unscrew the mounting plate from the ceiling. Keep screws safe for installing the new detector.
Wiring The First Smoke Detector
Wiring the first smoke detector is the key step in setting up your safety system. This device connects to your home’s power and links to other alarms. You must do this carefully to ensure the whole system works.
Start by turning off the power at the circuit breaker. This protects you from electric shock. Gather your tools and check the smoke detector instructions. Each model can have small differences.
Connecting Power Wires
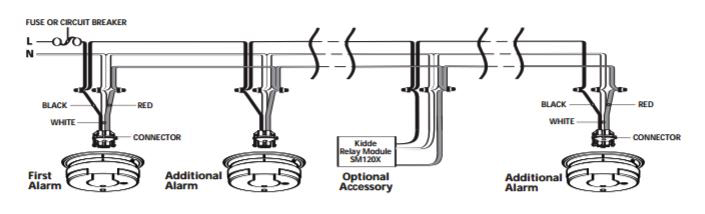
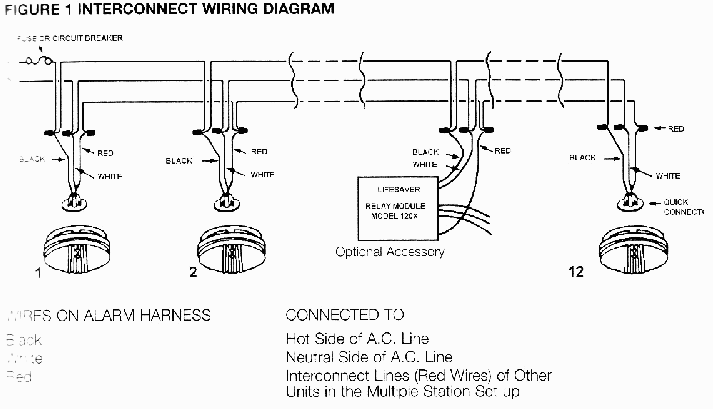
Identify the power wires in your ceiling box. Usually, black is hot, white is neutral, and green or bare is ground. Connect the black wire from the house to the black wire on the detector. Join the white wire from the house to the white wire on the detector.
Use wire nuts to secure each connection tightly. Twist the wires together before screwing on the nut. Attach the ground wire to the metal box or green wire on the detector. Proper grounding helps prevent electrical hazards.
Linking Interconnect Wires
Find the interconnect wire, often red or orange, in the ceiling box. Connect this wire to the matching interconnect wire on the smoke detector. This link allows all alarms to sound together during a fire.
Make sure the interconnect wires are firmly twisted and capped. Loose connections cause false alarms or no alarms at all. After wiring, carefully tuck the wires into the box before mounting the detector.
Wiring Additional Smoke Detectors
Adding more smoke detectors to your home increases safety. Wiring additional units correctly ensures they all alert at once. This section explains how to connect extra smoke detectors to the existing system.
Daisy-chaining Interconnect Wires
Daisy-chaining means linking smoke detectors in a series. Connect the interconnect wire from the first detector to the second. Continue this pattern for all detectors in the chain.
Use the same wire type recommended by the manufacturer. Usually, a 3-wire cable with a ground wire works well. Keep the wires neat and avoid sharp bends to prevent damage.
Securing Connections
Secure all wire connections tightly to avoid loose contacts. Use wire nuts or connectors designed for smoke detectors. Wrap connections with electrical tape for extra safety.
Check that no bare wires are exposed. Loose wires can cause false alarms or failure. Test each connection by pressing the test button on every detector.
Mounting The Smoke Detectors
Mounting smoke detectors correctly is a key step in wiring interconnected smoke alarms. Proper placement ensures the devices detect smoke quickly. It also helps the alarms communicate well with each other. Follow these tips to mount each smoke detector safely and effectively.
Choosing The Right Location
Place smoke detectors on ceilings or high on walls. Smoke rises, so higher spots detect it faster. Avoid corners and areas near air vents. These spots can block smoke from reaching the alarm. Keep detectors away from kitchens and bathrooms to reduce false alarms.
Marking And Preparing The Mounting Spot
Use the mounting plate to mark screw holes. Make sure the plate is level and secure. Drill holes carefully to avoid damage to wires or pipes inside walls. Use anchors if needed for a strong hold. Clean the surface before attaching the plate for better grip.
Attaching The Smoke Detector
Connect the wiring to the smoke detector base first. Match the wire colors as per instructions. Attach the base to the mounting plate with screws. Snap the smoke detector onto the base firmly. Test the unit to confirm it powers up and links to other alarms.
Credit: www.edcheung.com
Testing The System
Testing the interconnected smoke detectors is a key step. It ensures the system works well and keeps your home safe. Testing helps find problems early. It also confirms all alarms sound together.
Powering On
Turn on the main power supply to the smoke detectors. Check the backup batteries too. The detectors should light up or beep once. This shows they have power and are ready. No lights or sounds may mean a wiring issue.
Triggering Alarms
Press the test button on one smoke detector. Hold it for a few seconds. All connected alarms should sound at once. This proves the detectors communicate properly. If only one alarm sounds, check wiring or connections. Test every detector in the system for full coverage.
Troubleshooting Common Issues
Troubleshooting interconnected smoke detectors can be simple with the right steps. These devices are crucial for home safety. They must work properly to alert you in case of fire. Common problems include false alarms, no alarms, or weak signals. Understanding these issues helps fix them fast.
Check Power Supply And Battery
Start by verifying the power source. Ensure the smoke detectors are connected to the main power. Check if the backup batteries are fresh and installed correctly. Dead batteries often cause alarms to beep or fail.
Inspect Wiring Connections
Loose or damaged wires can interrupt the signal between detectors. Turn off the power before checking wires. Look for any frayed or disconnected wires. Secure all connections firmly to restore proper function.
Reset The Smoke Detectors
Sometimes detectors need a reset to clear errors. Press and hold the test button for 15 seconds. This can stop false alarms and reset the system. If problems persist, try resetting each unit individually.
Test Each Detector Individually
Identify which unit causes trouble by testing one at a time. Press the test button on each detector. This helps find the faulty device. Replace any detector that does not respond or sounds weak.
Check For Interference And Placement
Smoke detectors near kitchens or bathrooms may trigger false alarms. Steam, smoke, or dust can cause issues. Move detectors away from these areas if possible. Clean dust or debris off the sensors regularly.
Frequently Asked Questions
How Do Interconnected Smoke Detectors Work?
Interconnected smoke detectors communicate through wiring or wireless signals. When one detects smoke, all alarms sound simultaneously. This enhances safety by alerting everyone in the building instantly, even if they are in different rooms.
What Tools Are Needed To Wire Smoke Detectors?
Essential tools include a wire stripper, voltage tester, screwdriver, and drill. You’ll also need electrical wire, wire connectors, and mounting hardware. These tools ensure safe and secure installation of interconnected smoke detectors.
Can I Wire Smoke Detectors Myself Safely?
Yes, with basic electrical knowledge and careful following of instructions. Always turn off power before installation. If unsure, consult a professional electrician to ensure safety and code compliance.
Why Is Wiring Smoke Detectors Important?
Wiring smoke detectors ensures they work together, providing early warning throughout the home. This interconnected setup improves response time and increases safety during fire emergencies.
Conclusion
Wiring interconnected smoke detectors improves home safety significantly. When one alarm sounds, all alarms activate together. This early warning helps protect families better. Follow the steps carefully for correct installation. Double-check all connections before powering the system. Test the alarms regularly to ensure they work well.
A safe home starts with smart planning. Stay cautious and keep your loved ones secure.