
Looking for a stylish and sturdy way to hang your towels? Making a pipe towel rack is a simple project that adds a cool industrial touch to your space.
You don’t need to be a pro to create one, and it’s a great way to personalize your bathroom or kitchen. In this guide, you’ll discover easy steps to build your own pipe towel rack that looks great and lasts long.
Ready to transform your space with a unique rack you made yourself? Let’s get started!
Materials Needed
Gathering the right materials makes building a pipe towel rack easier. Knowing what to buy saves time and money. Prepare everything before starting your project.
Types Of Pipes
Choose pipes that fit your style and space. Black iron pipes give an industrial look. Galvanized steel pipes resist rust and last longer. Copper pipes add a warm, classic touch. Pick the size based on the towel rack length you want.
Tools Required
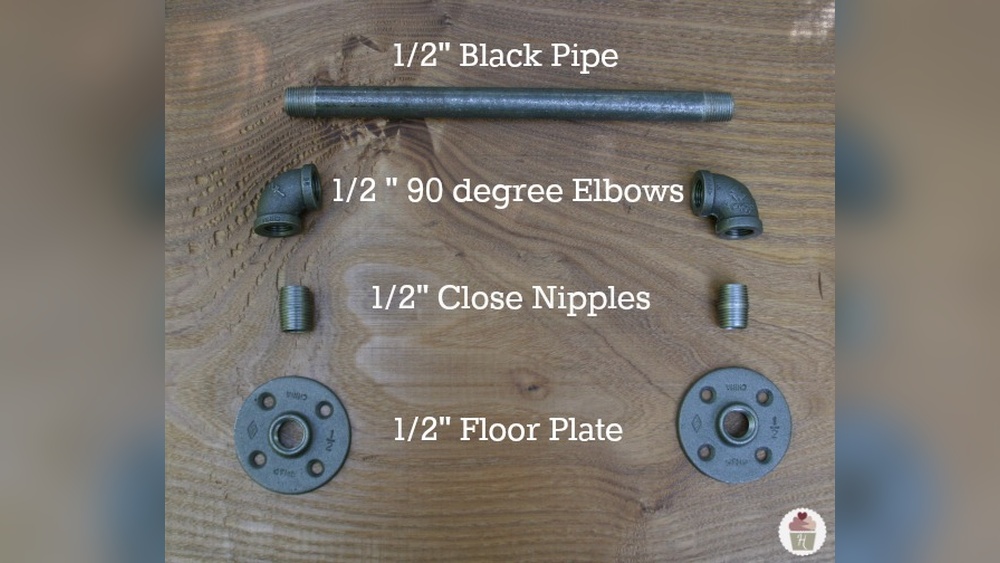
Use a pipe cutter or hacksaw to cut pipes. A tape measure helps get exact lengths. Pipe wrenches tighten and loosen fittings. Sandpaper smooths pipe edges. A drill and screws fix the rack to the wall securely.
Additional Supplies
Pipe fittings like elbows and flanges connect pipes. Thread seal tape keeps joints tight and leak-free. Wall anchors support the rack on drywall. Paint or sealant protects pipes and matches decor. Gloves protect your hands while working.

Credit: www.youtube.com
Design Ideas
Design ideas help you create a pipe towel rack that fits your space and style. You can choose from different looks that match your home. Each design brings a unique touch and feel. Explore styles that suit your taste and needs.
Industrial Style
The industrial style uses metal pipes and fittings. It shows raw, unfinished materials. This style fits well in urban or loft spaces. The dark metal and wood make a strong, bold look. It is perfect for those who like a tough, modern feel.
Minimalist Look
A minimalist pipe towel rack focuses on simplicity. Clean lines and few details create a neat space. Use slim pipes and light colors to keep it open. This design works well in small bathrooms. It keeps the room calm and clutter-free.
Rustic Touch
The rustic touch adds warmth and charm. Use wood with rough texture and aged metal pipes. This style feels cozy and natural. It fits well in country or farmhouse homes. The mix of wood and pipe makes a nice contrast.
Measuring And Planning
Measuring and planning are the first steps to create a sturdy pipe towel rack. Careful measurement ensures the rack fits your space perfectly. Planning helps you buy the right materials and avoid mistakes. This stage saves time and money later.
Determining Rack Size
Start by deciding where to place the towel rack. Measure the width and height of that wall area. Think about how many towels you want to hang. Add extra space for easy access and air flow. Write down these measurements clearly. Choose a size that fits well without crowding the room.
Marking Pipe Lengths
Use your rack size to mark pipe lengths on the pipes. Mark each piece with a pencil or tape. Double-check all measurements before cutting. Include extra length for joints and fittings. Accurate marking helps the rack look neat and hold strong.
Cutting And Preparing Pipes
Cutting and preparing pipes is the first step in making a pipe towel rack. This part needs focus and care to ensure the pieces fit well. Using the right tools and methods helps create smooth, safe edges. Proper preparation makes assembly easier and the final rack stronger.
Safe Cutting Techniques
Use a pipe cutter or hacksaw to cut pipes accurately. Secure the pipe tightly in a vise before cutting. Cut slowly and steadily to avoid slipping. Wear safety glasses to protect your eyes from metal bits. Gloves help protect your hands from sharp edges and cuts. Measure twice and cut once to avoid mistakes.
Smoothing Edges
After cutting, pipe edges can be sharp and rough. Use a metal file or sandpaper to smooth these edges. Work gently to remove burrs and sharp points. Smooth edges prevent injuries and make the rack look neat. Clean the pipes with a cloth to remove dust and metal shavings. Prepared pipes fit better and make assembly easier.
Assembling The Rack
Assembling the pipe towel rack is the next step after gathering all materials. This part shapes your project into a sturdy, useful rack. Follow clear steps to join each piece correctly. Take your time to avoid mistakes and ensure a strong build.
Connecting Pipe Pieces
Start by arranging all pipe pieces on a flat surface. Match the lengths and types according to your design. Push the pipes into the connectors firmly. Twist slightly to secure a tight fit. Check that all pieces align straight and level. Proper connection prevents wobbling and keeps the rack stable.
Securing Joints
Use pipe thread sealant or tape on each threaded joint. This prevents loosening and leaks in metal pipes. Tighten each joint with a pipe wrench or pliers. Avoid overtightening to prevent damage to threads. Double-check each joint for firmness before moving on. Strong joints make your towel rack last longer and hold weight well.
Mounting The Rack
Mounting the pipe towel rack is a key step to ensure it holds up well. The rack must be strong and steady to support towels. This part of the project needs care and the right tools. Choose the right wall anchors and place the rack where it is easy to reach.
Wall Anchors And Supports
Use wall anchors to hold the rack firmly. Drywall alone may not support heavy weight. Anchors spread the load and keep screws tight. Select anchors based on your wall type. For drywall, plastic or metal anchors work well. For brick or concrete, use masonry anchors. Always drill holes before inserting anchors. Screw the rack securely into the anchors. Check the rack is stable and does not wobble.
Positioning For Accessibility
Place the towel rack where you can easily grab towels. Mount it near the sink or shower for quick access. Keep it at a height that suits all users. Usually, 48 to 52 inches from the floor works well. Make sure towels hang freely without touching the floor. Avoid crowded or hard-to-reach spots. Proper placement keeps your bathroom neat and functional.
Finishing Touches
Finishing touches bring your pipe towel rack to life. They protect the materials and add style. Proper finishing makes the rack last longer and look better. This step lets you customize the rack to fit your space perfectly.
Painting Or Sealing
Painting your pipe towel rack gives it color and protects it. Choose paint made for metal to avoid peeling. Use a primer first for better paint grip. Let each coat dry before the next. Sealing with clear varnish or sealant protects wood parts from water. It keeps the rack looking new and clean.
Adding Decorative Elements
Decorative elements make your rack unique. Add hooks with interesting shapes or colors. Attach small shelves to hold soaps or lotions. Use rope or fabric to wrap parts of the pipes. This adds texture and a soft touch. Small plants or labels also make the rack more attractive.

Credit: citygirlmeetsfarmboy.com
Maintenance Tips
Maintaining your pipe towel rack keeps it looking great and working well. Regular care helps avoid damage and extends its life. Simple steps prevent wear and tear and keep the rack safe for daily use.
Cleaning The Rack
Dust and dirt can build up on the rack. Wipe it with a soft cloth regularly. Use mild soap and water to clean tougher spots. Avoid harsh chemicals that can damage the finish. Dry the rack fully after cleaning to stop moisture buildup.
Preventing Rust
Rust can ruin metal racks fast. Keep the rack dry at all times. Check for scratches or chips in the paint or coating. Touch up these spots with rust-resistant paint. Use a clear sealant spray for extra protection. Place the rack away from direct water contact if possible.

Credit: citygirlmeetsfarmboy.com
Frequently Asked Questions
How Do You Start Making A Pipe Towel Rack?
Begin by gathering all materials like pipes, fittings, and a towel bar. Measure and cut pipes to desired lengths. Assemble parts using connectors, then secure the rack to the wall. Always check alignment and stability before final installation.
What Tools Are Needed For A Pipe Towel Rack?
You need a pipe cutter, drill, screwdriver, wrench, and measuring tape. Also have wall anchors and screws ready. These tools help cut, assemble, and mount the rack securely on the wall.
Can I Customize The Size Of My Pipe Towel Rack?
Yes, pipe towel racks are highly customizable. Adjust pipe lengths and layout to fit your space. You can create single or multiple bars depending on your towel storage needs.
What Types Of Pipes Work For Towel Racks?
Black steel, galvanized steel, or copper pipes work well. Choose based on your style preference and durability needs. Black steel offers an industrial look, while copper adds a vintage feel.
Conclusion
Building a pipe towel rack is simple and practical. You only need basic tools and materials. This project saves money and adds a unique look to your space. You can customize the size and style as you like. Enjoy a sturdy and stylish towel rack made by your own hands.
Try it today and see how easy it is. Small projects like this bring big satisfaction. Give your home a fresh touch with this DIY rack.