Imagine giving your pet the freedom to come and go without needing you to open the door every time. Sounds great, right?
Building a pet door tunnel can make this possible, and it’s easier than you might think. Whether you want to keep your pet safe or simply make life more convenient, this guide will show you step-by-step how to create a tunnel that fits your home and your furry friend’s needs.
Ready to get started? Keep reading, and you’ll have your pet’s new favorite hangout in no time.
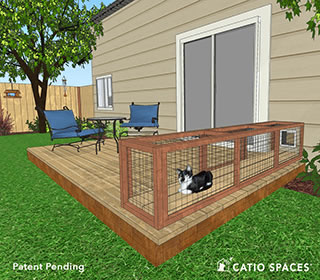
Credit: catiospaces.com
Choosing The Right Pet Door
Choosing the right pet door is important for your pet’s comfort and safety. The right door helps your pet move freely and keeps your home secure. Think about your pet’s size, the door’s material, and security features. These factors make a big difference in how well the pet door works.
Measuring Your Pet
Measure your pet’s height and width carefully. Measure from the floor to the top of their shoulders. Also, check the widest part of their body. This ensures the door is large enough for your pet to pass through easily. A door too small or too big can cause problems.
Selecting Door Material
Choose a door made from strong, weather-resistant material. Plastic and metal are common choices. Plastic is lightweight and good for small pets. Metal is durable and works well for bigger pets. Consider your climate. Some materials handle cold or heat better.
Considering Security Features
Pick a pet door with good security to keep your home safe. Look for doors with locking mechanisms. Some doors have electronic locks that open only for your pet’s collar tag. This stops other animals from coming inside. Security is key for peace of mind.
Gathering Materials And Tools
Before building a pet door tunnel, gather all needed materials and tools. This step saves time and avoids interruptions. Having everything ready helps you work smoothly and finish faster. Prepare your workspace to keep items close and organized. Safety is important, so include protective gear to avoid injuries.
Essential Tools List
- Measuring tape for accurate sizing
- Power drill with drill bits
- Jigsaw or handsaw for cutting
- Screwdriver set for assembly
- Level to ensure straight installation
- Hammer for securing parts
- Pencil for marking measurements
- Caulking gun for sealing edges
Materials For The Tunnel
- Plastic or metal tunnel tube
- Pet door flap suitable for your pet
- Wood or plastic panels for framing
- Weatherstripping to keep drafts out
- Screws and nails for fastening
- Sealant to protect against moisture
- Insulation material for colder climates
Safety Equipment
- Safety goggles to protect eyes
- Work gloves for hand protection
- Dust mask to avoid inhaling particles
- Ear protection if using loud tools
- Proper footwear for stable footing
Preparing The Installation Site
Preparing the installation site is the first step to building a pet door tunnel. This stage ensures the door fits well and works safely. Careful preparation helps avoid problems later. Follow these key steps to get ready.
Selecting Door Location
Choose a spot on the door or wall that your pet uses often. Pick a place with enough space for your pet to pass through easily. Avoid areas near electrical outlets or plumbing pipes. The location should be low enough for your pet to reach comfortably.
Measuring And Marking
Measure your pet’s height and width to get the right door size. Use a tape measure for accuracy. Mark the area on the door or wall clearly with a pencil. Double-check the marks before cutting to prevent mistakes. Make sure the marks are level and centered.
Checking Wall Structure
Look inside the wall where you plan to install the tunnel. Check for studs, wires, or pipes that could block the tunnel. Use a stud finder or ask a professional if unsure. Avoid cutting through any structural elements to keep the building safe. Clear the area before you start cutting.

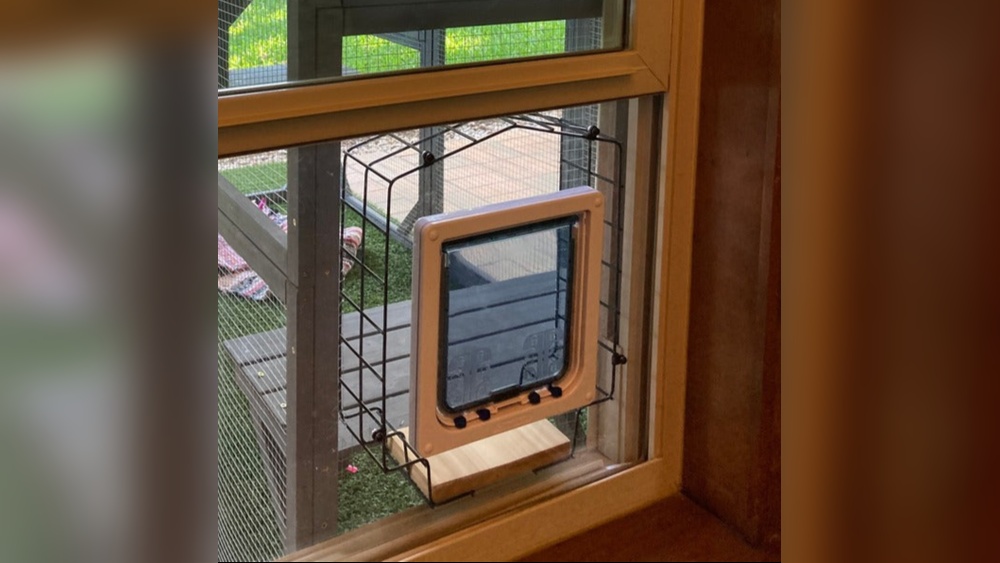
Credit: www.petdoors.com
Cutting The Door Opening
Cutting the door opening is a key step in building a pet door tunnel. It creates the space your pet will use to go in and out. Precise cutting ensures the door fits well and works properly. Taking time and care in this step saves future problems and extra work.
Using The Right Saw
Choose a saw that fits your door material. A jigsaw works best for wood and thin metal doors. It gives control and smooth cuts. For thicker doors, a reciprocating saw may be needed. Always wear safety goggles and gloves before starting.
Ensuring Clean Edges
Cut slowly and follow your marked lines carefully. Clean edges help the pet door fit snugly. Use sandpaper or a file to smooth rough spots. Smooth edges prevent splinters and make the door look neat.
Removing Debris
Clear away wood chips and dust after cutting. Use a brush or vacuum to clean the area. Removing debris keeps the workspace safe and tidy. It also helps when installing the pet door tunnel.
Building The Tunnel Frame
Building the tunnel frame is a key step in making a pet door tunnel. It gives shape and support to the tunnel. A strong frame keeps the tunnel sturdy and safe for your pet. The frame also helps the tunnel fit well between walls or doors.
Constructing The Frame Box
Start by measuring the space where the tunnel will go. Cut wooden boards to match these measurements. Use simple wood like pine for easy cutting and handling. Assemble the boards into a rectangular box shape. Make sure the box is slightly longer than your pet’s size. This allows your pet to move comfortably through the tunnel.
Securing The Frame
Use screws or nails to join the wooden boards tightly. Check that all corners are square and firm. Add extra wood pieces inside the box for more strength. Tight joints prevent wobbling or breaking. Sand any rough edges to avoid splinters. A solid frame helps the tunnel last longer and stay safe.
Waterproofing Techniques
Protect the wooden frame from water and weather damage. Apply a coat of waterproof paint or sealant to all surfaces. Let it dry fully before installation. You can also use a plastic sheet or vinyl wrap around the frame. This adds an extra layer of water resistance. Proper waterproofing keeps the frame strong and prevents rot.
Installing The Pet Door
Installing the pet door is a key step in building a pet door tunnel. This step ensures your pet can move safely and easily through the door. It needs care and attention to fit it properly and keep your home insulated.
Fitting The Door Into The Frame
Start by placing the pet door into the frame carefully. Check that it fits snugly without gaps. Use screws to secure the door firmly in place. Make sure the door flap swings freely without hitting the frame. Adjust the frame if the door does not fit well.
Sealing And Insulating
Seal around the door edges to prevent air leaks. Use weatherproof caulk or foam sealant for the best results. This keeps cold or hot air outside. Add insulation around the tunnel walls if possible. It helps your home stay comfortable and saves energy.
Testing Door Functionality
Test the pet door by gently pushing the flap. Check if it opens and closes smoothly. Watch your pet use the door to ensure ease of use. Make adjustments if the door sticks or does not close well. Proper function keeps your pet safe and happy.
Finishing Touches
After building the pet door tunnel, some finishing touches make it last longer and work better. These steps help protect the tunnel and keep your pet comfortable. Small details improve the overall look and function.
Adding Weatherstripping
Weatherstripping seals gaps around the pet door. It keeps cold air, rain, and bugs out. Choose a soft, flexible strip that fits your door size. Attach it carefully to the edges of the tunnel. This step makes the tunnel more energy efficient and cozy for your pet.
Painting Or Staining
Painting or staining protects the wood from damage. Use paint or stain made for outdoor use. Apply evenly and let it dry completely. This step helps the tunnel resist water and sun damage. Choose colors that match your home or yard for a neat look.
Training Your Pet
Show your pet how to use the new door. Use treats and praise to encourage them. Let them explore the tunnel slowly. Practice a few times each day until they feel confident. Training helps your pet enjoy the door safely and happily.

Credit: catiospaces.com
Maintenance Tips
Keeping your pet door tunnel in good shape helps it last longer. Regular maintenance keeps it safe and easy for your pet to use. Small checks and cleaning prevent bigger problems later. Follow these simple tips to take care of your pet door tunnel.
Cleaning The Door And Tunnel
Clean the door and tunnel often. Dirt and dust can build up and block the door. Use a damp cloth to wipe the surfaces. Avoid harsh chemicals that can harm your pet or the materials. Clear any debris inside the tunnel to keep it smooth for your pet’s passage.
Checking For Wear And Tear
Look closely for signs of damage. Check the edges and hinges of the door. Look inside the tunnel for cracks or loose parts. Fix small issues early before they get worse. Replace worn-out parts quickly to keep the door safe and functional.
Seasonal Adjustments
Change the door settings with the seasons. In winter, make sure the door closes tightly to keep cold air out. In summer, allow more airflow if possible. Check seals and insulation to keep your home comfortable. Adjusting your pet door with the weather helps save energy and keeps your pet happy.
Frequently Asked Questions
What Materials Are Needed To Build A Pet Door Tunnel?
You need a pet door kit, PVC pipes, measuring tape, saw, screws, and sealant. These materials ensure a sturdy and weatherproof tunnel.
How Do I Measure For A Pet Door Tunnel?
Measure your pet’s width and height, then add extra space for comfort. Also, measure wall thickness to choose the right tunnel length.
Can I Install A Pet Door Tunnel In Brick Walls?
Yes, but it requires careful drilling and cutting. Use a masonry drill bit and seal properly to prevent drafts and damage.
How Long Does It Take To Build A Pet Door Tunnel?
It usually takes 2 to 4 hours, depending on wall type and your DIY skills. Preparation and precise measurements save time.
Conclusion
Building a pet door tunnel helps your pet move freely and safely. It saves energy and time for both you and your pet. The steps are simple and need only basic tools. You can customize the size to fit your pet perfectly.
A well-made tunnel keeps weather and bugs outside. Enjoy watching your pet explore with ease and comfort. This small project makes a big difference in daily life. Try it yourself and see how much your pet loves it.