Imagine never missing a visitor at your door, even when you’re not home. With the X Smart Home Wireless Video Doorbell, you can see and talk to anyone at your doorstep right from your phone.
Installing it might sound tricky, but don’t worry—this guide will walk you through every step, making the process simple and hassle-free. By the end, you’ll have a powerful tool that boosts your home’s security and convenience. Ready to take control of your front door?
Let’s get started!
Choosing The Right Location
Choosing the right location for your X Smart Home Wireless Video Doorbell is key. The correct spot helps you see visitors clearly and keeps your home safe. Placement affects the doorbell’s performance and the quality of video footage.
Think about height, angle, and any obstacles. Also, check the Wi-Fi signal to avoid connection problems. Good location means better security and ease of use.
Ideal Height And Angle
Mount the doorbell about 48 inches from the ground. This height captures faces well and works for most people. Angle the camera slightly downward. This helps avoid glare and captures visitors’ full faces clearly.
Avoiding Obstructions
Clear the area around the doorbell. Avoid plants, decorations, or lights that block the view. Obstructions can hide visitors or cause false alerts. Keep the lens clean and free from dirt or spider webs.
Considering Wi-fi Signal Strength
Place the doorbell where the Wi-Fi signal is strong. Weak signals cause delays or missed alerts. Test the signal near your door before installing. Use a Wi-Fi extender if needed for better coverage.
Credit: vixencomposites.com
Gathering Required Tools
Gathering the right tools before installing the X Smart Home Wireless Video Doorbell saves time and effort. Having everything ready makes the installation smooth. It helps avoid interruptions and reduces mistakes.
List Of Essential Tools
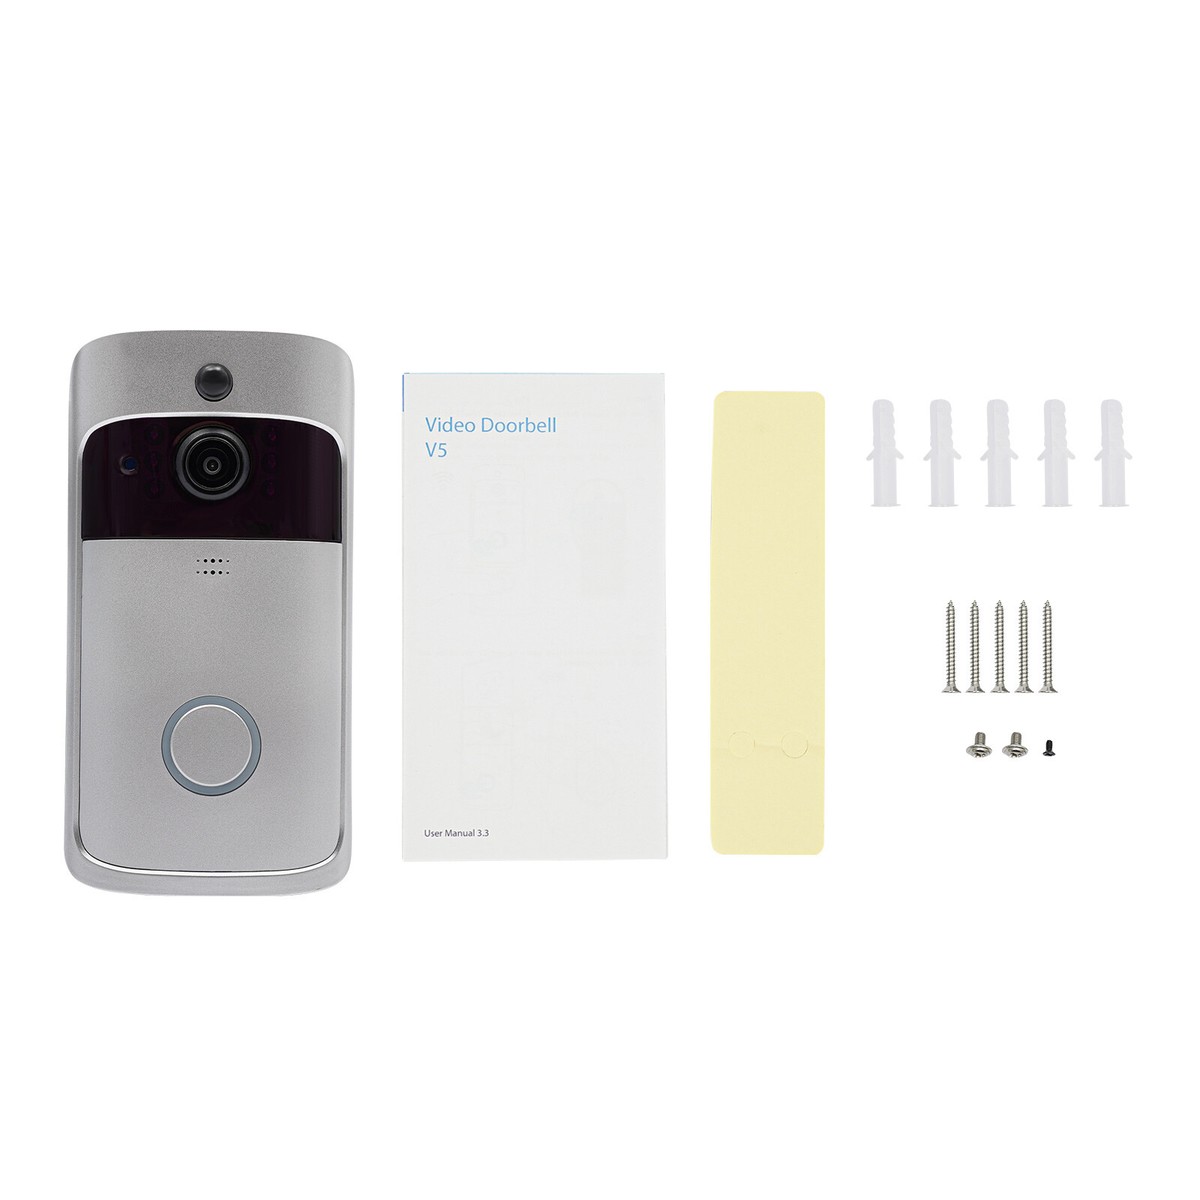
Prepare these tools for a successful installation:
- Power drill with drill bits
- Screwdriver (Phillips and flathead)
- Measuring tape
- Level tool
- Pencil or marker
- Wire stripper (if wiring is needed)
- Anchors and screws (usually included)
- Ladder or step stool
These tools cover basic needs. Check your doorbell package first for extra items.
Safety Equipment Tips
Safety matters during installation. Protect yourself with simple gear:
- Wear safety goggles to protect your eyes
- Use gloves to avoid cuts or scrapes
- Choose stable ladder or stool
- Keep your workspace clear of hazards
- Turn off power at the breaker if working with wires
Follow these tips to stay safe and secure during the process.
Preparing The Installation Area
Preparing the installation area is the first step to install the X Smart Home Wireless Video Doorbell. A clean and well-marked surface helps the doorbell fit perfectly. It also makes the installation process smooth and secure.
Cleaning The Surface
Start by cleaning the wall or door frame where you want to place the doorbell. Use a cloth with mild soap and water to remove dirt, dust, and grease. Dry the surface completely before moving to the next step. A clean surface ensures the doorbell sticks well and stays in place.
Marking Drill Points
Hold the doorbell mounting bracket against the surface. Use a pencil to mark the holes for drilling. Double-check the marks to make sure they are level and in the right position. Accurate marking helps you drill holes correctly and prevents mistakes during installation.

Credit: www.arloren.com
Mounting The Doorbell
Mounting the X Smart Home Wireless Video Doorbell is the key step to ensure it works well. A steady and secure fit keeps the camera steady and captures clear video. This section guides you through the simple mounting process.
Drilling Holes
Start by selecting the right spot near your door. Mark the holes using the mounting bracket as a guide. Use a drill with a bit matching the screws included. Drill carefully, making sure the holes are straight. Clean any dust from the drilled area before moving on.
Attaching The Mounting Bracket
Hold the bracket up to the drilled holes. Insert the screws through the bracket into the wall. Tighten screws using a screwdriver until the bracket feels firm. Avoid over-tightening to prevent damage to the wall. The bracket must stay steady to hold the doorbell safely.
Securing The Doorbell Unit
Align the doorbell unit with the mounting bracket. Slide or click it into place as per the design. Make sure it fits tightly without any wobble. Test by gently pulling to check if it stays secure. Your doorbell is now ready to operate perfectly.
Connecting To Power
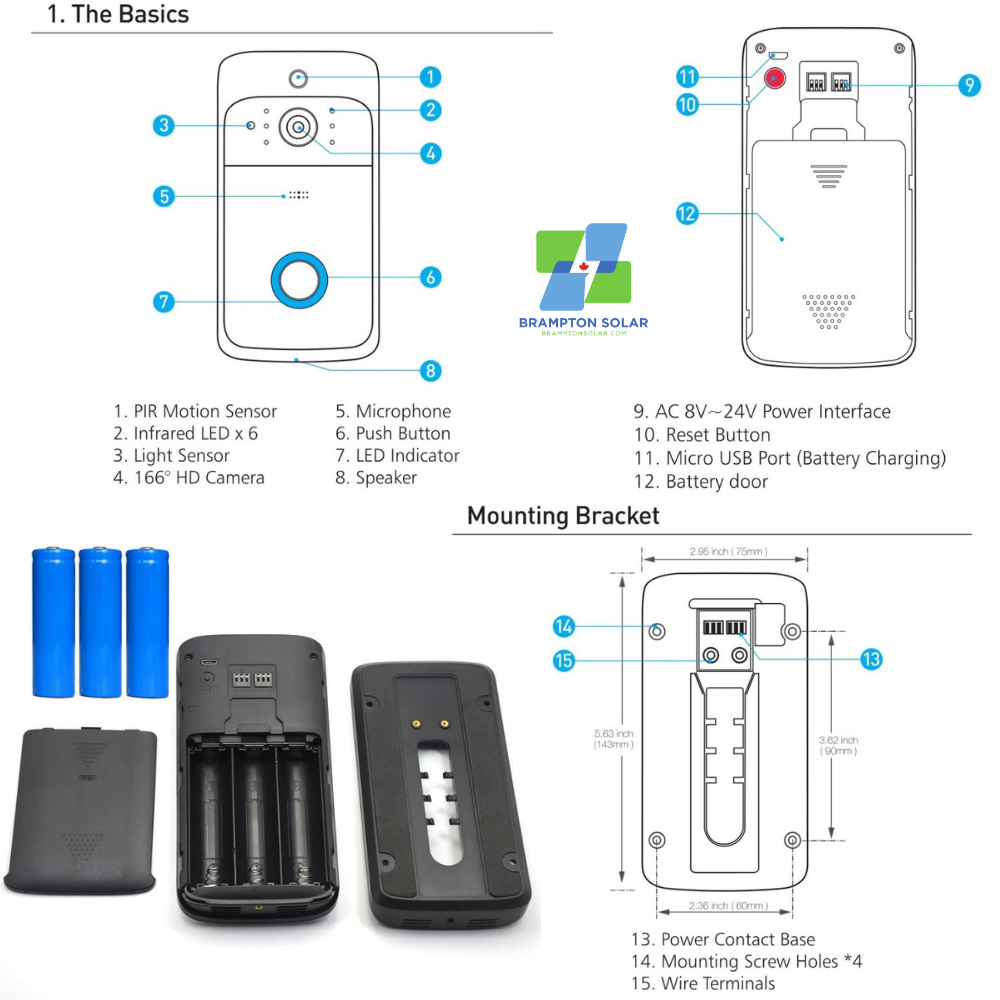
Connecting your X Smart Home Wireless Video Doorbell to power is a crucial step. This ensures your device stays active and ready to use. The doorbell supports two main power methods. Choose the one that fits your home setup best. Below, learn how to connect using wired power or install and charge the battery.
Wired Power Setup
Wired power keeps the doorbell running without interruptions. Start by turning off the power at your home’s circuit breaker. Use a screwdriver to remove the existing doorbell. Connect the doorbell wires to the terminals on the back of your new device. Match the wires carefully; usually, they are labeled. Secure the wires tightly to avoid loose connections. Mount the doorbell on the wall using the screws provided. Turn the power back on and test the doorbell. It should light up or make a sound. This means it is working correctly.
Battery Installation And Charging
The X Smart Home Doorbell has a rechargeable battery option. Open the back cover of the doorbell carefully. Insert the battery following the positive and negative signs. Close the cover securely to protect the battery. Charge the battery fully before the first use. Use the USB cable included for charging. Plug the cable into a power source and the doorbell. Charging usually takes a few hours. A full battery offers weeks of doorbell use. Remove the doorbell from the wall to charge if needed.
Credit: www.technipro.ma
Setting Up The App
Setting up the app is the first step to control your X Smart Home Wireless Video Doorbell. The app lets you see visitors, talk to them, and get alerts. Follow these simple steps to get started quickly.
Downloading And Installing
Go to your phone’s app store. Search for the “X Smart Home” app. Tap “Download” or “Install” to add it to your device. The app is free and takes only a few minutes to download. Make sure your phone has a good internet connection.
Creating An Account
Open the app after installation. Tap “Sign Up” to create a new account. Use a valid email address and choose a strong password. Confirm your email if asked. The account will save your settings and doorbell history.
Pairing The Doorbell
Turn on your doorbell and keep it near your phone. In the app, tap “Add Device” or “Pair Doorbell.” Follow the on-screen instructions to connect the doorbell to your Wi-Fi. Wait for the app to confirm the connection. Your doorbell is now ready to use.
Configuring Settings
Configuring the settings of your X Smart Home Wireless Video Doorbell helps you get the most from its features. Proper setup ensures the doorbell works just how you want it. It improves security and convenience.
Start by adjusting the motion detection. This lets you control when the doorbell alerts you about movement. Next, set your notification preferences to choose how and when you get alerts. Finally, customize the video quality to balance clear images with data use.
Adjusting Motion Detection
Open the app linked to your doorbell. Find the motion detection settings. You can set the sensitivity level to low, medium, or high. High sensitivity picks up small movements but may cause more alerts. Low sensitivity reduces false alarms but might miss some motion. You can also set specific zones to monitor for motion. This focuses alerts on important areas like your front door.
Setting Notification Preferences
Choose how you want to receive alerts. Options include push notifications, emails, or both. Set quiet hours to avoid alerts during certain times. You can also enable or disable notifications for motion or doorbell presses separately. This helps you stay informed without too many interruptions.
Customizing Video Quality
Select the video resolution in the app settings. Higher resolution gives clearer video but uses more data. Lower resolution saves data and works better on slow internet. Adjust the frame rate to control smoothness versus data use. Choose settings that fit your internet speed and data plan. This ensures good video without slowing your network.
Testing The Doorbell
Testing the X Smart Home Wireless Video Doorbell is important after installation. It ensures the device works well and keeps your home secure. Follow these steps to check its main features and fix any issues.
Checking Video Feed
Open the doorbell app on your phone. Look at the live video feed from the doorbell camera. The image should be clear and show the area in front of your door. Move around to see if the camera adjusts well. Check the video quality in different light conditions. This confirms the camera captures good footage at all times.
Verifying Audio And Notification
Press the doorbell button to test the sound. Listen to the chime inside your home. The volume should be loud enough to hear. Speak to the visitor through the app to check the microphone and speaker. Wait for a notification on your phone. It should arrive quickly and show the visitor’s image. These tests confirm you can talk and get alerts easily.
Troubleshooting Common Issues
If the video feed is blurry, clean the camera lens. Restart the doorbell and the app if video or audio does not work. Check your Wi-Fi connection for strength and speed. Make sure the doorbell is within range of your router. Update the app and doorbell firmware to the latest version. These fixes solve most common problems fast.
Maintaining Your Doorbell
Maintaining your X Smart Home Wireless Video Doorbell is key to its long-term performance. A well-kept doorbell stays clear and functions smoothly. Simple care routines keep the device reliable and ready.
Regular upkeep prevents dirt and damage. It also helps avoid common issues. Follow these steps to keep your doorbell in top shape.
Regular Cleaning Tips
Clean the doorbell surface gently with a soft cloth. Avoid harsh chemicals that can damage the lens or buttons. Use a mild soap and water mix if needed. Remove dust and grime to keep video clear. Check the camera lens often for smudges or dirt.
Firmware Updates
Check for firmware updates regularly through the app. Updates fix bugs and improve security. Install updates promptly to maintain smooth operation. Keep the doorbell connected to Wi-Fi during updates. This ensures the latest features and protections.
Battery Replacement Guidelines
Monitor battery levels via the app. Replace batteries when the charge is low. Use only recommended battery types for safety. Turn off the doorbell before replacing batteries. Insert batteries correctly to avoid damage or failure.
Frequently Asked Questions
How Do I Mount The X Smart Home Video Doorbell?
Use the included mounting bracket and screws. Choose a location near your door, preferably at eye level. Ensure a stable Wi-Fi signal for optimal performance. Follow the step-by-step mounting guide in the user manual for best results.
What Tools Are Needed For Installation?
You’ll need a drill, screwdriver, level, and possibly a pencil. These tools help secure the doorbell and ensure proper alignment. Having them ready before starting will make the installation smoother and faster.
How Do I Connect The Doorbell To Wi-fi?
After mounting, power on the device and open the app. Follow the in-app instructions to select your Wi-Fi network. Enter your password carefully to ensure a successful connection. The doorbell requires a 2. 4 GHz network for best compatibility.
Can I Install The Doorbell Without Professional Help?
Yes, the X Smart Home doorbell is designed for easy DIY installation. Clear instructions and included hardware make it user-friendly. However, if unsure, consulting a professional ensures safety and proper setup.
Conclusion
Installing the X Smart Home Wireless Video Doorbell is simple and quick. Follow each step carefully for the best results. You can improve your home security easily. The doorbell lets you see and talk to visitors from anywhere. Regular checks help keep the device working well.
Enjoy the peace of mind it brings every day. Start your installation today and feel safer at home.