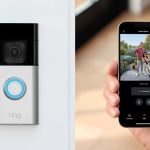
Are you ready to upgrade your home security without the hassle of complicated wiring? Installing the Ring Video Doorbell 3 using your existing doorbell system is easier than you think.
Imagine seeing who’s at your door from anywhere, right on your phone. In this guide, you’ll discover simple, step-by-step instructions that save you time and frustration. By the end, you’ll have a smart doorbell that fits perfectly with what you already have—no extra tools or expert help needed.
Keep reading to make your home safer and smarter today.
Tools And Materials Needed
Preparing the right tools and materials makes installing the Ring Video Doorbell 3 easy. Gather everything before starting. This saves time and avoids interruptions.
The tools and materials listed here work with your existing doorbell setup. They help ensure a smooth installation process.
Tools Required
- Electric drill with drill bits
- Screwdriver (Phillips and flathead)
- Wire stripper or cutter
- Level tool for straight installation
- Voltage tester to check power
- Measuring tape
Materials Needed
- Ring Video Doorbell 3 device
- Mounting bracket included with the doorbell
- Screws and anchors (usually in the box)
- Existing doorbell wires
- Optional: Extra wire for longer connections
- Optional: Electrical tape for safety
Safety Gear
- Insulated gloves to protect from shocks
- Safety glasses to protect your eyes
Check Compatibility With Existing Doorbell
Before installing the Ring Video Doorbell 3, checking compatibility with your existing doorbell is important. This step ensures smooth installation and proper functioning. Not all doorbells work well with the Ring Video Doorbell 3. Knowing this helps avoid problems later.
The Ring Video Doorbell 3 requires specific voltage and wiring setups. Understanding your current doorbell’s system saves time and effort. Let’s explore how to check compatibility with your existing doorbell.
Identify Your Existing Doorbell Type
Start by examining your current doorbell. Most homes use mechanical or digital doorbells. Mechanical doorbells have a physical chime that rings. Digital doorbells use electronic sounds. The Ring Video Doorbell 3 works with both types but may need extra parts.
Check Doorbell Voltage
Use a multimeter to measure your doorbell’s voltage. The Ring Video Doorbell 3 needs 16 to 24 volts AC. If your doorbell has lower voltage, it may not work properly. High voltage can damage the device. Measuring voltage ensures safe installation.
Confirm Doorbell Transformer Power
The transformer powers your doorbell system. It changes your home’s main power to low voltage. The Ring Video Doorbell 3 requires a transformer with 16 to 24 volts and 30 to 40 VA rating. Check your transformer label for these details. A weak transformer can cause malfunction.
Inspect Doorbell Wiring
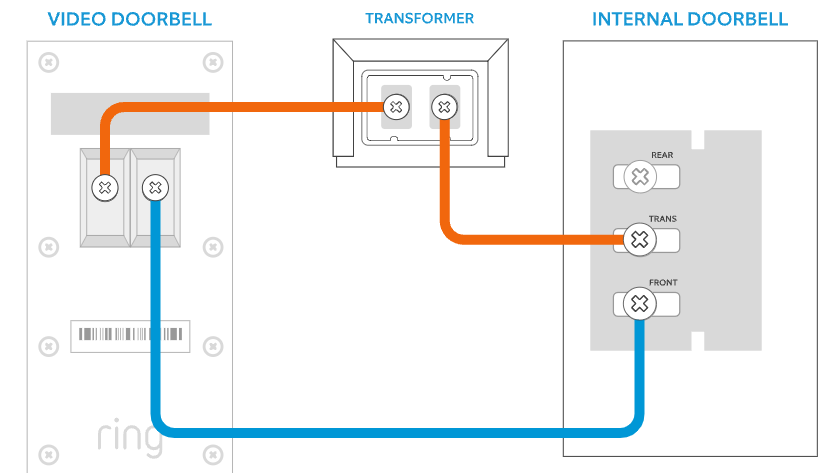
Remove your existing doorbell button to see wiring. The Ring Video Doorbell 3 needs two wires connected to terminals. Wires should be in good condition and long enough. If wires are old or damaged, replace them before installation.
Use Ring Compatibility Checker
Ring offers an online tool to check compatibility quickly. Enter details about your doorbell system. The tool tells if your setup works with the Ring Video Doorbell 3. This helps avoid guesswork and prepares you for installation.
Turn Off Power Safely
Turning off the power safely is the first step to install your Ring Video Doorbell 3. This step protects you from electric shock. It also prevents damage to your doorbell and wiring. Take your time and follow each step carefully. Safety always comes first.
Locate Your Home’s Circuit Breaker
Find the main circuit breaker panel in your home. It is usually in the basement, garage, or utility room. The panel has switches that control power to different areas of your house.
Identify The Correct Breaker
Look for the breaker that controls your doorbell or front door area. The breaker may be labeled. If not, switch off one breaker at a time and check if the doorbell stops working.
Switch Off The Power
Flip the correct circuit breaker switch to the “off” position. This stops electricity from reaching your doorbell. Double-check by pressing your existing doorbell button. The doorbell should not ring.
Use A Voltage Tester
Before touching any wires, use a voltage tester. This device confirms no electricity flows through the wires. If the tester shows power, turn off the wrong breaker and try another one.
Remove Old Doorbell
Removing your old doorbell is the first step to installing the Ring Video Doorbell 3. This process makes room for your new device and ensures a clean installation.
Careful removal protects the wiring and wall from damage. This helps your new doorbell work correctly and look neat.
Turn Off Power
Start by switching off power to the doorbell at your home’s circuit breaker. This step keeps you safe from electric shock during removal.
Unscrew The Old Doorbell
Use a screwdriver to remove screws holding the old doorbell in place. Keep the screws if they are still in good condition for later use.
Disconnect The Wires
Gently pull the doorbell away from the wall. Loosen the wire connectors and carefully detach the wires. Note which wire connects where for your Ring doorbell.
Remove The Old Doorbell Plate
Take off the mounting plate left on the wall. Clean the area to remove dust or dirt before installing the new device.
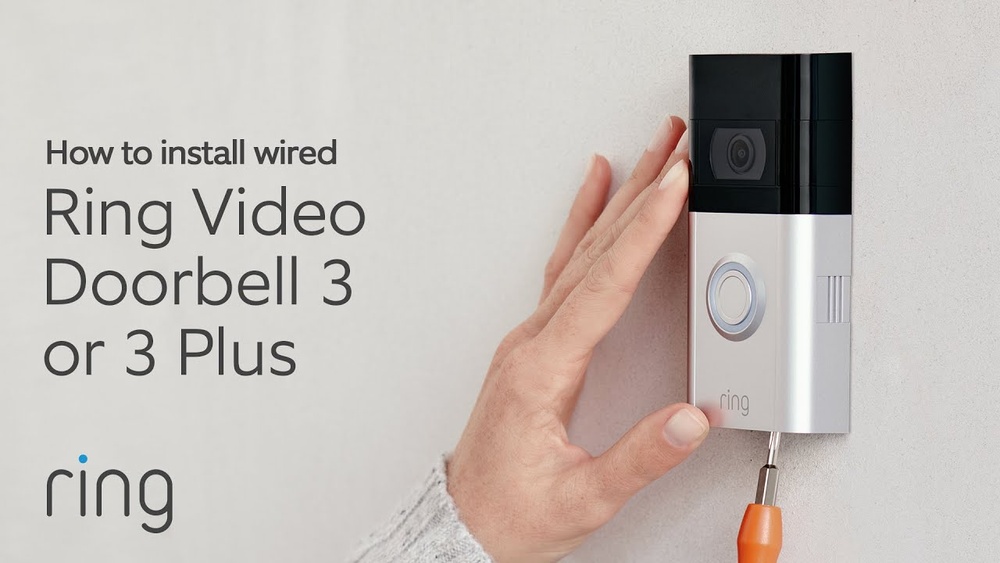
Connect Ring Video Doorbell 3
Connecting your Ring Video Doorbell 3 is an important step. It ensures your doorbell works with your home system. Follow the steps carefully to make a secure connection. This part is simple and takes just a few minutes.
Attach Mounting Bracket
Start by attaching the mounting bracket to the wall. Use the screws that came with your doorbell. Hold the bracket steady and screw it tightly. Make sure it is level and secure. The bracket will hold your doorbell firmly in place.
Wire The Doorbell
Next, connect the wires from your existing doorbell to the Ring device. Use the provided screws to attach the wires to the terminals. Check that the wires are tight and do not touch each other. Proper wiring powers your Ring doorbell correctly.
Secure The Device
Finally, attach the Ring Video Doorbell 3 to the mounted bracket. Push it until you hear a click sound. This means the doorbell is locked in place. Use the small security screw on the bottom to secure it. This prevents the device from falling or being stolen.
Credit: ring.com
Restore Power And Test
After wiring your Ring Video Doorbell 3 to the existing doorbell, restoring power is the next key step. This step wakes up the device and allows it to start working. Testing ensures everything connects and functions properly.
Power restoration is simple but important. It helps confirm that your installation is correct and that your Ring Doorbell is ready to use. Follow the steps carefully to avoid any issues.
Turn On The Circuit Breaker
Go to your home’s electrical panel. Find the breaker that controls your doorbell circuit. Flip the switch back to the “on” position. This restores electricity to your doorbell wiring.
Check Ring Doorbell Lights
Look at your Ring Video Doorbell 3. The light ring should start glowing. A solid or spinning light means the device is powering up. If there is no light, check your wiring again.
Test The Doorbell Button
Press the button on your Ring Doorbell. Listen for the chime inside your home. If you hear the chime, the connection to your existing doorbell works well. If not, recheck your setup.
Use The Ring App For Final Testing
Open the Ring app on your phone. Check the live video feed from your doorbell. Press the button and see if the app notifies you. This confirms your Ring Doorbell is fully functional.
Set Up Ring App And Wi-fi
Setting up the Ring app and connecting your Ring Video Doorbell 3 to Wi-Fi is an important step. It allows you to control the doorbell from your phone. This setup gives you live video, notifications, and easy access to settings.
Follow the steps below carefully to get your device online and ready to use.
Download And Install App
Open the app store on your phone. Search for “Ring” in the search bar. Tap on the Ring app in the results. Click the install button and wait for the app to download. Once installed, open the app to start setup.
Create Or Log In To Account
After opening the app, choose to create a new account or log in. Enter your email address and create a password. Follow the prompts to verify your email if needed. Logging in lets you save your device settings and access features.
Connect Doorbell To Wi-fi
Turn on your Ring Doorbell 3 and follow app instructions to find the device. Select your home Wi-Fi network from the list. Enter your Wi-Fi password carefully. Wait for the doorbell to connect to your network. A confirmation message appears once connected.

Credit: www.youtube.com
Customize Settings
After installing your Ring Video Doorbell 3, take time to customize its settings. This helps you get alerts that matter most. Adjusting settings improves security and reduces false alarms.
Customize settings easily through the Ring app. Tailor the device to fit your home’s needs. Focus on motion zones, notifications, and video recording options.
Adjust Motion Zones
Motion zones let you choose where the doorbell detects movement. Set specific areas to watch closely. Avoid spots with frequent passing cars or trees.
This reduces unwanted alerts from irrelevant motion. You can create multiple zones for better coverage. Adjust zones anytime in the app for best results.
Set Notification Preferences
Choose how and when you get alerts on your phone. Turn notifications on or off for motion or doorbell rings. Pick quiet times to avoid disturbances.
You can customize alerts for family members too. This keeps everyone informed without overload. Notifications help you respond quickly to visitors.
Enable Video Recording
Turn on video recording to save doorbell footage. Recordings help review events later if needed. Set recording length and video quality in the app.
Cloud storage options keep your videos safe and accessible. Enable video recording for full protection. Check recordings regularly to monitor your home’s safety.
Troubleshooting Tips
Troubleshooting is key to a smooth Ring Video Doorbell 3 setup. Problems can happen even with the best installation. This section helps you fix common issues fast. Clear steps make it easier to get your doorbell running well.
No Power Issues
First, check your existing doorbell wires. They must have power. Use a voltage tester for safety. Confirm the doorbell transformer is working. It should supply 16-24 volts AC. Tighten any loose wires at the terminals. Replace old or damaged wires. Reset the doorbell by removing and reinserting the battery. These steps often restore power quickly.
Wi-fi Connectivity Problems
Place the doorbell near your router during setup. Walls can block signals. Use the Ring app to check signal strength. Restart your router if connection fails. Make sure your Wi-Fi password is correct. Avoid using 5 GHz networks; Ring prefers 2.4 GHz. Move devices causing interference away. These tips help maintain a stable connection.
Audio Or Video Quality Concerns
Clean the camera lens and microphone gently. Dirt affects image and sound quality. Adjust the motion sensitivity in the Ring app. Lower it to reduce false alerts. Check your internet speed; low bandwidth causes lag. Ensure your router supports HD video streaming. Update the doorbell firmware regularly. This keeps performance smooth and clear.
Maintenance And Updates
Maintaining your Ring Video Doorbell 3 ensures it works well for a long time. Regular care keeps the video clear and the device responsive. Updates improve security and add new features. Follow these tips to keep your doorbell in top shape.
Regular Cleaning
Clean the camera lens and sensor often. Use a soft, dry cloth to remove dirt and dust. Avoid using water or cleaning chemicals. Keep the area around the doorbell free from spider webs or leaves. Clean devices work better and last longer.
Firmware Updates
Firmware updates improve device performance and security. Check for updates in the Ring app regularly. The app notifies you when updates are ready. Install updates quickly to keep the doorbell secure. Updated devices have fewer bugs and new features.
Battery Care
Charge the battery before it runs out completely. Remove the doorbell from the mount to charge. Use the original charger for best results. Avoid extreme temperatures to protect the battery life. Regular charging keeps your doorbell ready and active.
Credit: ring.com
Frequently Asked Questions
How Do I Connect Ring Video Doorbell 3 To Existing Wiring?
To connect Ring Video Doorbell 3 to existing wiring, turn off power first. Remove your old doorbell, connect the Ring’s wires to the existing terminals, then mount the device. Restore power and follow in-app instructions to complete setup.
Can I Keep My Old Doorbell Chime With Ring Doorbell 3?
Yes, you can keep your existing doorbell chime. Ring Video Doorbell 3 supports mechanical chimes. Use the included Ring Chime connector to prevent buzzing and ensure proper functionality with your chime.
What Tools Are Needed To Install Ring Video Doorbell 3?
You’ll need a screwdriver, drill, drill bits, and a voltage tester. These tools help safely remove the old doorbell, drill holes for mounting, and verify wiring voltage before installation.
Is Professional Help Required For Ring Doorbell 3 Installation?
Professional help is not required but recommended if unsure. The installation is user-friendly with clear instructions. If uncomfortable with electrical wiring, hiring an electrician ensures safety and proper setup.
Conclusion
Installing the Ring Video Doorbell 3 with your existing doorbell is simple. Just follow the steps carefully and take your time. You will enjoy better security and convenience at your front door. No need to change your current wiring or doorbell chime.
This setup saves money and keeps your home connected. Now, you can see visitors and talk to them from anywhere. Stay safe and feel more in control with this easy installation. Give your home a smart upgrade today.