
Have you ever needed to fill in a pet door but didn’t know where to start? Whether your furry friend has outgrown the door or you simply want to close it off for now, filling in a pet door can seem tricky.
But don’t worry—you can do it yourself with the right steps and tools. In this guide, you’ll discover easy, practical methods to seal up that opening neatly and securely. Keep reading, and you’ll learn how to make your door look as good as new—no hassle, no confusion.
Choosing The Right Materials
Choosing the right materials is important for filling in a pet door. It helps make the fix strong and keeps your home safe. The materials should fit well and stop air or water from coming inside. Using the correct tools and measuring carefully also makes the job easier and better.
Types Of Sealants
Sealants block gaps around the pet door frame. Silicone sealant works well because it is flexible and waterproof. Acrylic sealant is easy to clean and paint over. Latex sealant dries fast and holds tight. Pick a sealant that matches the door material and weather conditions.
Tools You’ll Need
Some tools make filling the pet door easier. A tape measure helps get exact dimensions. A utility knife cuts excess material cleanly. A caulking gun applies sealant smoothly. Sandpaper smooths rough edges. Have a putty knife ready to press materials firmly.
Measuring The Door
Measure the pet door carefully. Take width and height from the inside frame. Write down the numbers to avoid mistakes. Measure twice to be sure. Accurate measurements help cut materials to the right size.

Credit: www.reddit.com
Preparing The Pet Door
Preparing the pet door is the first step to filling it in properly. This stage ensures a smooth and secure fit for the new materials. Take time to clean, remove old seals, and check for damage. These tasks help avoid future problems like leaks or drafts. A well-prepared surface leads to better results and durability.
Cleaning The Surface
Start by cleaning the pet door area thoroughly. Use a mild detergent and warm water to remove dirt and grime. Dry the surface completely with a clean cloth. This step helps new materials stick better. Avoid oily or dusty surfaces that can cause weak adhesion.
Removing Old Seals
Next, remove any old seals or weather stripping. Use a putty knife or scraper to lift them carefully. Dispose of old materials properly. Removing old seals clears the way for new sealing products. It also prevents bumps and uneven surfaces under the fill.
Inspecting For Damage
Check the pet door frame for cracks, holes, or rot. Small damages can weaken the fill and cause leaks. Repair any problems before filling the door. Use wood filler for cracks or replace damaged parts if needed. A strong base keeps the fill secure and long-lasting.
Applying The Sealant
Applying the sealant is an important step when filling in a pet door. It helps close gaps and stops air or water from leaking. Proper sealing makes the area stronger and keeps your home comfortable. Use the right sealant and follow the steps carefully for the best results.
Step-by-step Application
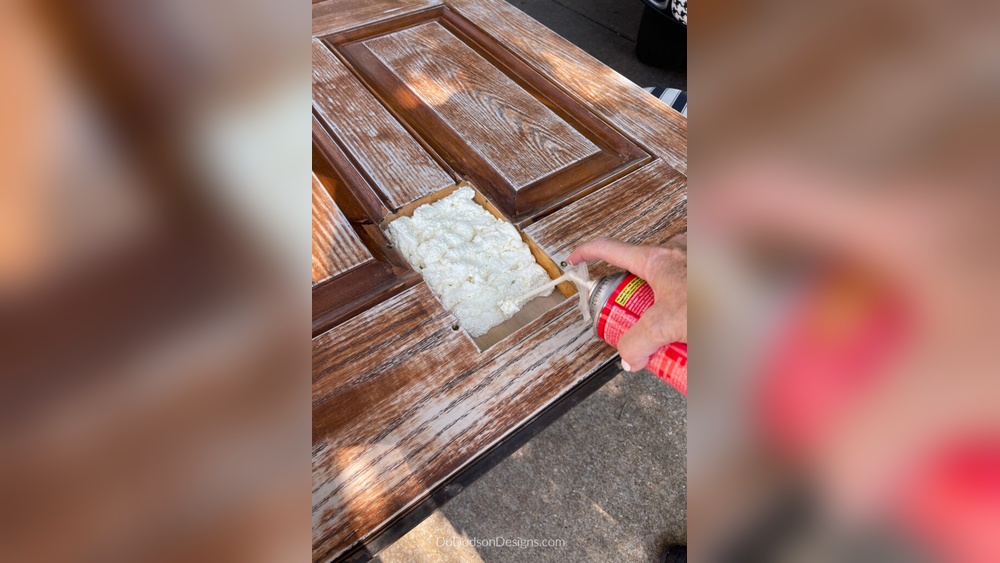
Start by cleaning the pet door frame well. Remove dirt and dust with a cloth. Cut the tip of the sealant tube at a 45-degree angle. Use a caulking gun to apply the sealant. Move the gun steadily along the edges of the pet door. Fill all gaps evenly without leaving holes.
Ensuring Even Coverage
Spread the sealant smoothly with a putty knife or your finger. Press gently to push the sealant into cracks. Check for thin spots and add more if needed. Smooth edges help the sealant stick better and look neat. Avoid lumps or thick blobs that can peel off later.
Drying And Setting Time
Let the sealant dry for at least 24 hours. Keep the area dry and avoid touching the sealant. Check the product label for exact drying time. Once dry, the sealant forms a strong, flexible seal. This keeps your home sealed and ready for any weather.

Credit: www.reddit.com
Testing The Seal
Testing the seal of your pet door is a vital step after installation. It ensures the door fits tightly and keeps out drafts, bugs, and noise. A good seal also helps save energy by stopping air leaks. This section guides you through checking and adjusting the seal for the best fit.
Checking For Gaps
Start by closing the pet door slowly. Look closely at the edges for any visible gaps. Use a flashlight to see small spaces where light passes through. You can also slide a thin piece of paper around the edges. If the paper moves freely, the seal is not tight enough.
Adjusting The Seal
Adjust the seal by pressing it gently along the frame. Some seals can be repositioned or tightened with screws. Replace any worn or damaged weatherstripping. Make sure the flap closes smoothly without forcing it. Keep the seal even on all sides for a uniform fit.
Preventing Air Leaks
Seal any remaining gaps with weatherproof tape or caulk. Check both inside and outside edges of the door. Use foam tape for small cracks and silicone for larger ones. Regularly inspect the seal to keep it effective. A well-sealed pet door stops cold air and keeps your home comfortable.
Maintaining The Pet Door Seal
Maintaining the pet door seal is important for keeping your home comfortable. A good seal stops drafts, dust, and insects from coming inside. It also helps save energy by keeping warm or cool air in your home. Regular care of the seal extends the life of your pet door and keeps it working well.
Regular Inspections
Check the pet door seal every month. Look for cracks, tears, or areas where the seal is loose. Press gently along the edges to find weak spots. Early problems are easier to fix than big damage. Make sure the seal fits tightly against the door frame.
Cleaning Tips
Keep the seal clean to help it last longer. Use a soft cloth with mild soap and water. Wipe the seal gently to remove dirt and dust. Avoid harsh chemicals that can damage the material. Dry the seal well after cleaning to stop mold or mildew growth.
When To Replace The Seal
Replace the seal if you see cracks, holes, or if it feels hard and brittle. A worn-out seal lets air and bugs inside. If cleaning does not fix the problem, it is time to get a new seal. Use the right size and type for your pet door to ensure a tight fit.

Credit: everydaylillie.com
Frequently Asked Questions
How Do I Fill In A Pet Door Temporarily?
Use a rigid board cut to fit the pet door opening. Secure it with screws or strong tape for a quick seal. This method blocks drafts and keeps pets inside without permanent changes.
What Materials Work Best To Fill A Pet Door?
Plywood or acrylic sheets work well to fill pet doors. They are durable, easy to cut, and provide good insulation. Choose weather-resistant materials for outdoor doors to prevent damage.
Can I Remove A Pet Door Flap When Filling It?
Yes, removing the flap makes filling easier and cleaner. It prevents drafts and ensures a tight seal. Keep the flap stored for future use if needed.
How To Insulate A Filled Pet Door Effectively?
Add foam insulation or weatherstripping around the fill panel edges. This reduces heat loss and blocks cold air. Proper sealing improves energy efficiency in your home.
Conclusion
Filling in a pet door can be simple and quick. Choose the right materials to match your door style. Measure carefully to ensure a perfect fit. Secure the patch tightly to avoid drafts or pests. Taking these steps helps keep your home safe and cozy.
Now, your door looks neat and functions well. Try these tips and enjoy a hassle-free fix. Easy and effective.