Wiring hardwired smoke detectors might sound tricky, but it’s easier than you think. If you want to keep your home safe and make sure your alarms work perfectly together, this guide is for you.
You’ll learn simple steps to connect your smoke detectors the right way. By the end, you’ll feel confident about protecting your family with a reliable fire warning system. Keep reading to discover how to do it quickly and safely.
Tools And Materials Needed
Wiring hardwired smoke detectors requires specific tools and materials. Preparing these items before starting makes the process smoother and safer. This section lists the essential tools and materials needed for the task.
Essential Tools
- Voltage tester to check power safety
- Wire stripper for clean wire ends
- Screwdriver set for mounting and connections
- Drill with bits for making holes
- Electrical tape to secure wire connections
- Ladder to reach ceiling mounting spots
- Wire nuts for joining wires safely
Required Materials
- Hardwired smoke detectors with backup batteries
- Electrical wires compatible with your home wiring
- Electrical boxes to house connections
- Wire connectors for secure joins
- Mounting brackets or plates for detectors
- Power source or circuit breaker access
Safety Precautions
Working with hardwired smoke detectors involves handling electrical wiring. Safety is very important to avoid accidents. Follow safety rules strictly before starting any wiring task. Proper precautions protect you and your home from harm. This section covers key safety steps to keep in mind.
Power Shutoff Procedures
Turn off the main power at the circuit breaker. Confirm the power is off by testing the wires with a voltage tester. Never trust the switch alone. Always double-check to avoid electric shock. Keep the circuit breaker off throughout the installation process. Only turn power back on after all connections are secure and tested.
Personal Safety Tips
Wear insulated gloves to protect your hands. Use safety goggles to shield your eyes from sparks or dust. Avoid working in wet or damp conditions. Stand on a dry, stable surface while working. Keep a flashlight nearby to see clearly in dark spaces. Do not rush; work slowly and carefully. Keep children and pets away from the work area.
Planning Detector Placement
Planning the placement of hardwired smoke detectors is crucial for home safety. Proper positioning ensures early warning during a fire. Careful thought helps protect every room and hallway effectively.
Correct placement improves detector performance and reduces false alarms. It also ensures the system works as intended, alerting everyone in time.
Optimal Locations
Place smoke detectors inside each bedroom. Install one outside every sleeping area, such as hallways. Put detectors on every level of the home, including basements.
Avoid kitchens and bathrooms to prevent false alarms from steam or cooking fumes. Install detectors on the ceiling or high on walls, as smoke rises.
Spacing Guidelines
Keep smoke detectors at least 10 feet away from cooking appliances. Space detectors about 20 feet apart in hallways and large rooms.
Do not install detectors near windows, doors, or ducts where drafts might affect sensitivity. Follow local building codes for exact spacing rules.
Wiring Basics
Wiring hardwired smoke detectors is a key step for safety. Knowing the basics helps you do it right. This section explains simple wiring concepts. Understanding these basics makes installation easier. It also helps avoid common mistakes.
Understanding Electrical Wiring
Electrical wiring carries power in your home. It connects smoke detectors to the power source. Wires have different functions: live, neutral, and ground. Live wires carry electricity to devices. Neutral wires complete the circuit by returning power. Ground wires protect from electrical faults. Knowing these helps you connect detectors safely.
Identifying Wire Types
Wires come in various colors and sizes. Each color means a specific role. Black or red wires are usually live wires. White wires are neutral. Green or bare copper wires are ground. Using the right wire is important for safety. Check wire colors before you start wiring. This avoids dangerous connections and ensures proper operation.
Removing Old Smoke Detectors
Removing old smoke detectors is an important step before installing new hardwired units. It ensures safety and prepares the wiring for the upgrade. Follow these simple steps carefully to avoid any damage or electrical issues.
Disconnecting Power
Start by turning off the power to the smoke detector circuit. This stops any risk of electric shock during removal. Use your home’s circuit breaker to cut power. Double-check that the power is off by testing the smoke detector or using a voltage tester.
Detaching The Unit
Locate the smoke detector base on the ceiling or wall. Twist or slide the unit to release it from the base. Gently pull the detector away from the mounting plate. Unplug the connector that links the detector to the wiring harness. Avoid pulling on the wires to prevent damage.
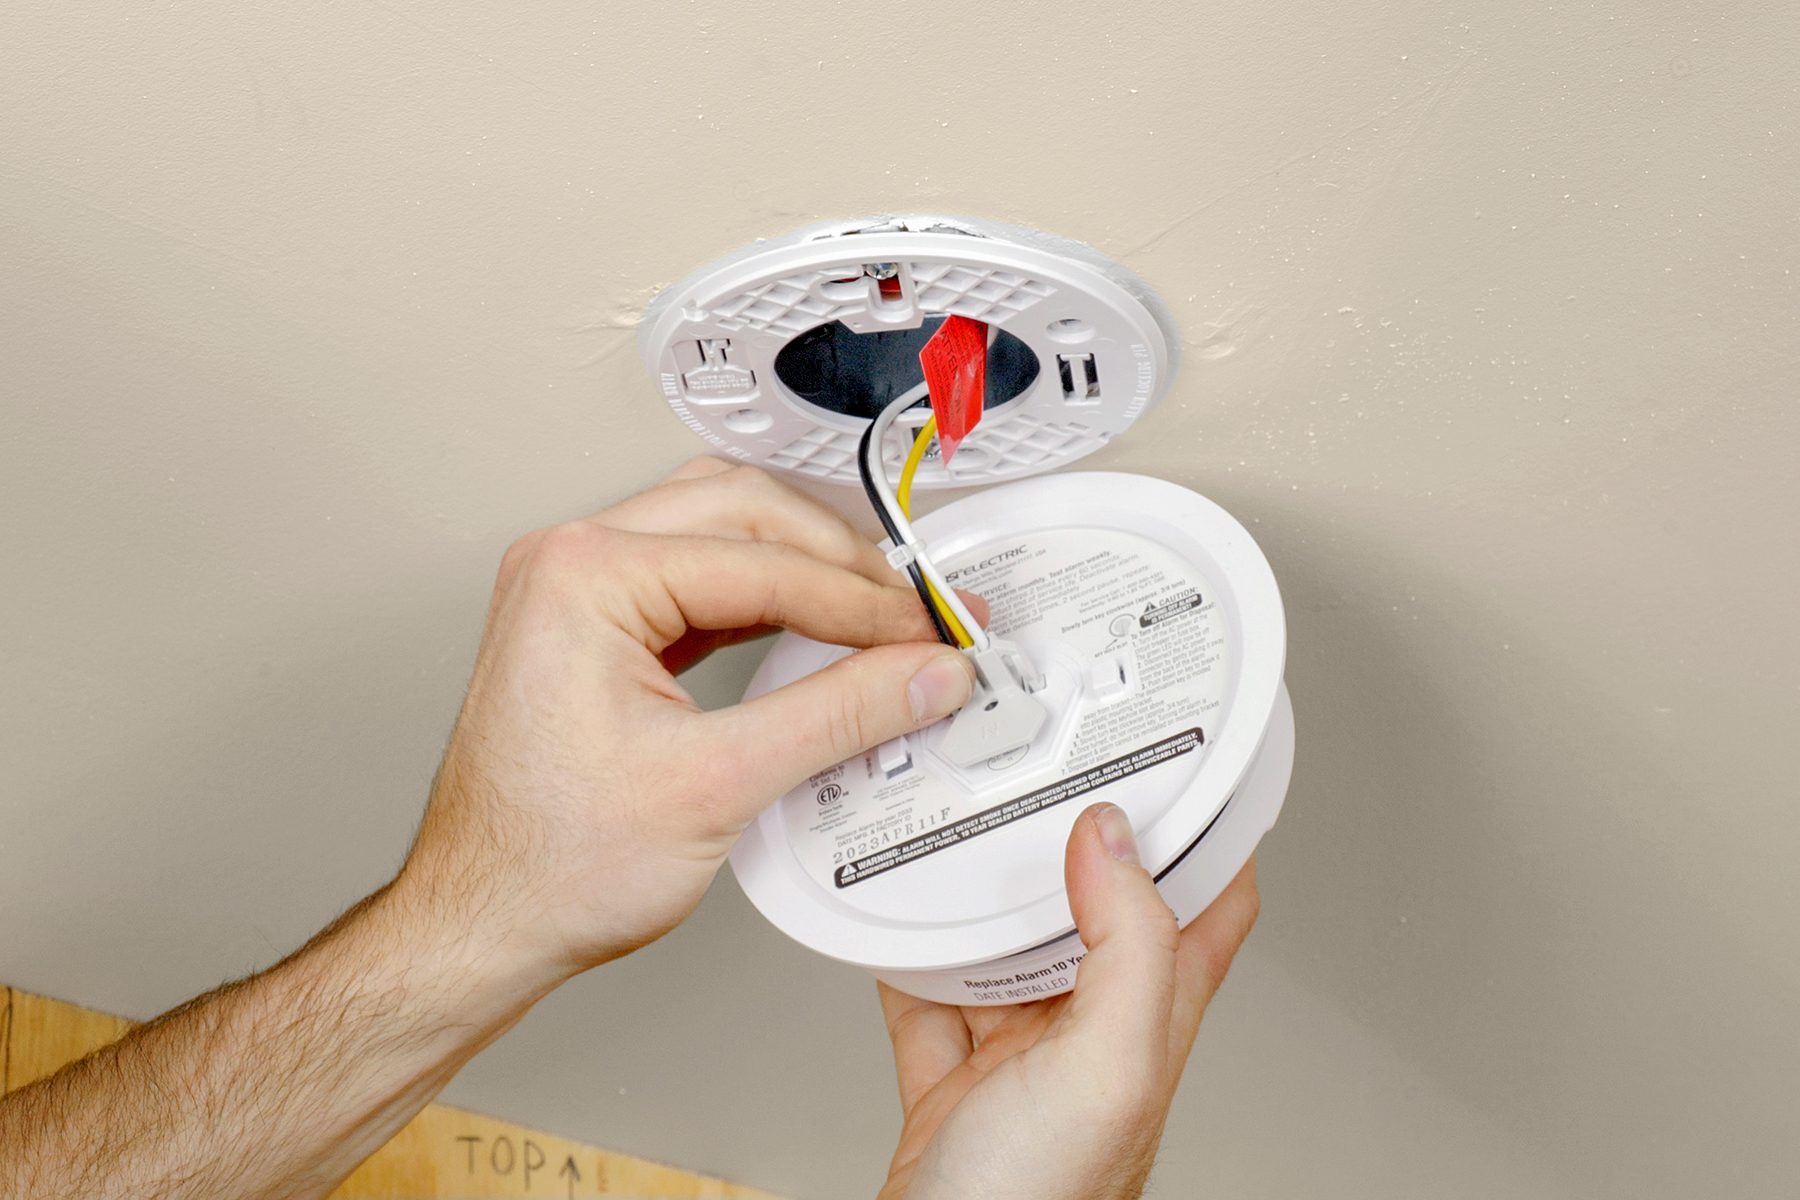
Credit: www.familyhandyman.com
Installing New Smoke Detectors
Installing new smoke detectors is a key step to keep your home safe. These devices alert you early if a fire starts. Proper installation ensures they work well and last long. Follow simple steps to mount and connect your new smoke detectors correctly.
Mounting The Detector
Choose a spot on the ceiling or high on a wall. Avoid corners or near windows and vents. Use the mounting bracket that comes with the detector. Mark the holes with a pencil. Drill holes carefully. Attach the bracket to the ceiling or wall using screws. Align the detector with the bracket and twist it to lock in place. Make sure it fits snugly and does not wobble.
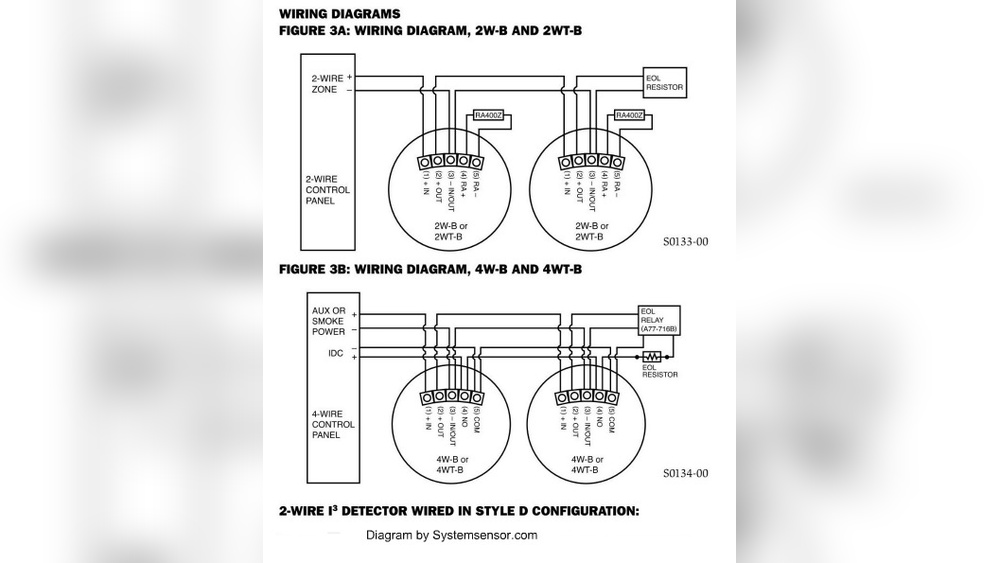
Connecting The Wires
Turn off the power at the circuit breaker. Remove the cover of the old detector if there is one. Identify the wires: usually black, white, and a red or orange wire for interconnection. Connect the black wire from the detector to the black house wire. Connect the white wire to the white house wire. Attach the red or orange wire to the matching wire in the house for interlinked alarms. Use wire nuts to secure connections tightly. Carefully tuck wires into the electrical box. Replace the detector on the mounting bracket. Turn on the power and test the detector by pressing the test button.
Interconnecting Multiple Units
Interconnecting multiple hardwired smoke detectors improves home safety. When one detector senses smoke, all units sound an alarm. This feature alerts everyone quickly, even in large or multi-story homes.
Proper wiring is essential for this system to work. Each detector must connect correctly to the others. This connection allows instant communication between units, increasing the chance to escape danger.
Linking Detectors
Start by turning off the power at the circuit breaker. Remove the detector cover to access wires. Locate the interconnect wire, usually a separate colored wire. Connect this wire to the matching terminal on the next detector. Use wire nuts to secure connections. Repeat this for all detectors in the network. Ensure all connections are tight and insulated to prevent shorts.
Testing Interconnectivity
Restore power to the circuit. Press the test button on one detector. Listen for alarms from all interconnected units. If all sound, wiring is correct. If not, double-check connections and wiring paths. Test regularly to ensure the system works properly. This simple step can save lives by providing early warning.
Restoring Power And Testing
After wiring your hardwired smoke detectors, restoring power and testing is the next crucial step. This process ensures the devices work correctly and keep your home safe. Follow the steps carefully to avoid any issues.
Turning Power Back On
Find your home’s main electrical panel. Look for the breaker that controls the smoke detector circuit. Flip the breaker switch to the ON position. This restores electricity to the detectors. Check that all detectors light up briefly. This shows they received power.
Conducting Function Tests
Press the test button on each smoke detector. Hold it for a few seconds until you hear a loud alarm. The sound confirms the detector works. Test every unit in your home. Replace batteries if the alarm sounds weak or fails. Regular testing keeps your smoke detectors reliable.
Troubleshooting Common Issues
Troubleshooting common issues helps keep your hardwired smoke detectors working well. Problems can stop the alarm from sounding or cause false alarms. Finding the cause quickly makes your home safer. Below are two common issues and how to fix them.
No Power Or Alarm
No power means the smoke detector won’t work. Check the circuit breaker first. It might be turned off or tripped. Make sure the detector is properly connected to the electrical wiring. Loose wires can cause power loss. Look at the backup battery inside the unit. Replace it if it is dead or missing. Test the alarm after fixing any power problems.
False Alarms
False alarms can be annoying and cause panic. Dust and dirt inside the detector often trigger false alarms. Clean the unit gently with a soft brush or vacuum. Avoid harsh chemicals that may damage the sensor. Steam from showers or cooking smoke can also cause false alarms. Install the detector away from kitchens and bathrooms. Check for insects or spider webs inside the detector. Remove any pests carefully to prevent false alarms.
:max_bytes(150000):strip_icc()/install-hardwired-smoke-detectors-1152329-08-7adda3e3f25b408ca859f1f792f626e3.jpg)
Credit: www.thespruce.com

Credit: www.researchgate.net
Frequently Asked Questions
How Do I Wire Hardwired Smoke Detectors Safely?
Turn off power before starting. Connect matching wires: black to black, white to white, and red to red. Use wire nuts and secure connections. Follow local electrical codes for safety.
Can I Connect Multiple Smoke Detectors Together?
Yes, you can interconnect several detectors. This ensures all alarms sound if one detects smoke. Use the red interconnect wire for linking devices.
What Tools Are Needed For Wiring Smoke Detectors?
You need a voltage tester, wire strippers, screwdriver, wire nuts, and electrical tape. These tools help ensure safe and proper installation.
How Do I Test Hardwired Smoke Detectors After Installation?
Restore power and press the test button on each detector. The alarm should sound. If not, check wiring and power supply.
Conclusion
Wiring hardwired smoke detectors keeps your home safer. Follow each step carefully for best results. Double-check connections before turning the power back on. Test each detector to make sure it works well. Regular checks help avoid unexpected problems later. Stay safe by installing detectors in every room.
Your effort helps protect your family and property. Simple wiring can make a big difference in emergencies. Safety starts with good preparation and attention to detail.