Are you tired of constantly opening the door for your furry friend? Imagine giving your pet the freedom to come and go as they please, without you lifting a finger.
Building a pet door is easier than you think, and it can save you time and frustration every day. In this guide, you’ll discover simple steps to create a pet door that fits your home and keeps your pet happy.
Ready to make your life—and your pet’s—more convenient? Let’s get started!

Credit: www.petdoors.com
Choosing The Right Pet Door
Choosing the right pet door makes a big difference for your pet’s comfort and safety. A good door fits your pet’s size and suits your home. It also helps your pet go outside easily and keeps your house secure.
Types Of Pet Doors
There are many pet doors to pick from. Manual doors need your pet to push or slide them open. Electronic doors use a sensor or collar to open only for your pet. Some doors fit on walls, others on doors or windows.
Measuring Your Pet
Measure your pet’s height and width carefully. Use the largest size to be sure they fit. Measure from the ground to the top of their shoulders. Also, check their body width at the widest part.
Material Options
Pet doors come in plastic, metal, or wood. Plastic doors are light and easy to clean. Metal doors are strong and last long. Wood doors look nice and match home decor but need care to avoid damage.

Credit: www.youtube.com
Gathering Tools And Materials
Starting a pet door project requires the right tools and materials. Gathering these before you begin helps the process go smoothly. It also saves time and keeps the work safe and neat.
Essential Tools
First, you need some basic tools. A drill with drill bits is important for making holes. A jigsaw helps cut the door opening. A screwdriver is needed for screws. Measuring tape measures the size of the pet door. A pencil marks the cutting lines. A level ensures the door is straight. Sandpaper smooths rough edges after cutting.
Required Materials
Next, gather the materials. Buy a pet door kit that fits your pet’s size. You will also need screws to attach the door. Use weatherstripping to seal gaps around the door. Some wood or plastic trim may be needed for finishing. Check the wall or door material where you install the pet door.
Safety Gear
Safety is very important. Wear safety goggles to protect your eyes from dust and debris. Use gloves to protect your hands while cutting and drilling. A dust mask prevents inhaling dust particles. Work in a well-ventilated area to avoid breathing in fumes or dust. Keep pets and children away during installation for safety.
Preparing The Installation Spot
Preparing the installation spot is the first step in making a pet door. It helps to ensure the door fits well and works properly. Proper preparation saves time and avoids mistakes during installation.
Careful planning and measuring make the process easier. Keep your pet’s size and habits in mind. The right spot will keep your pet safe and happy.
Selecting The Door Or Wall Location
Choose a spot that your pet can easily reach. The door should be at your pet’s shoulder height. Avoid places near sharp edges or heavy traffic.
Pick a location that is weather-protected. A sheltered spot helps keep your home warm. Also, the spot should not block your regular door or window.
Marking The Cut Area
Measure your pet’s size to mark the cut area correctly. Use a pencil to outline the shape of the pet door. Double-check the measurements before cutting.
Draw straight and clear lines. This makes the cutting process smooth and accurate. Take your time marking the area.
Checking For Obstructions
Look inside the wall or door for wires, pipes, or studs. These can block the cut or cause damage. Use a stud finder to check the area carefully.
Clear any obstacles before cutting. This step protects your home and ensures a clean installation. Safety is very important here.

Credit: www.instructables.com
Cutting The Opening
Cutting the opening for a pet door is a key step in the process. It needs careful measurement and the right tools. The opening must fit your pet door perfectly. Start by marking the area clearly on your door or wall. This helps guide your cutting for a clean and accurate hole.
Drilling Starter Holes
Drill starter holes at each corner of the marked area. Use a drill bit wide enough for your jigsaw blade. These holes allow the jigsaw blade to enter the cutting space easily. Keep the drill steady to avoid cracks or splinters in the door material. Clean out any debris after drilling.
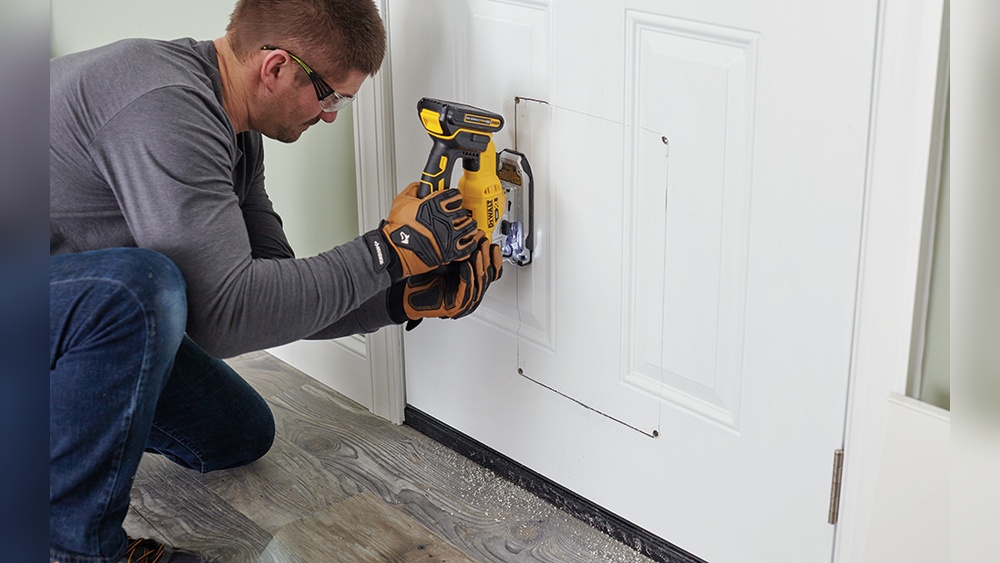
Using A Jigsaw For Cutting
Insert the jigsaw blade into one starter hole. Follow the marked lines slowly and carefully. Keep the saw steady and avoid forcing the blade. Move the jigsaw smoothly around corners for a neat cut. Take breaks to check your progress and adjust if needed.
Smoothing Edges
After cutting, the edges may be rough or sharp. Use sandpaper or a file to smooth all edges carefully. This makes the opening safe for your pet and prevents damage to the door frame. Wipe away dust and test the fit of your pet door. Smooth edges ensure a clean, professional look.
Installing The Pet Door Frame
Installing the pet door frame is a key step in creating a functional pet door. This step ensures the door fits well and works smoothly. Proper installation prevents drafts and keeps your home secure. Follow simple steps for a strong and safe frame setup.
Aligning The Frame
Place the pet door frame into the cut opening. Check that it sits evenly on all sides. Use a level to make sure the frame is straight. Adjust the frame until it is perfectly aligned. Proper alignment helps the door open and close easily.
Securing The Frame
Use screws to attach the frame firmly to the door or wall. Start by drilling pilot holes to avoid splitting the material. Tighten the screws evenly around the frame. Ensure the frame does not move or wiggle. A secure frame keeps your pet safe and prevents damage.
Sealing And Insulating
Apply weatherstripping or foam around the frame edges. This blocks cold air and moisture from coming inside. Use a sealant to fill any small gaps. Check the frame for tightness after sealing. Good insulation saves energy and keeps your home comfortable.
Testing And Adjusting The Door
Testing and adjusting the pet door is a key step. This ensures the door works well and your pet uses it easily. Take your time to check every part. Fix small problems before your pet starts using the door regularly.
Ensuring Proper Swing
Check the door swing carefully. It should open smoothly without sticking. The flap must close tightly to keep weather out. Adjust the hinges if the door hangs unevenly. Test by pushing the flap gently. It should swing back quickly and seal properly.
Training Your Pet
Show your pet the new door step by step. Use treats or toys to encourage them. Let the pet explore the door at their own pace. Praise every time they try to use it. Practice often so your pet feels comfortable and confident.
Maintenance Tips
Keep the pet door clean and free of dirt. Check the flap and frame regularly for damage. Tighten screws and fix loose parts quickly. Replace worn-out seals to keep the door airtight. Regular care helps the door last longer and work better.
Frequently Asked Questions
What Tools Do I Need To Make A Pet Door?
To make a pet door, you’ll need a jigsaw, drill, measuring tape, screwdriver, and sandpaper. Safety gear like gloves and goggles is essential. These tools help you measure, cut, and smooth the door area accurately for a perfect pet door installation.
How Do I Choose The Right Pet Door Size?
Measure your pet’s height and width at the shoulder. Choose a door slightly bigger for easy access. Proper sizing ensures your pet can enter and exit comfortably without injury or difficulty, improving usability and safety.
Can I Install A Pet Door On Any Door Type?
Yes, pet doors can be installed on most door types like wood, metal, or PVC. Each material may require specific tools or techniques. Always check manufacturer guidelines for compatibility and installation instructions to ensure a secure fit.
Is It Safe To Install A Pet Door Myself?
Yes, installing a pet door yourself is safe if you follow instructions carefully. Use proper tools and safety gear. Take precise measurements and cut slowly to avoid mistakes or injuries. DIY installation saves money and adds convenience.
Conclusion
Making a pet door can save time and give pets freedom. It does not need to be hard or costly. With basic tools and clear steps, anyone can do it. Choose the right size for your pet’s comfort and safety.
Seal the edges well to keep weather out. Your pet will enjoy easy access in and out. Try this simple project and see the difference it makes. A pet door adds convenience for both you and your furry friend.