Are you staring at that old towel rack on your wall, wondering how to get it down without making a mess? Removing a towel rack might seem tricky, but with the right steps, you can do it quickly and cleanly.
Imagine freeing up your wall space for a fresh new look or an upgrade—without damage or hassle. Keep reading, and you’ll learn simple, clear instructions that anyone can follow. This guide is designed to help you remove your towel rack safely and easily, so you can move on to your next home project with confidence.
Tools Needed
Removing a towel rack from the wall needs the right tools. These tools make the job easier and safer. Having them ready helps you finish the task quickly.
Each tool has a special role. Some help to loosen screws, others to protect the wall. Use the right tools to avoid damage.
Screwdriver
A screwdriver is essential. It loosens and removes screws holding the rack. Choose the right type: flathead or Phillips.
Drill
A drill speeds up screw removal. It works well for stuck or rusted screws. Use a drill with adjustable settings.
Putty Knife
A putty knife helps to gently pry the rack away from the wall. It avoids damaging paint or drywall.
Wall Anchors Remover
This tool removes wall anchors left behind. It clears holes for easy repair later. Use it carefully to protect the wall.
Safety Gloves
Wear safety gloves to protect your hands. They stop cuts and scrapes during removal. Always use gloves for safety.
Credit: www.reddit.com
Prepare The Area
Clear the space around the towel rack to avoid damage. Lay down a cloth or plastic sheet to catch dust and debris. Gather all tools needed before starting the removal.
Clear The Surrounding Space
Start by removing towels, clothes, and other items near the rack. This gives you room to work safely. Clear surfaces prevent accidents and keep your items clean.
Protect The Floor And Walls
Lay down a drop cloth or old sheet under the towel rack. It catches dust and small debris. Use painter’s tape around the rack to protect the wall from scratches.
Gather Necessary Tools
Collect tools like a screwdriver, putty knife, and a drill if needed. Having everything ready saves time and keeps the process smooth. Check if you need a ladder for high racks.
Turn Off Power Nearby
Switch off electricity if the towel rack is near an outlet or light. This prevents electric shock during removal. Safety first, always.
Locate Fasteners
Locating the fasteners is the first step in removing a towel rack from the wall. Fasteners hold the rack firmly in place. Knowing where they are helps you remove the rack without damage. Fasteners come in different types and can be hidden.
Finding these fasteners can save time and effort. It also prevents unnecessary wall damage. This section explains how to spot fasteners and prepare for removal.
Check For Visible Screws Or Caps
Look closely along the towel rack. Screws may be visible at the ends or under mounting brackets. Some racks have small plastic caps covering screws. Gently pry off caps with a flat tool to reveal screws.
Feel For Mounting Brackets Behind The Rack
Run your fingers along the rack’s base. Mounting brackets often hide fasteners. Press gently to detect raised or loose areas. These spots usually mark fastener locations.
Use A Flashlight For Better Visibility
Shine a flashlight at different angles on the rack. Shadows reveal hidden screws or anchors. This method works well in low light or on textured walls.
Identify The Type Of Fasteners Used
Fasteners may be screws, anchors, or nails. Screws need a screwdriver. Anchors require special tools to remove. Identifying the type helps pick the right tool for removal.

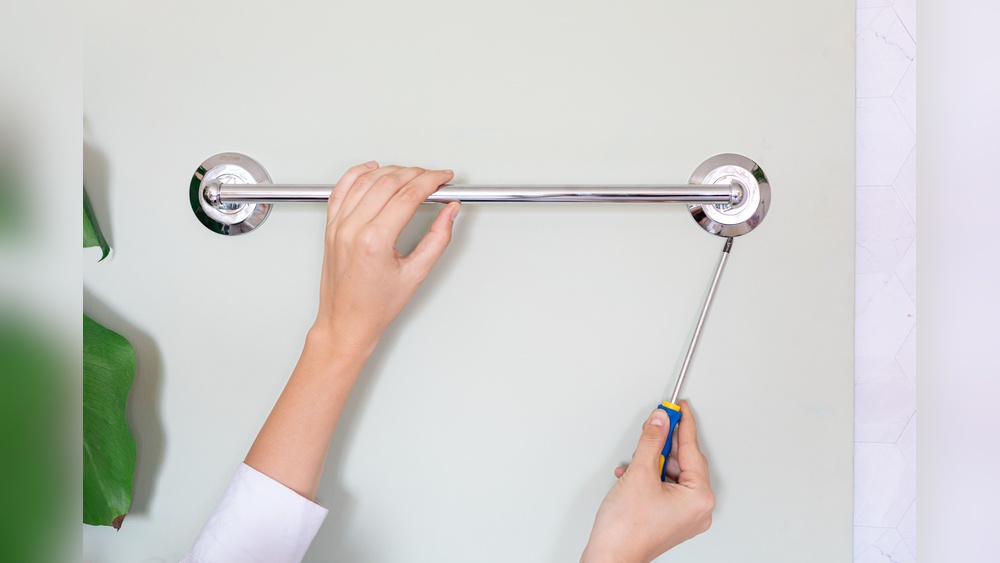
Credit: www.wikihow.com
Remove Screws And Anchors
Removing screws and anchors is the key step to take down a towel rack. This step frees the rack from the wall safely and cleanly. It also prevents damage to the wall surface. Use the right tools and move carefully to avoid any issues.
Start by locating all screws holding the towel rack. These screws usually sit on the mounting brackets. Some may hide under decorative covers. Remove these covers gently to expose the screws.
Gather The Right Tools
Use a screwdriver that fits the screw heads exactly. A loose fit can strip the screws. A drill with a screwdriver bit can speed up the process. A pair of pliers helps if screws are stuck.
Remove The Screws
Turn the screws counterclockwise to loosen them. Apply steady pressure to avoid slipping. Keep screws in a safe place for reuse or disposal. Sometimes screws are rusted or stuck. Use a little oil to loosen them if needed.
Take Out The Anchors
Anchors stay inside the wall after screws are removed. They keep the rack stable. Pull them out carefully with pliers. If they don’t come out, push them into the wall cavity. Avoid damaging drywall during this step.
Handle Wall Damage
Removing a towel rack can leave marks or holes on your wall. These small damages need fixing for a clean look. Handling wall damage properly helps keep your room neat. Follow simple steps to repair the wall after taking down the rack.
Fill Holes
Start by filling the holes left by screws or anchors. Use spackling paste or wall filler for small holes. Apply a small amount with a putty knife. Press the filler into the hole and smooth the surface. Let it dry completely before moving on.
Sand Surface
After the filler dries, sand the area gently. Use fine-grit sandpaper for a smooth finish. Sand until the patched area is level with the wall. Wipe away dust with a dry cloth. This step prepares the wall for painting.
Touch Up Paint
Match paint color to your wall for the best results. Use a small brush to apply paint over the patched spot. Apply thin layers and let each dry well. Blend the edges to avoid visible lines. Your wall will look like new in no time.
Prevent Future Damage
Removing a towel rack can leave marks or holes on your wall. Preventing damage helps keep your walls smooth and clean. Simple steps protect your wall’s surface and save time on repairs.
Use Proper Tools For Removal
Choose the right tools like a screwdriver or putty knife. Avoid using excessive force that can damage the wall. Gently loosen screws or brackets to reduce wall stress.
Fill Holes Immediately
Small holes from screws should be filled right away. Use spackling paste or wall filler for best results. Smooth the surface with a putty knife and let it dry fully.
Sand And Paint For A Clean Finish
After filling, lightly sand the area to smooth it out. Use fine-grit sandpaper for gentle sanding. Paint the spot to match the wall color and hide any repair marks.
Consider Wall Anchors For Heavy Items
For future installations, use wall anchors for better support. Anchors reduce stress on drywall and prevent cracks. Choose anchors suitable for the wall type and weight load.
:max_bytes(150000):strip_icc()/how-to-remove-towel-bar-5221017-02-25716e1d19134b538fd87e85c8acbfa0.jpg)
Credit: www.thespruce.com
Frequently Asked Questions
How Do I Safely Remove A Towel Rack From Drywall?
First, unscrew the mounting brackets using a screwdriver. Gently pull the rack away from the wall. Use a putty knife to remove any adhesive or caulk. Fill holes with spackle and sand smooth before repainting.
What Tools Are Needed To Remove A Towel Rack?
You will need a screwdriver, putty knife, spackle, sandpaper, and possibly a drill. These tools help safely detach the rack and repair the wall afterward.
How To Fix Holes After Removing A Towel Rack?
Apply spackle or wall filler to the holes using a putty knife. Let it dry completely, then sand the area smooth. Finally, repaint the wall to match the surrounding surface.
Can I Reuse The Towel Rack After Removal?
Yes, if the rack is undamaged, clean it thoroughly. Remove any old adhesive or screws. Store it safely for reinstalling or relocating elsewhere.
Conclusion
Removing a towel rack from the wall is simple with the right steps. Take your time and use the correct tools. Avoid damaging the wall by working carefully. Patch any holes left behind to keep the wall smooth. Cleaning the area after removal keeps your space neat.
This small project saves money and improves your bathroom. Try it yourself and enjoy a fresh look.