Are you tired of that old, wobbly towel rack ruining the look of your bathroom? Replacing it might seem tricky, but it’s easier than you think.
With just a few simple tools and clear steps, you can give your bathroom a fresh, clean upgrade. Imagine reaching for your towel on a sturdy, stylish rack that stays put every time. Keep reading, and you’ll discover exactly how to replace your towel rack quickly and confidently—no handyman needed.
Your bathroom makeover starts right here.

Credit: www.youtube.com
Tools And Materials Needed
Replacing a towel rack requires a few basic tools and materials. Having the right items makes the job easier and faster. Prepare everything before starting to avoid interruptions. This section lists what you need for a smooth towel rack replacement.
Essential Tools
Gather a drill with drill bits suitable for your wall type. Use a screwdriver, either manual or electric, to remove and attach screws. A level helps keep the rack straight on the wall. A measuring tape ensures correct placement and spacing. A pencil marks the spots where you will drill. Wall anchors and screws hold the rack firmly. A stud finder locates the studs inside the wall. Safety glasses protect your eyes during drilling.
Choosing The Right Towel Rack
Select a towel rack that fits your bathroom size and style. Measure the space available to pick the correct length. Choose materials resistant to moisture, like stainless steel or aluminum. Consider racks with enough bars or hooks for your needs. Match the rack’s finish with other bathroom fixtures. Easy installation designs save time and effort. Pick a sturdy model that holds wet towels without bending.
Credit: www.drivenbydecor.com
Preparing The Workspace
Preparing the workspace is a key step before replacing a towel rack. It helps you work safely and efficiently. A clean and organized area makes the task easier. You can focus better without distractions or mess.
Clearing The Area
Start by removing towels and other items near the rack. Clear shelves or counters around the workspace. Move any furniture that may block your access. This creates space to work freely and prevents accidents. A tidy area helps you keep track of tools and parts.
Safety Precautions
Wear safety goggles to protect your eyes from dust and debris. Use gloves to prevent cuts or scrapes. Turn off water supply if the rack is near plumbing. Keep a first aid kit nearby in case of minor injuries. Work slowly and carefully to avoid mistakes or accidents.
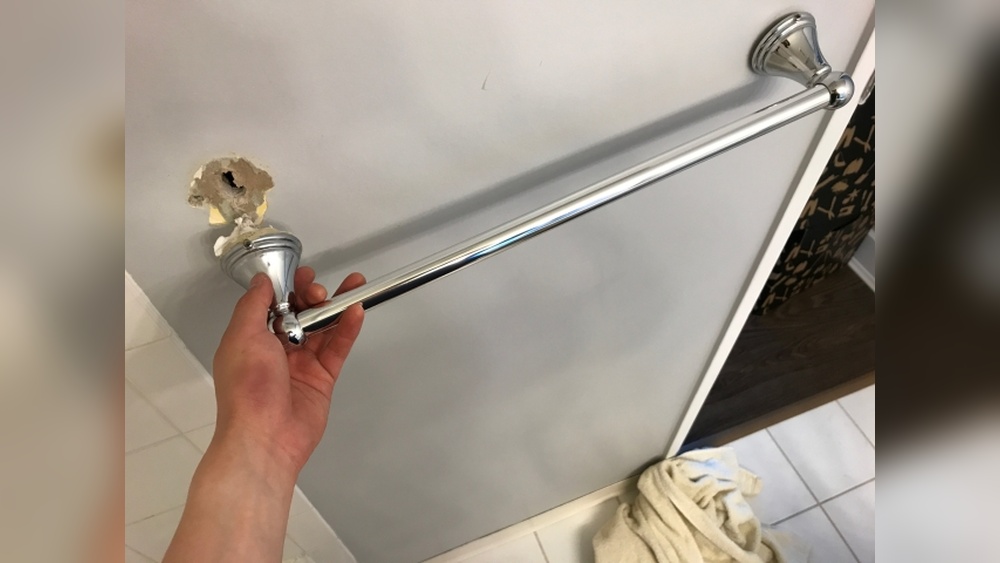
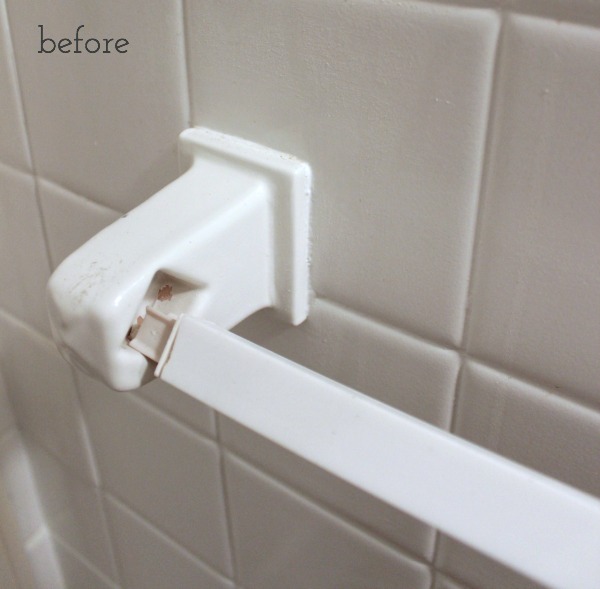
Removing The Old Towel Rack
Removing the old towel rack is the first step in updating your bathroom. It clears the wall and prepares the space for the new rack. This process is simple and requires only a few tools. Follow these steps carefully to avoid damage to your wall.
Start by locating the mounting hardware. This will help you understand how the rack is fixed to the wall. After that, unscrew and take down the rack gently. Keep the screws safe if you plan to reuse them.
Locating Mounting Hardware
Look closely at the towel rack. You will see small covers or caps hiding the screws. These covers keep the screws out of sight. Use a flat tool or your fingernail to pry off these caps. Sometimes the screws are visible without covers.
Check both ends of the rack and the middle if needed. The screws hold the rack firmly to the wall. Identifying all screws is important before unscrewing. This prevents damage to the wall or rack.
Unscrewing And Taking Down
Use a screwdriver that fits the screws well. Turn the screws counterclockwise to loosen them. Remove each screw completely and keep them in a safe place. Hold the rack with one hand while unscrewing to stop it from falling.
After removing all screws, gently pull the rack away from the wall. If it feels stuck, wiggle it slightly to loosen. Avoid using force that could damage the wall. Clean the wall area to remove any dirt or leftover adhesive.

Credit: www.youtube.com
Inspecting The Wall Condition
Inspecting the wall condition is a vital step before replacing a towel rack. The wall must be strong enough to hold the new rack securely. Any damage or weakness can cause the rack to fall or become loose over time. Taking time to check the wall helps avoid future problems and extra repairs.
Checking For Damage
Look closely at the wall around the towel rack. Search for signs of water damage, mold, or soft spots. Tap the wall gently and listen for hollow sounds, which may mean the drywall is weak. Also, check if the paint or wallpaper is peeling. These signs show the wall might need repair before installing the new rack.
Repairing Holes Or Cracks
Small holes and cracks can weaken the wall’s strength. Use spackle or wall filler to fill these areas. Apply the filler smoothly and let it dry completely. Sand the surface to make it even with the wall. This creates a solid base for the new towel rack and ensures it stays in place without damage.
Installing The New Towel Rack
Installing the new towel rack is the key step in your bathroom update. This process needs accuracy to ensure the rack stays strong and looks good. Follow each step carefully to get the best results.
Marking Drill Points
Hold the towel rack against the wall at the desired height. Use a pencil to mark the holes where screws will go. Make sure the rack is level by using a spirit level. Double-check the marks before drilling.
Drilling And Anchoring
Choose a drill bit that matches the wall anchors. Drill holes where you marked the spots. Insert the anchors firmly into the holes. Anchors help hold the screws tightly in place on drywall or tile.
Mounting The Rack
Align the towel rack holes with the anchors in the wall. Insert screws through the rack and tighten them using a screwdriver. Check that the rack is secure and does not wobble. Your towel rack is now ready for use.
Testing And Final Touches
After installing your new towel rack, testing and final touches are important. This step ensures the rack is safe and looks neat. Small checks now save problems later. Take your time to make sure everything is perfect.
Ensuring Stability
First, test the towel rack’s strength. Gently pull on it from different angles. It should not wobble or feel loose. Tighten screws if needed. Use a level to check if it is straight. A stable rack holds towels securely and lasts longer.
Cleaning Up
Remove dust and debris around the installation area. Wipe the rack with a soft cloth to remove fingerprints. Clean the wall surface to keep it looking fresh. Dispose of old hardware and packaging properly. A tidy space makes your bathroom look neat and welcoming.
Frequently Asked Questions
How Do I Remove An Old Towel Rack Safely?
To remove an old towel rack, first locate and unscrew all mounting screws. Use a screwdriver and gently pull the rack away from the wall. Be careful to avoid damaging drywall or tiles. Patch any holes before installing the new rack.
What Tools Are Needed To Replace A Towel Rack?
You’ll need a screwdriver, drill, wall anchors, measuring tape, level, and pencil. These tools help remove the old rack and install the new one securely. Using the right tools ensures a stable and professional finish.
How Do I Choose The Right Towel Rack Size?
Measure the space where the towel rack will go. Choose a rack size that fits comfortably without crowding. Consider the number of towels you want to hang. Proper sizing improves both function and bathroom aesthetics.
Can I Install A Towel Rack On Tile Walls?
Yes, but use a drill with a masonry bit to avoid cracking tiles. Insert wall anchors designed for tile walls for strong support. Take care to drill slowly and precisely to protect the tile surface.
Conclusion
Replacing a towel rack can be simple and quick. Follow the steps carefully and take your time. Use the right tools and measure twice before drilling. A new towel rack improves your bathroom’s look and function. You can do this yourself with some patience and care.
Enjoy your updated space and the satisfaction of a job well done. Simple projects like this build confidence for future home tasks. Give it a try and see the difference it makes.