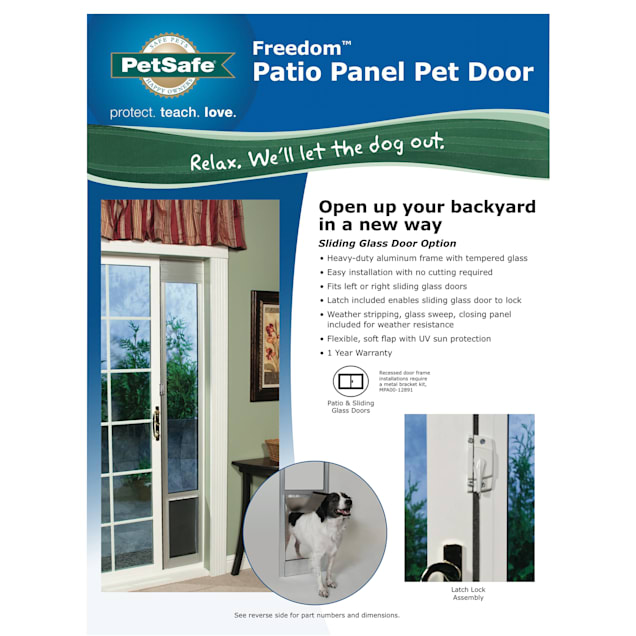
If you want to give your pet easy access to the outdoors without leaving your patio door open, installing a Freedom Patio Panel Pet Door is a smart choice. But how do you get started?
You might be wondering if it’s too complicated or if you’ll need special tools. Don’t worry—this guide breaks down every step in a simple, clear way. By the end, you’ll have your pet door installed smoothly, saving you time and giving your furry friend the freedom they deserve.
Ready to make your life easier and your pet happier? Let’s dive in.
Tools And Materials Needed
Gathering the right tools and materials makes installing the Freedom Patio Panel Pet Door easier. Having everything ready saves time and avoids frustration. This section lists the essential items for a smooth installation.
Tools Needed
- Measuring tape – to measure the patio panel accurately
- Marker or pencil – to mark cut lines
- Power drill – to create holes for screws
- Jigsaw or handsaw – to cut the patio panel
- Screwdriver – to tighten screws securely
- Level – to ensure the pet door is straight
- Safety glasses – to protect your eyes while cutting
- Work gloves – to protect your hands during installation
Materials Needed
- Freedom Patio Panel Pet Door kit
- Mounting screws (usually included in the kit)
- Weather stripping (optional for better sealing)
- Silicone sealant (optional to prevent leaks)

Credit: www.liftingitalia.com
Choosing The Right Location
Choosing the right location for your Freedom Patio Panel Pet Door is essential. It makes sure your pet uses the door easily and safely. The location also affects the door’s performance and your patio’s look.
Think about where your pet spends most time outside. A spot that is clear and easy to reach works best. Avoid places near busy roads or sharp objects.
Measure Your Pet
Measure your pet’s height and width carefully. The pet door should be big enough for your pet to pass through comfortably. Check your pet’s size while standing and sitting. Add a few inches to these measurements for easy movement.
Check Patio Door Compatibility
Not all patio doors fit the Freedom Patio Panel Pet Door. Check the door’s thickness and type before buying. Make sure the pet door kit matches your patio door model. Confirm the panel can be removed and replaced easily. This avoids damage and keeps your door secure.
Prepare The Patio Door
Preparing the patio door is the first step to install the Freedom Patio Panel Pet Door. This step ensures the door is ready for the new pet door panel. Proper preparation helps the installation go smoothly and keeps the door in good condition.
Cleaning the surface and marking the cutout area are key tasks. These tasks help avoid mistakes and make sure the pet door fits perfectly. Take your time and work carefully to get the best results.
Clean The Surface
Start by cleaning the patio door surface. Use a mild soap and water solution. Wipe the area with a soft cloth to remove dirt and dust. A clean surface helps the pet door stick well and prevents damage. Dry the surface completely before the next step.
Mark The Cutout Area
Next, mark the exact spot for the pet door cutout. Use the template that comes with the product. Hold it steady against the patio door panel. Trace the outline with a pencil or marker. Double-check the measurements to avoid errors. Clear and accurate markings make cutting easier and more precise.
Cutting The Patio Door
Cutting the patio door is an important step when installing the Freedom Patio Panel Pet Door. It requires careful measurement and precise cutting to create a perfect fit for the pet door. This part of the process demands attention and the right tools to avoid damage to the door.
Preparing the door for cutting ensures the pet door will function smoothly. Taking the right steps helps maintain the door’s strength and appearance. Safety must be a priority during this task.
Safety Precautions
Wear safety goggles to protect your eyes from dust and debris. Use gloves to avoid cuts from sharp tools or door edges. Work in a well-lit area to see clearly. Keep children and pets away from the workspace. Secure the patio door firmly to stop it from moving while cutting.
Cutting Techniques
Mark the cutting area clearly with a pencil or tape. Use a measuring tape to ensure accuracy. Start cutting slowly along the marked lines. Use a jigsaw or circular saw for smooth cuts. Follow the manufacturer’s instructions for the pet door size. Check the cut edges for splinters and sand them smooth. Test fit the pet door before final installation.
Installing The Pet Door Frame
Installing the pet door frame is a key step in fitting the Freedom Patio Panel Pet Door. It sets the base for the flap and ensures a snug fit. A proper frame installation keeps the door stable and secure. This part requires careful alignment and firm attachment to the patio panel. Follow the steps below for a smooth installation.
Aligning The Frame
Place the pet door frame over the cut-out in the patio panel. Make sure the frame fits evenly on all sides. Check the top and bottom edges for a straight fit. Adjust the frame until it sits flush against the panel. Proper alignment prevents air leaks and keeps the door steady. Use a level tool to confirm the frame is straight.
Securing With Screws
Once aligned, secure the frame using the provided screws. Start by inserting screws into the top corners. Tighten them gently to hold the frame in place. Next, add screws along the sides and bottom. Avoid over-tightening to prevent cracking the panel. Check that the frame remains flush as you tighten. This step locks the frame firmly for long-lasting use.
Attach The Flap And Seal
Attaching the flap and sealing it properly is an important step in installing your Freedom Patio Panel Pet Door. This part keeps your home insulated and prevents drafts. It also makes sure your pet can use the door easily and safely. Follow these simple steps to install the flap and apply weather stripping for a tight seal.
Install The Flap
Start by aligning the flap with the pet door frame. Make sure it fits snugly and swings freely. Use the screws provided to secure the flap to the frame. Tighten the screws just enough to hold the flap firmly. Avoid over-tightening to keep the flap flexible. Test the flap by pushing it gently to check for smooth movement. Adjust if needed for easy pet access.
Apply Weather Stripping
Weather stripping helps block air and moisture from entering your home. Measure the edges of the pet door frame carefully. Cut the weather stripping to fit these edges perfectly. Peel off the backing and press the weather stripping firmly onto the frame. Check all sides to ensure no gaps remain. This step improves energy efficiency and keeps your home comfortable.
Test The Pet Door
Testing the Freedom Patio Panel Pet Door is a crucial step after installation. It ensures the door works properly and your pet can use it safely. A smooth operation helps avoid damage to the door or injury to your pet. Plus, training your pet to use the door makes the transition easy and stress-free.
Check For Smooth Operation
Open and close the pet door several times. The door should move easily without sticking or resistance. Listen for any unusual sounds like squeaks or jams. Make sure the flap closes completely to keep weather out. Check that the locking mechanism works properly. Smooth operation means the door is ready for your pet’s use.
Train Your Pet
Show your pet how to use the door. Use treats or toys to encourage them to go through it. Practice several times in a calm, quiet area. Be patient and praise your pet for trying. Repeat training daily until your pet is comfortable. Training helps your pet feel safe and confident using the new door.
Credit: kdfoundation.org
Maintenance Tips
Proper maintenance keeps your Freedom Patio Panel Pet Door working well. It helps the door last longer and stay safe for your pet. Simple care steps prevent problems and save you time and money later.
Regular Cleaning
Clean the pet door often to remove dirt and dust. Use a soft cloth and mild soap with water. Wipe the flap and frame gently. Avoid harsh chemicals that can damage the materials. Dry the door well to stop rust or mold. Clean both sides of the door for smooth opening and closing.
Inspect For Wear And Tear
Check the pet door regularly for signs of damage. Look for cracks, loose parts, or worn seals. Make sure the flap moves freely without sticking. Replace any broken or worn parts quickly. Tighten screws and bolts to keep the door secure. Early fixing prevents bigger problems and keeps pets safe.

Credit: www.radiofence.com
Frequently Asked Questions
How Do I Prepare My Patio Door For Installation?
Start by measuring your patio door’s dimensions accurately. Clear the area and remove any obstacles. Clean the glass surface thoroughly to ensure proper adhesion and fit of the Freedom Patio Panel Pet Door.
What Tools Are Needed To Install The Pet Door?
You will need a screwdriver, drill, measuring tape, pencil, and a level. These tools help ensure precise fitting and secure installation of the pet door panel.
How Long Does Installing The Freedom Patio Panel Take?
Installation usually takes about 1 to 2 hours. This varies depending on experience and door type. Following instructions carefully speeds up the process.
Is The Freedom Patio Panel Pet Door Secure?
Yes, it includes a locking mechanism to keep your home safe. It is designed to prevent unwanted entry while allowing your pet easy access.
Conclusion
Installing the Freedom Patio Panel Pet Door is simple and quick. Follow each step carefully for the best fit. Your pet will enjoy easy outdoor access in no time. The door saves energy by sealing well. Enjoy the convenience and comfort it brings to your home.
This small upgrade makes a big difference for pet owners. Take your time, and your pet door will work perfectly. Ready for a pet-friendly home?