Looking to boost your home security with a Ring Video Doorbell Pro? You’re in the right place.
Installing this smart device might seem tricky, but with the right steps, you’ll have it up and running in no time. Imagine knowing exactly who’s at your door, even when you’re not home. That peace of mind is just a few simple moves away.
Keep reading, and you’ll learn exactly how to install your Ring Video Doorbell Pro quickly and easily.
Prepare For Installation
Preparing for the installation of your Ring Video Doorbell Pro is essential for a smooth setup. This step ensures that you have everything needed and avoid delays. Taking time to prepare makes the process faster and easier.
Check Compatibility
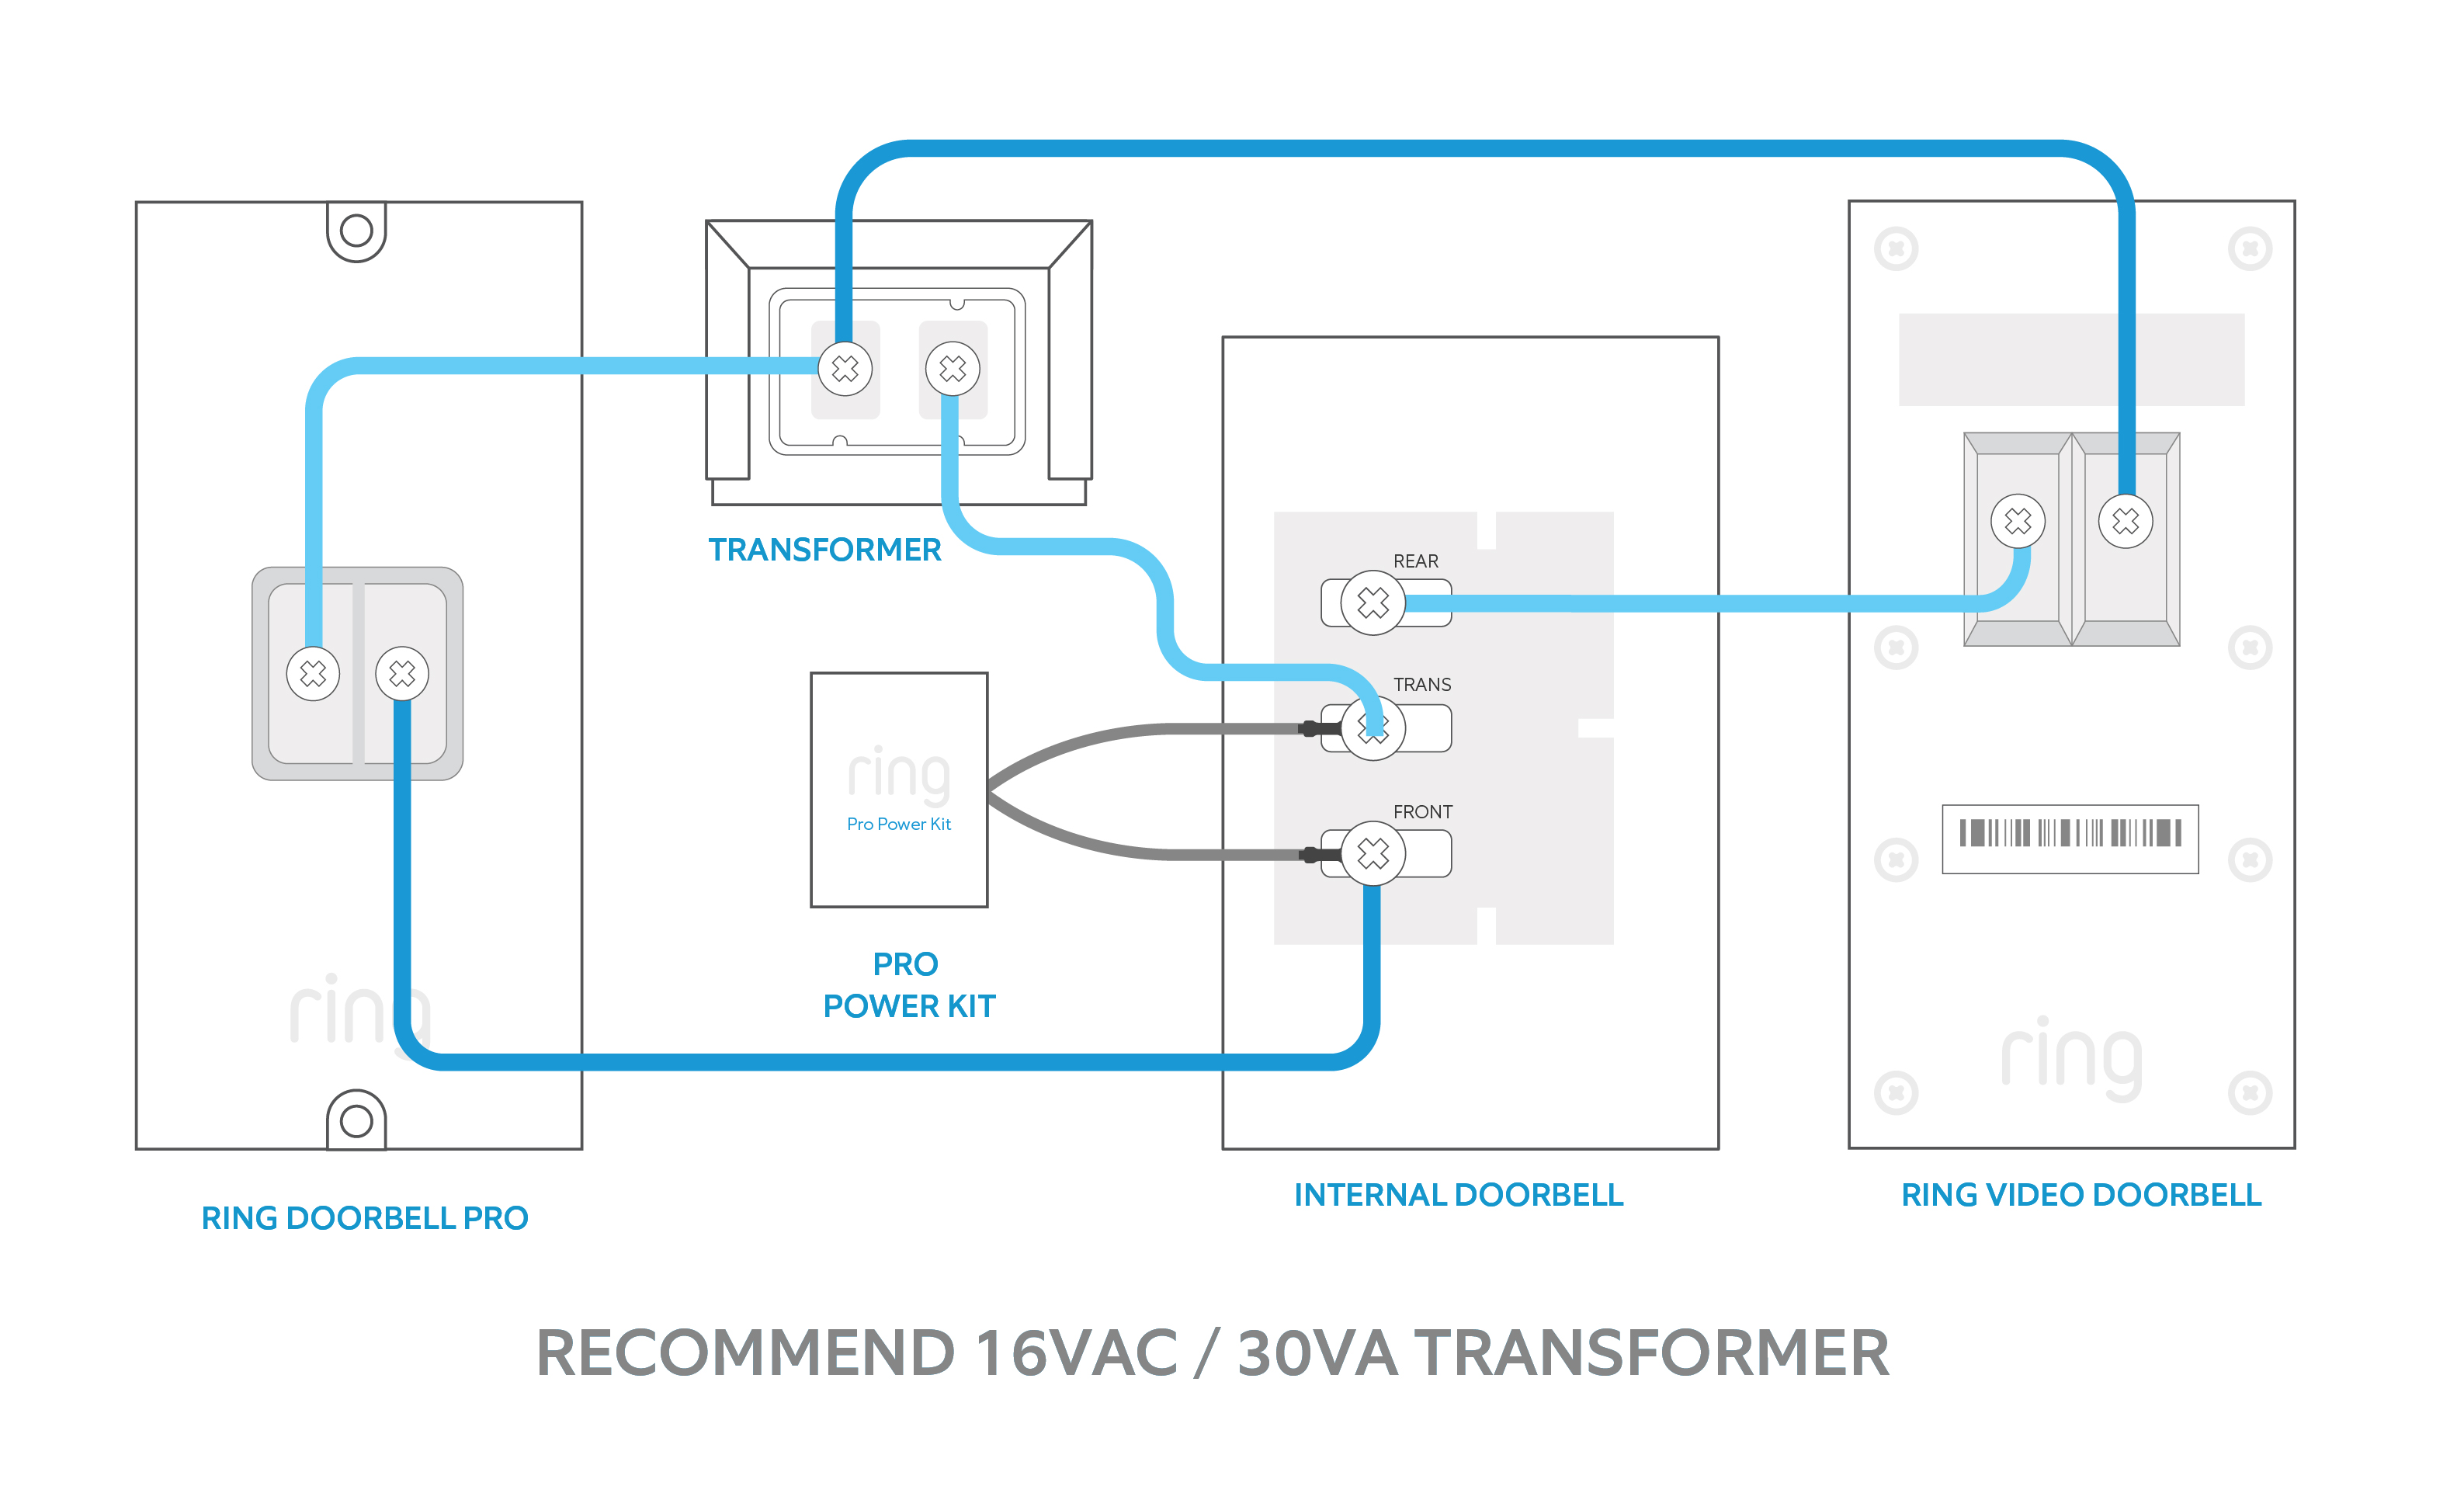
Start by confirming your doorbell’s compatibility with your home system. The Ring Video Doorbell Pro works best with existing doorbell wiring of 16 to 24 volts AC. Check your doorbell chime and transformer to match these requirements. Also, ensure your Wi-Fi signal is strong near your door. Compatibility ensures the doorbell functions correctly and stays connected.
Gather Necessary Tools
Collect all tools before you begin. You will need a drill, screwdriver, wire stripper, and a level. Have the screws and anchors that come with the doorbell ready. Keeping tools handy saves time during installation. It also helps avoid interruptions and frustration.
Charge The Doorbell
Charge the Ring Video Doorbell Pro battery fully before installation. A full charge prevents power issues during setup. Use the included USB cable and plug it into a power source. Wait until the indicator light shows a full charge. This step ensures your doorbell works smoothly from the start.
Turn Off Power
Turning off the power is a critical step before installing your Ring Video Doorbell Pro. It keeps you safe from electric shocks. It also protects your device from damage. Always take time to ensure the power is completely off.
Locate Circuit Breaker
First, find your home’s circuit breaker panel. It is often in the basement, garage, or utility room. Open the panel door carefully. Look for the breaker labeled for your front door or porch light. If the labels are unclear, switch off the main breaker to cut all power.
Ensure Power Is Off
After switching off the breaker, test the power at your doorbell location. Use a voltage tester or try pressing the doorbell button. No sound or light means the power is off. Double-check to avoid accidents during installation. Safety must come first.
Remove Existing Doorbell
Before installing the Ring Video Doorbell Pro, start by removing your old doorbell. This step clears the space and prepares the wiring for the new device.
Handle the existing doorbell carefully to avoid damaging the wires. Turn off power at the breaker for safety.
Unscrew Old Doorbell
Use a screwdriver to remove the screws holding your old doorbell. Keep the screws in a safe place in case you need them later.
Gently pull the doorbell away from the wall to expose the wires behind it.
Disconnect Wires
Locate the wires connected to your doorbell. These usually come from your home’s electrical system.
Loosen the screws or clips holding the wires in place. Carefully disconnect each wire from the old doorbell.
Make sure the wires do not touch each other to prevent a short circuit. Tuck them safely into the wall or use wire nuts.
Install Mounting Bracket
Installing the mounting bracket is the key step to secure your Ring Video Doorbell Pro. This bracket holds the doorbell firmly on your wall. Follow each step carefully for a strong and stable setup.
Mark Screw Holes
Hold the mounting bracket against your chosen wall spot. Use a pencil to mark the screw holes clearly. Check the marks twice to ensure the bracket will be level. Proper marking saves you from mistakes later.
Drill Holes
Use a drill with the right drill bit size for the wall type. Drill holes exactly where you marked. Clean out any dust or debris from the holes. This helps the screws fit tightly and hold better.
Attach Bracket
Place the mounting bracket over the drilled holes. Insert screws and tighten them firmly with a screwdriver. Avoid over-tightening to prevent damage to the bracket or wall. The bracket should feel solid and not move.
Connect Doorbell Wires
Connecting the doorbell wires is an important step in installing your Ring Video Doorbell Pro. This step powers the device and allows it to work properly. You need to handle the wires carefully to ensure a secure and safe connection.
Follow simple steps to attach the wires and make sure they stay connected. A good connection prevents interruptions and keeps your doorbell running smoothly.
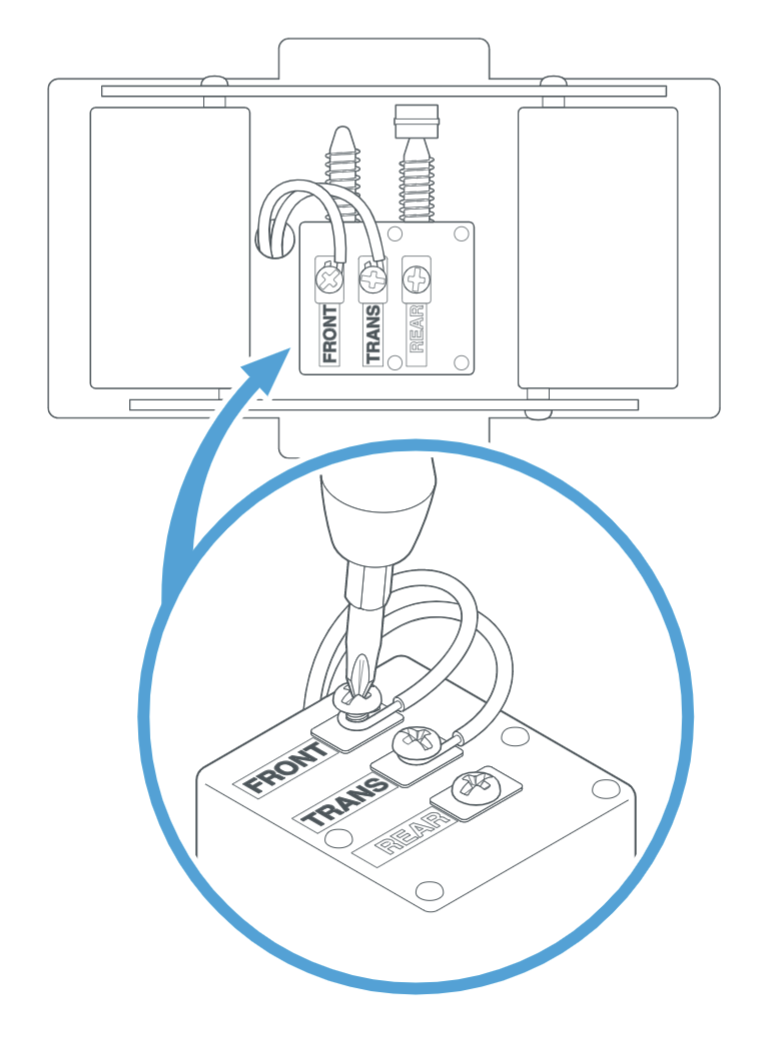
Attach Wires To Terminals
Start by identifying the two wires from your existing doorbell system. Usually, they are thin copper or coated wires. Loosen the screws on the terminal plate of the Ring Doorbell Pro. Wrap each wire around a terminal screw. Tighten the screws to hold the wires firmly in place. Make sure the wires do not touch each other or other metal parts.
Secure Wire Nuts
Use wire nuts to protect and secure the wire connections. Twist the wire nuts onto the ends of the wires tightly. This prevents the wires from coming loose or shorting out. Check that the wire nuts hold the wires firmly without any exposed copper. Proper use of wire nuts keeps the connection safe and reliable.
Credit: vicentetorns.com
Attach Doorbell To Bracket
Attaching the Ring Video Doorbell Pro to the bracket is a simple step. This part holds the doorbell firmly on your wall. Proper attachment ensures your doorbell stays safe and works well.
Follow these steps carefully to fix the doorbell correctly. It fits securely on the bracket, ready for use.
Align And Snap Into Place
Start by holding the doorbell close to the bracket. Line up the bottom edge of the doorbell with the bracket’s bottom. Make sure the pins on the back match the holes on the bracket. Gently press the doorbell onto the bracket. You will feel it click when it snaps into place. This click means the doorbell is attached correctly and will not fall off.
Secure With Screws
Next, take the small screws included in the box. Use a screwdriver to tighten each screw into the holes on the bracket. Screws keep the doorbell steady and safe from theft. Tighten them just enough so the doorbell does not wiggle. Avoid over-tightening to prevent damage. Check that the doorbell is firmly fixed and ready to use.
Restore Power And Test
Restoring power to your Ring Video Doorbell Pro is a key step after installation. It ensures your doorbell works correctly and stays connected. Testing the device confirms it is ready to keep your home safe.
Turn On Circuit Breaker
Locate the circuit breaker that controls your doorbell’s power. Flip the switch back to the “on” position. This action restores electricity to the doorbell wiring. Be sure the breaker is fully engaged for proper power flow.
Check Doorbell Functionality
Press the doorbell button to test its response. Watch for the chime sound inside your house. Open the Ring app to check the video feed and notifications. Confirm the doorbell camera and microphone work clearly. This step ensures your system is fully operational.

Credit: www.youtube.com
Set Up Ring App
Setting up the Ring app is the first step to use your Ring Video Doorbell Pro. The app helps you control and monitor your doorbell from anywhere. It lets you see visitors, get alerts, and customize settings quickly.
Follow these simple steps to get the app ready for your doorbell. The process is easy and takes just a few minutes.
Download And Install App
Find the Ring app in your device’s app store. It is available for both Android and iOS devices. Tap “Download” or “Install” to add the app to your phone or tablet. Wait for the download to finish before opening the app.
Create Or Log Into Account
Open the Ring app after installation. You must create a new account if you do not have one. Use your email and choose a strong password. If you already have an account, simply log in using your details. This account connects your doorbell and app securely.
Connect Doorbell To Wi-fi
Power on your Ring Video Doorbell Pro. Follow the app’s instructions to connect to your home Wi-Fi network. Select your Wi-Fi from the list and enter the password. A stable Wi-Fi connection is important for smooth video and alerts. Wait for the app to confirm the connection before moving on.
Customize Settings
After installing your Ring Video Doorbell Pro, customizing the settings helps make it work best for you. Adjusting features allows you to control how the device senses movement and sends alerts. Fine-tuning these options improves your home security and reduces unnecessary notifications.
Adjust Motion Zones
Set specific areas where the doorbell detects motion. This stops alerts from cars or passersby far from your door. Use the app to draw or select zones on the screen. Focus on areas close to your entrance for better security. This helps you get alerts only for important activity.
Set Notification Preferences
Choose how and when you receive alerts on your phone. Turn on notifications for motion or when someone presses the doorbell. You can also set quiet hours to avoid alerts at night. Custom notifications let you stay informed without constant interruptions.
Enable Video Recording
Activate video recording to save clips of visitors or events. Recordings help review any unusual activity around your home. You can set how long videos are stored in the cloud. This option gives you peace of mind and evidence if needed.
Credit: vicentetorns.com
Troubleshooting Tips
Troubleshooting your Ring Video Doorbell Pro installation can save time and hassle. Problems may appear during setup or after use. Knowing simple fixes helps keep your doorbell working well. This section covers key issues and easy solutions.
Common Installation Issues
Incorrect mounting causes most problems. Check the doorbell is level and secure. Use the included screws and tools. Loose wires can stop the doorbell from working. Make sure wires connect tightly to terminals. Avoid placing the doorbell in direct sunlight or heavy rain.
Wi-fi Connection Problems
Weak Wi-Fi signals disrupt video and alerts. Place your router closer to the doorbell for better signal. Use a Wi-Fi extender if needed. Restart your router and doorbell to refresh connections. Confirm your network password is correct. The doorbell supports 2.4 GHz networks; avoid 5 GHz.
Power Supply Concerns
The Ring Video Doorbell Pro needs a stable power source. Check your doorbell transformer matches Ring’s power requirements. Inspect wiring for damage or loose connections. A low battery or power surge can cause failures. If the doorbell shuts off, test your home’s voltage. Replace faulty parts promptly for smooth operation.
Frequently Asked Questions
How Do I Install Ring Video Doorbell Pro?
First, turn off power at the breaker. Remove your old doorbell, mount the Ring Pro with the provided bracket. Connect the wires, restore power, and follow the app instructions to complete setup.
What Tools Are Needed For Installation?
You will need a screwdriver, drill, level, and wire stripper. Also have the mounting bracket and screws from the box ready for use.
Can I Install Ring Video Doorbell Pro Myself?
Yes, it is designed for DIY installation. Just follow the step-by-step instructions in the manual and app for a smooth setup.
How Do I Connect Ring Doorbell Pro To Wi-fi?
During setup, the app will prompt you to select your Wi-Fi network. Enter your password, and the doorbell will connect automatically.
Conclusion
Installing the Ring Video Doorbell Pro is simple and quick. Follow the steps carefully for the best results. Make sure your Wi-Fi works well and the power is off before starting. Test the device after installation to confirm it works properly.
Enjoy the extra security and convenience it brings to your home. Stay safe and connected with this smart doorbell.