You want to keep your home safe and see who’s at your door anytime, anywhere. Installing a Ring Video Doorbell 2 is a simple way to do just that.
Imagine getting instant alerts on your phone the moment someone rings your doorbell or approaches your porch. This guide will walk you through each step, making the setup easy—even if you’re not tech-savvy. By the end, you’ll have your Ring Video Doorbell 2 ready to protect your home and give you peace of mind.
Let’s get started!
Tools And Materials Needed
Before installing your Ring Video Doorbell 2, gather the right tools and materials. This step ensures a smooth and quick installation. Having everything ready helps avoid interruptions and frustration.
Ring Video Doorbell 2 Components
The package includes the video doorbell, mounting bracket, and screws. You will also find a drill bit, security screws, and a screwdriver bit. A quick start guide is included for easy reference.
Essential Installation Tools
You need a power drill or screwdriver for mounting. A level helps align the doorbell perfectly. Use a pencil to mark drill spots. A ladder might be necessary for high door frames.
Optional Accessories
Consider a chime kit if your doorbell has no sound alerts. Extra batteries can be handy for longer use. A Wi-Fi extender can improve connection if your signal is weak.
Credit: vidscola.com
Preparing For Installation
Preparing for the installation of your Ring Video Doorbell 2 is a key step. It ensures smooth setup and proper function. This stage involves simple checks and safety measures.
Taking time now can save frustration later. Follow these steps to get ready before you start the installation.
Checking Wi-fi Signal Strength
Your doorbell needs a strong Wi-Fi signal to work well. Test the signal near your front door. Use a smartphone or laptop to check connection speed.
Weak signals can cause delays or disconnections. If the signal is low, consider moving your router or adding a Wi-Fi extender.
Choosing The Best Doorbell Location
Select a spot that clearly shows visitors’ faces. The doorbell should be at eye level, about 48 inches from the ground.
Avoid places with direct sunlight or strong shadows. These can affect video quality. Make sure the doorbell is near your main entrance.
Turning Off Power Supply
Safety first. Turn off the power to your existing doorbell at the circuit breaker. This step prevents electric shocks during installation.
Use a voltage tester to confirm power is off. Never skip this step, even if you use the battery option.
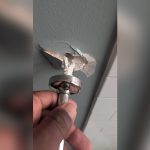
Removing Existing Doorbell
Removing your old doorbell is the first step to install the Ring Video Doorbell 2. This process prepares the wall and wiring for the new device. Handle the old doorbell carefully to avoid damage or injury. Follow the steps below to remove the existing doorbell safely and easily.
Unscrewing Old Doorbell
Locate the screws holding the old doorbell in place. Use a screwdriver that fits the screws well. Turn the screwdriver counterclockwise to loosen and remove them. Keep the screws safe if you plan to reuse them later. Gently pull the doorbell away from the wall after removing all screws. Avoid pulling too hard to prevent wire damage.
Disconnecting Wires Safely
Turn off the power supply to the doorbell at the circuit breaker. This step avoids electric shock. Check that the power is off by pressing the doorbell button; no sound should come. Use a small screwdriver or your fingers to loosen the wire connectors. Carefully detach the wires from the old doorbell terminals. Keep the wires straight and untangled for easy connection to the new doorbell.
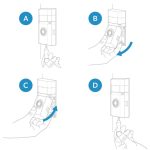
Mounting The Ring Doorbell
Mounting the Ring Video Doorbell 2 is a key step in the installation process. It ensures the device stays secure and works perfectly. A proper mount gives the doorbell a good view of your doorstep. This helps capture clear video and detect visitors easily. Follow these simple steps to mount your Ring Doorbell correctly.
Attaching The Mounting Bracket
Start by choosing the right spot for your doorbell. Use the mounting bracket as a guide. Hold the bracket against the wall near your door. Mark the screw holes with a pencil. Drill small holes where you marked. Use the screws to fasten the bracket firmly. Make sure it does not wobble or move.
Running Wires Through Bracket
If your Ring Doorbell connects to existing doorbell wires, route them carefully. Feed the wires through the hole in the mounting bracket. Pull enough wire to reach the back of the doorbell. Be gentle to avoid damaging the wires. Check that the wires are not twisted or pinched. This keeps the connection strong and reliable.
Securing The Doorbell
Align the Ring Doorbell with the mounting bracket. Press it firmly until it clicks into place. Use the included security screws to lock the doorbell. Tighten the screws with a screwdriver. This prevents theft and keeps the doorbell stable. Double-check the doorbell sits flat and secure on the bracket.
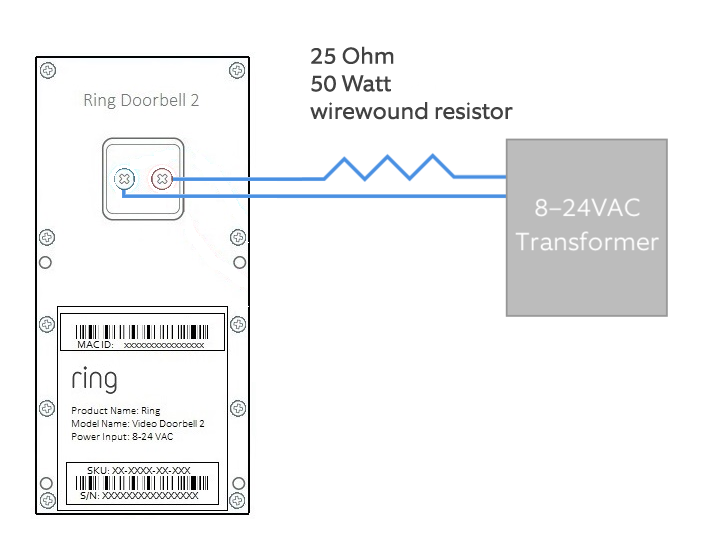
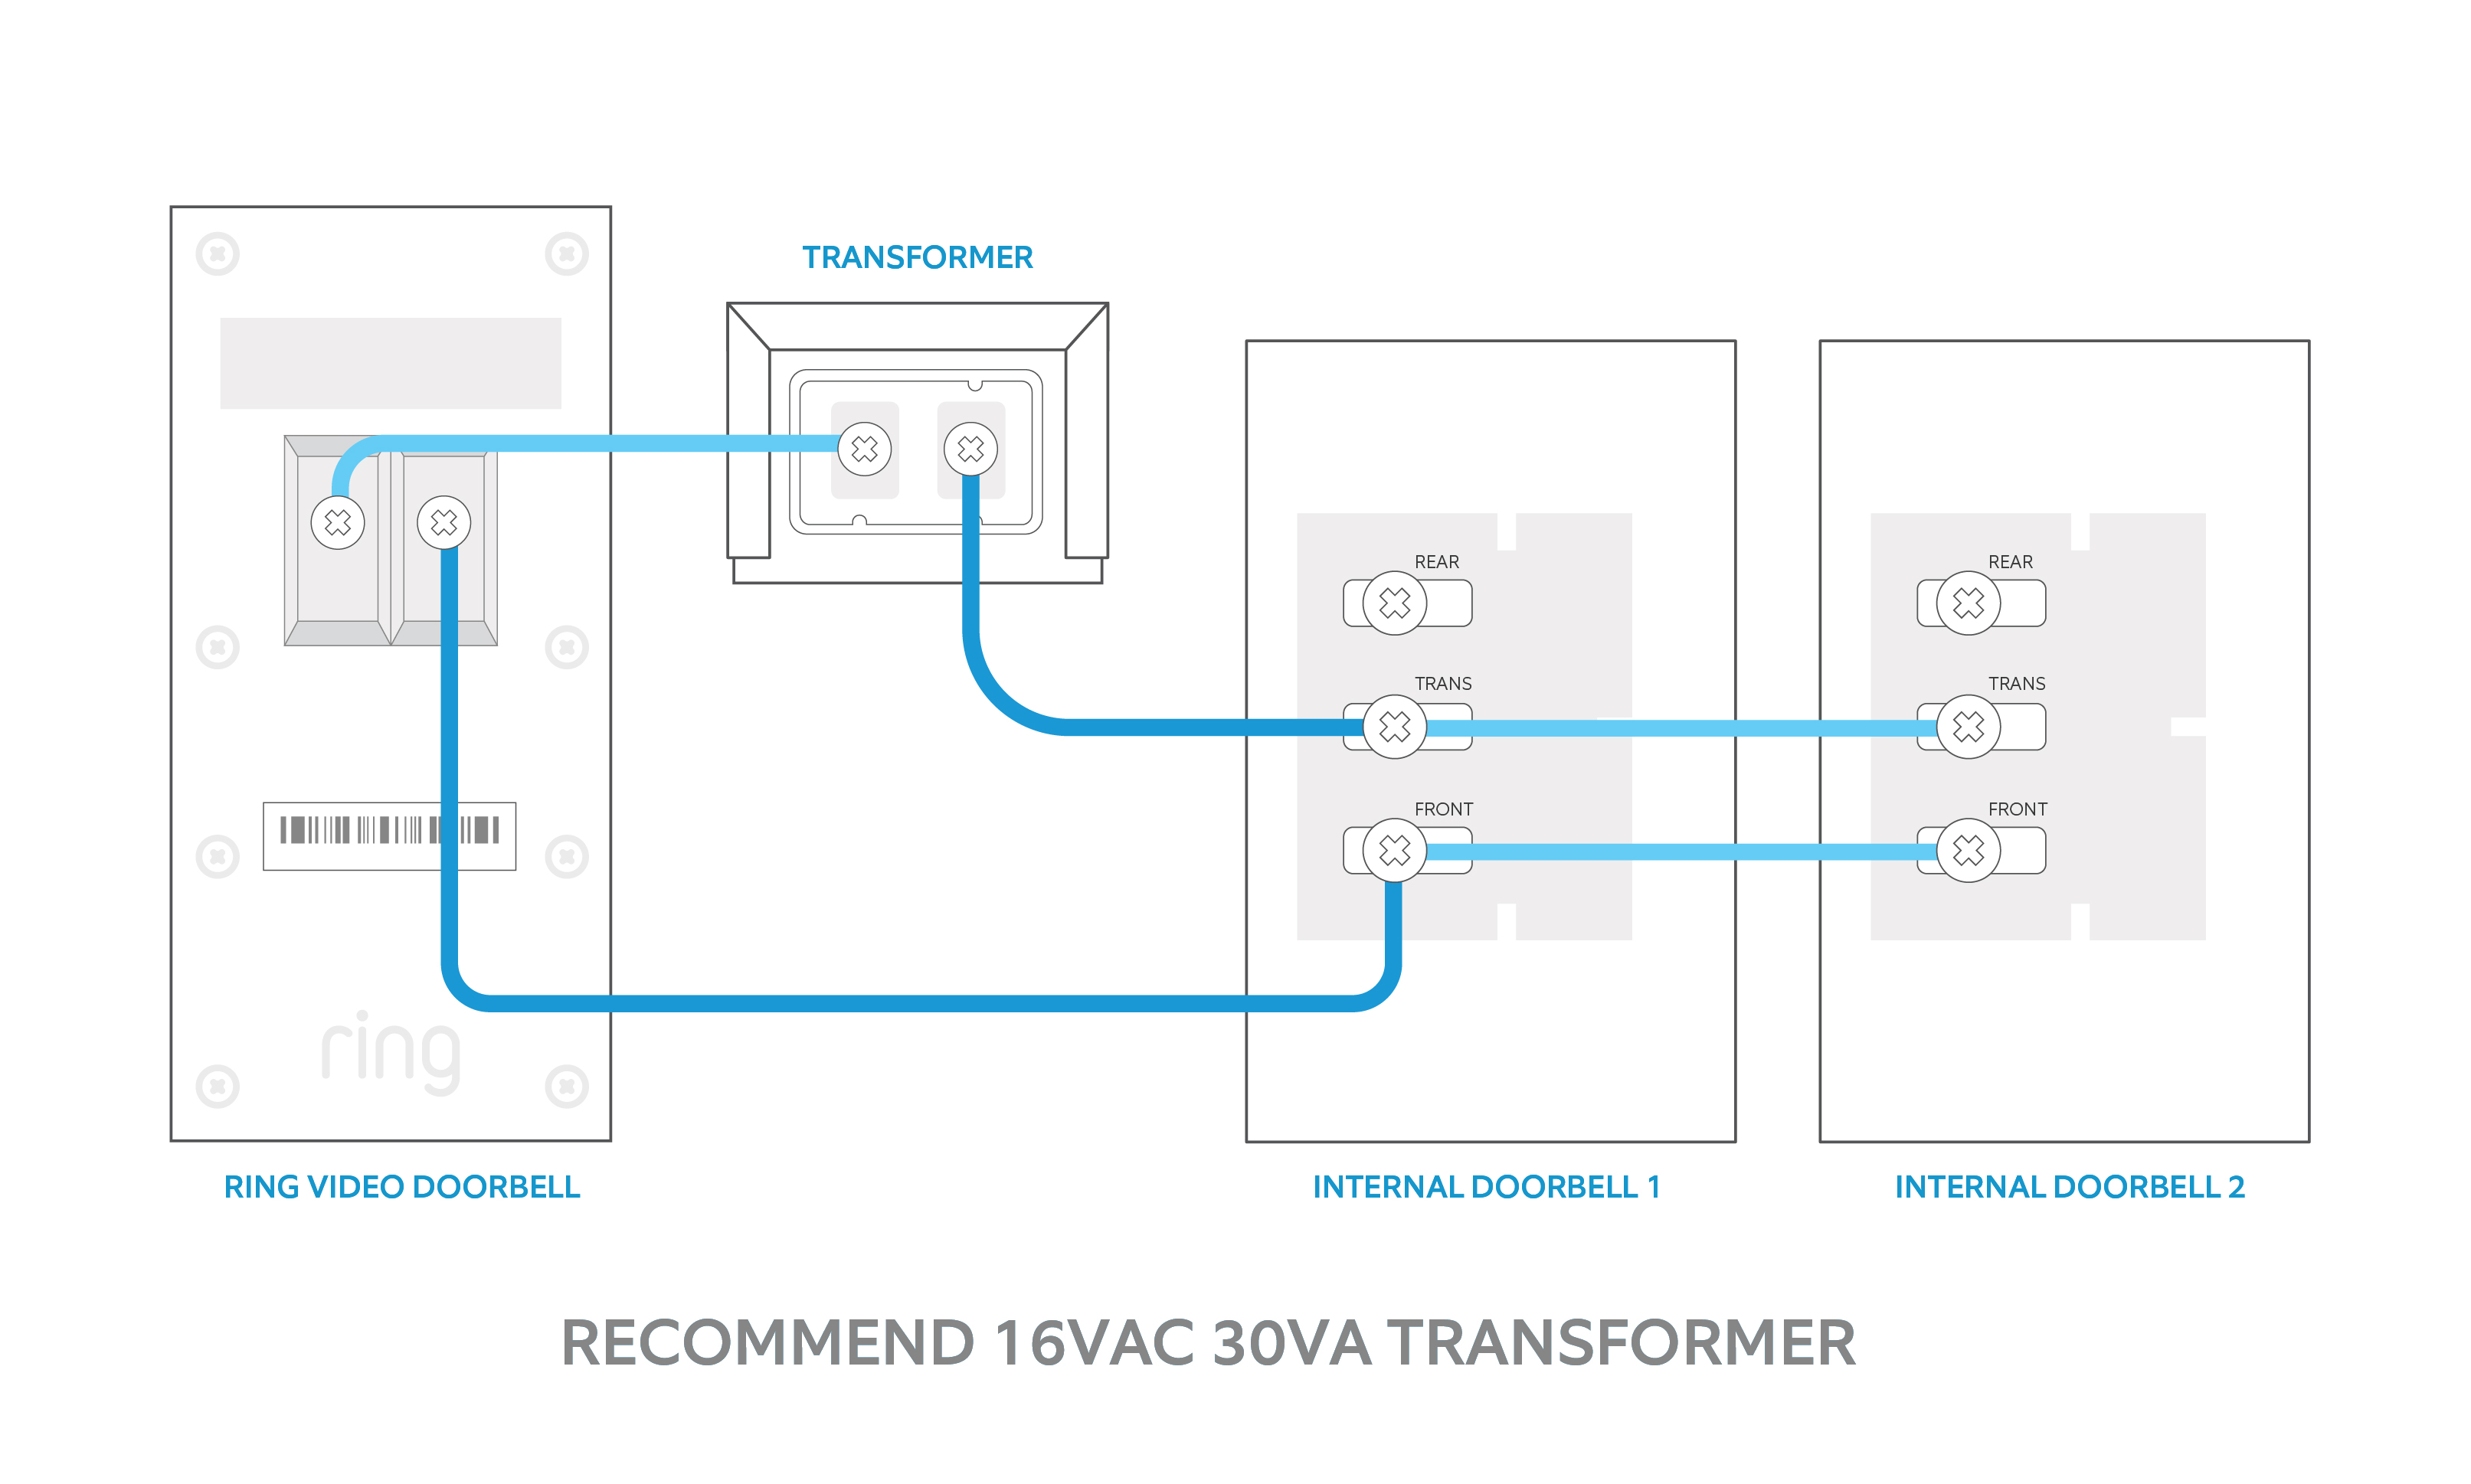
Wiring The Doorbell
Wiring the Ring Video Doorbell 2 is a key step in the installation process. It powers the device and allows it to connect to your existing doorbell system. This section covers how to connect the wires and use the optional power kit.
Connecting Wires To Terminals
Start by turning off the power at the breaker to avoid shocks. Remove your old doorbell and find the two wires. These wires usually come from the wall and provide power.
Attach each wire to the two terminals on the back of the Ring Doorbell 2. It does not matter which wire goes to which terminal. Tighten the screws to secure the wires firmly. Make sure no wire strands are loose or touching each other.
Once connected, tuck the wires carefully back into the wall. Mount the doorbell on the wall bracket. Turn the power back on to test if the doorbell powers up.
Using The Optional Power Kit
The optional power kit helps manage your doorbell’s power and prevents chimes from buzzing. It is useful if you have a mechanical doorbell chime.
To install the power kit, open your doorbell chime box. Locate the two screws holding the wires. Disconnect the wires from the screws.
Connect the power kit wires to the chime screws and the original wires. This setup helps the Ring Doorbell work smoothly with your chime. Follow the instructions included with the power kit carefully for best results.
Credit: www.arloren.com
Powering Up And Setup
Setting up your Ring Video Doorbell 2 starts with powering it up and connecting it to your home network. This step ensures the device works smoothly and you get alerts on your phone. Follow these easy steps to get your doorbell ready for use.
Turning On Power
First, charge the Ring Video Doorbell 2 battery fully. Use the USB charging cable included in the box. A full charge takes about 5-10 hours. Once charged, insert the battery into the doorbell. Press the small button on the side to turn it on. The light on the front will start blinking.
Downloading The Ring App
Next, download the Ring app on your smartphone. It is available for both Android and iOS devices. Open your app store and search for “Ring.” Install the app and create a new account or log in. The app guides you through the setup process step-by-step.
Connecting To Wi-fi
Connect your doorbell to your home Wi-Fi network. In the Ring app, select “Set Up a Device.” Choose “Doorbells” and follow instructions. Enter your Wi-Fi password carefully. The doorbell will connect and show a confirmation message. A strong Wi-Fi signal is important for video quality.
Configuring Settings
Customize your doorbell settings in the app. Set motion zones to reduce false alerts. Adjust notification preferences to suit your needs. Test the video and audio to ensure clear sound and picture. Regularly check for firmware updates in the app to keep your device secure and updated.
Testing The Doorbell
Testing your Ring Video Doorbell 2 is an important step after installation. It ensures the device works properly. You can check video quality, audio clarity, motion detection, and notifications. This helps you avoid surprises later. Follow these simple tests to confirm everything functions well.
Checking Video And Audio
Open the Ring app on your phone. Press the doorbell button to start a live video feed. Look at the video quality. It should be clear and sharp. Listen to the audio from the doorbell. It must be loud and clear. Speak into the app to test two-way talk. Your voice should come through the doorbell speaker.
Testing Motion Detection
Walk in front of the doorbell to trigger motion detection. The app should send an alert quickly. Check if the doorbell captures video of your movement. Adjust the motion zones in the app if needed. Proper motion detection keeps your home secure. Repeat this test a few times to confirm accuracy.
Verifying Notifications
Check your phone for notifications from the Ring app. Press the doorbell button or trigger motion detection. You should get instant alerts. If notifications are delayed, check your phone’s settings. Make sure the Ring app has permission to send alerts. Timely notifications keep you informed about visitors and activity.
Troubleshooting Tips
Installing a Ring Video Doorbell 2 can be simple, but sometimes issues arise. Troubleshooting helps solve common problems quickly. This keeps your doorbell working well and protects your home.
Below are key tips to fix common troubles. Follow these steps carefully for best results.
Dealing With Poor Wi-fi
Ring Video Doorbell 2 needs a strong Wi-Fi signal to work correctly. Weak signals cause delays or no video feed. Move your router closer to the doorbell. Remove obstacles like walls or metal objects.
Try using a Wi-Fi extender to boost the signal. Check your internet speed with a simple test. Restart your router to refresh the connection. Make sure your Wi-Fi password is correct in the Ring app.
Fixing Power Issues
Power problems can stop your doorbell from working. Check if the battery is charged. Remove the doorbell and charge it fully using the included charger.
If you use wired power, check the doorbell’s wiring. Turn off power at the breaker before inspecting wires. Look for loose or damaged cables and fix them safely.
Ensure the doorbell is securely mounted to connect with power properly.
Resetting The Device
Resetting your Ring Video Doorbell 2 can fix many software glitches. Press and hold the orange button on the back for 15 seconds. Release the button and wait for the doorbell to reboot.
After reset, open the Ring app to set up the device again. This clears old settings and can restore normal function.
Credit: vicentetorns.com
Frequently Asked Questions
How Do I Install A Ring Video Doorbell 2?
To install, charge the battery, attach the mounting bracket, connect to Wi-Fi, and secure the doorbell. Use the Ring app for setup and testing.
What Tools Are Needed For Installation?
You need a drill, screwdriver, level, and included mounting screws. The Ring Video Doorbell 2 kit has most essentials.
Can I Install Without Existing Doorbell Wiring?
Yes, Ring Video Doorbell 2 works wirelessly using the rechargeable battery. Wired installation is optional for continuous power.
How Do I Connect The Doorbell To Wi-fi?
Open the Ring app, select your device, and follow prompts to join your home Wi-Fi network. Ensure strong signal.
Conclusion
Installing a Ring Video Doorbell 2 is simple and quick. Follow each step carefully for the best results. Test the doorbell after installation to ensure it works well. Enjoy the added security and convenience it brings to your home. Stay connected and watch who visits your door anytime.
A small effort leads to greater peace of mind. Now, you are ready to keep your home safer every day.