
Your home’s safety depends a lot on your smoke detectors. But what happens when a hardwired smoke detector stops working or needs an upgrade?
Knowing how to change a hardwired smoke detector yourself can save you time, money, and stress. In this guide, you’ll find simple, clear steps that anyone can follow—even if you’re not an expert. Keep reading to learn how to keep your home safe and your mind at ease with a quick, easy smoke detector swap.

Credit: www.youtube.com
Safety Precautions
Always turn off the power before starting to change a hardwired smoke detector. Use a voltage tester to be sure no electricity flows. Handle wires carefully to avoid shocks or damage.
Turn Off Power Supply
Safety starts by cutting the power to the smoke detector. Locate your home’s main electrical panel. Switch off the circuit breaker controlling the smoke detector. Confirm the power is off by testing the detector or using a voltage tester. This step prevents electric shock during the replacement process.
Gather Necessary Tools
Prepare tools before starting the job. Common tools include a screwdriver, voltage tester, and ladder. Have a replacement smoke detector ready. Organize these items in one place. This helps avoid interruptions and keeps the work smooth.
Wear Protective Gear
Protect yourself with proper gear. Use safety glasses to shield your eyes from dust. Wear gloves to avoid cuts or contact with wires. Choose sturdy shoes for firm footing. These precautions reduce the risk of injury while working.
Credit: www.reddit.com
Remove Old Smoke Detector
Removing an old hardwired smoke detector is the first step in installing a new one. This process helps ensure safety and proper function. Follow the steps carefully to avoid damage or injury.
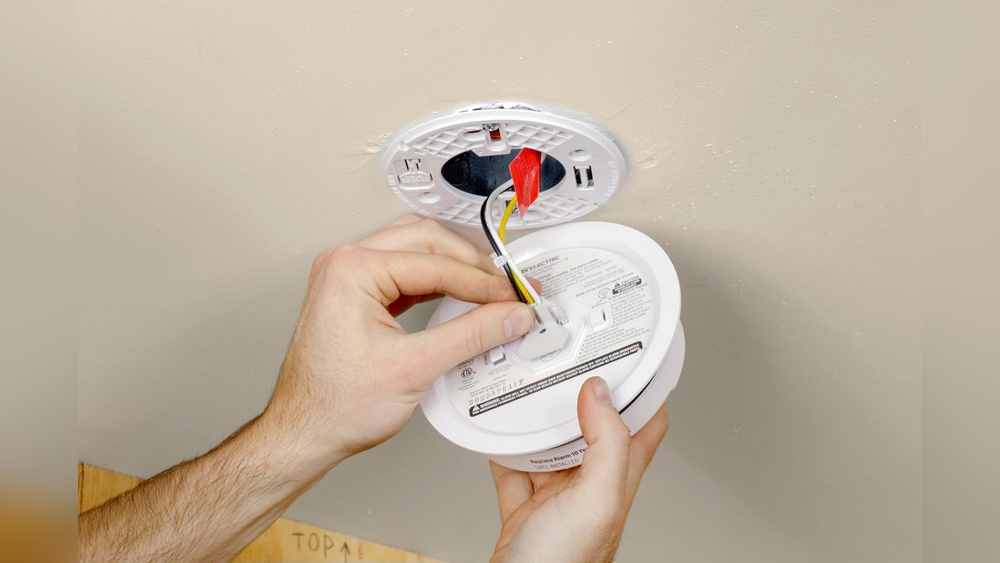
Turn off the power to the smoke detector before starting. Then, detach the device from the ceiling. Finally, unplug the wiring harness to complete the removal.
Disconnect Power
Find the circuit breaker for the smoke detector. Switch it off to cut power. Use a voltage tester to confirm no electricity flows. This step protects you from electric shocks.
Detach Detector From Ceiling
Look for screws or a twist-lock mechanism. Use a screwdriver or your hands to release the detector. Gently pull the smoke detector away from the mounting plate. Be careful not to drop it.
Unplug Wiring Harness
Locate the wiring harness connected to the smoke detector. Press the release tab or gently pull to disconnect it. Keep the wiring harness safe for the new detector installation.
Prepare New Smoke Detector
Preparing your new smoke detector is an important step before installation. This ensures the device works correctly and fits your home’s wiring system. Careful preparation helps avoid issues later and keeps your home safe.
Check Compatibility
Make sure the new smoke detector matches your home’s wiring. Verify it is hardwired and supports battery backup if needed. Check the voltage and connector type to avoid installation problems. Using a compatible unit prevents electrical issues and ensures safety.
Test New Unit
Test the new smoke detector before installation. Press the test button to check if the alarm sounds. This confirms the unit is working properly. Replace the batteries if the sound is weak or absent. Testing saves time and prevents future failures.
Attach Mounting Bracket
Secure the mounting bracket to the ceiling or wall. Use screws and anchors that fit your surface type. Make sure it is tight and level. The bracket holds the smoke detector firmly in place. Proper attachment avoids falling or damage over time.
Install New Smoke Detector
Installing a new hardwired smoke detector is a key step after removing the old one. This process ensures your home remains safe and up to code. Follow these simple steps to fit the new detector properly.
Connect Wiring Harness
First, identify the wiring harness from the ceiling. It usually has three wires: black, white, and a yellow or red wire for interconnection. Match these wires to the new detector’s connectors. Push the wires firmly into the harness plug until they click. This creates a secure electrical connection.
Secure Detector To Ceiling
Next, align the base of the smoke detector with the mounting bracket on the ceiling. Twist or snap it into place, depending on the model. Ensure it fits tight to avoid gaps. Use screws if provided for extra hold. The detector must sit flush against the ceiling.
Restore Power
Finally, switch the power back on at the circuit breaker. Test the smoke detector by pressing the test button. Listen for a loud beep or alarm sound. This confirms the detector receives power and works correctly. Your new smoke detector is now installed and ready.
Test And Maintain
Testing and maintaining your hardwired smoke detector keeps your home safe. Regular checks ensure it works during an emergency. Proper care extends the life of your device and avoids false alarms.
Perform Function Test
Press the test button on your smoke detector. Hold it for a few seconds. The alarm should sound loudly. If it does not, check the power supply or wiring. A loud beep confirms the device is working well.
Set Up Regular Maintenance
Clean the smoke detector every six months. Use a soft brush or vacuum to remove dust. Dust can block sensors and stop alarms. Check for any signs of damage or wear. Replace the unit if it looks old or broken.
Replace Batteries Periodically
Even hardwired detectors have backup batteries. Change these batteries once a year. Use the type recommended by the manufacturer. A weak battery can cause the alarm to fail. Keep spare batteries at home for emergencies.

Credit: www.youtube.com
Frequently Asked Questions
How Do I Safely Disconnect A Hardwired Smoke Detector?
Turn off power at the circuit breaker first. Use a voltage tester to ensure no electricity flows. Disconnect the detector’s wiring harness carefully before removing the unit from its mounting bracket.
What Tools Are Needed To Replace A Hardwired Smoke Detector?
You need a screwdriver, wire strippers, and a voltage tester. A ladder helps reach ceiling detectors. Always have the new smoke detector ready before starting.
Can I Replace A Hardwired Smoke Detector Myself?
Yes, if you follow safety steps. Turn off power, handle wiring carefully, and follow manufacturer instructions. If unsure, consult a professional electrician to avoid hazards.
How Often Should Hardwired Smoke Detectors Be Replaced?
Replace every 10 years to ensure reliability. Smoke detectors lose sensitivity over time. Test detectors monthly and replace batteries annually for battery backup models.
Conclusion
Changing a hardwired smoke detector is simple and important. Always turn off the power first. Remove the old detector carefully and connect the new one as shown in the instructions. Test the new smoke detector to ensure it works well.
Regular checks keep your home safe from fire risks. Taking small steps today helps protect your family tomorrow. Stay safe and keep your smoke detectors up to date.