If you want to boost your home security with clear, reliable video right at your front door, installing an Arlo Wired Video Doorbell is a smart move. But maybe you’re wondering how to get started or worried it might be too complicated.
Don’t worry—this guide will walk you through each step in a simple, straightforward way. By the end, you’ll have your doorbell set up and ready to help you see who’s there, anytime you want. Keep reading, and you’ll unlock the secrets to a smooth installation that saves you time and gives you peace of mind.

Credit: kb.arlo.com
Tools And Materials Needed
Before installing your Arlo Wired Video Doorbell, gather all tools and materials. Having everything ready makes the process smooth and quick. This step saves time and avoids frustration.
Below is a list of essential tools and materials. Each item plays a key role in the installation.
Basic Tools
You need a screwdriver set with both flathead and Phillips heads. A drill with drill bits is important for making holes in walls. Wire strippers help prepare the electrical wires for connection. A voltage tester ensures the power is off before working with wires.
Materials From The Arlo Kit
The doorbell itself comes with mounting screws and anchors. Use the provided backplate to attach the doorbell securely. The quick start guide offers step-by-step help. The included wiring connectors make joining wires safer and easier.
Additional Materials
Electrical tape helps protect wire connections. A level tool keeps the doorbell straight. A pencil marks drilling points accurately. Safety gloves protect your hands during installation. A ladder may be necessary for higher doorframes.
Prepare Your Doorbell Location
Preparing your doorbell location is the first step to install the Arlo Wired Video Doorbell. This step ensures the installation is safe and the device works well. You need to check the existing wiring and turn off the power correctly. These actions prevent damage and keep you safe.
Taking time to prepare also makes the installation faster. Let’s start by checking the wiring.
Check Existing Doorbell Wiring
Look at the current doorbell setup. Check if wires are visible near your door. The Arlo Wired Video Doorbell needs a compatible wiring system. It usually works with low voltage wires. Use a voltage tester to verify the wires carry power. Note the wire colors and positions. This helps when connecting the new doorbell. If wires are old or damaged, replace them before installing.
Turn Off Power Safely
Safety is important before handling wires. Find your home’s circuit breaker panel. Switch off the breaker connected to your doorbell. Confirm power is off by pressing the existing doorbell button. No sound means the power is off. Use a voltage tester again to double-check. Never skip this step to avoid shocks or injury.
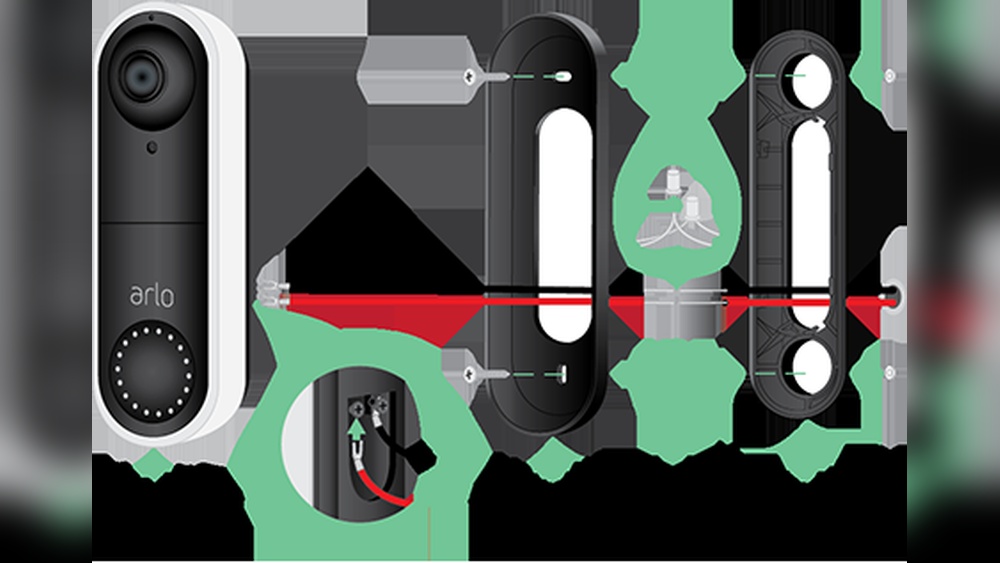
Mount The Doorbell Bracket
Mounting the doorbell bracket is a key step in installing your Arlo Wired Video Doorbell. This bracket holds the doorbell firmly on the wall. Proper mounting ensures the device works well and stays secure over time.
Follow these simple steps to mount the bracket correctly. Take your time and use the right tools for a safe and steady installation.
Mark Drill Points
Start by holding the bracket against the wall at the desired height. Use a pencil to mark the holes where screws will go. Make sure the bracket is level to avoid a crooked doorbell.
Double-check the marks before drilling to ensure accuracy. This helps prevent mistakes that can damage the wall or affect the doorbell’s position.
Drill Holes And Insert Anchors
Choose a drill bit that matches the size of the wall anchors included in the package. Drill holes at the marked points carefully. Avoid drilling too deep or too wide.
Push the wall anchors into the holes. These anchors keep the screws tight, especially on drywall or other soft surfaces. Tap them gently with a hammer if needed.
Attach The Bracket
Align the bracket holes with the anchors in the wall. Insert screws and tighten them with a screwdriver. The bracket should feel firm and not move.
Check the bracket again for levelness. Adjust slightly if needed before fully tightening the screws. A well-attached bracket supports the doorbell securely.

Credit: www.amazon.com
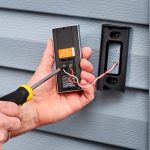
Connect The Wiring
Connecting the wiring is a key step in installing your Arlo Wired Video Doorbell. This part links the doorbell to your home’s power. Proper wiring ensures the doorbell works smoothly and safely.
Follow each step carefully. Double-check all connections before moving on. A secure connection prevents problems later.
Identify Wires
First, find the wires from your doorbell’s power source. Usually, two wires come from the wall. One is for power, the other completes the circuit. Use a voltage tester to confirm power is off before touching wires. Label the wires if needed to avoid confusion.
Attach Wires To Doorbell Terminals
Next, connect the wires to the doorbell terminals. Look for small screws or clips on the back of the Arlo doorbell. Attach each wire to the correct terminal. Tighten screws firmly to hold wires in place. Loose wires can cause the doorbell to fail.
Secure Wire Connections
After attaching, wrap wire connections with electrical tape. This adds safety and prevents short circuits. Push wires neatly into the wall cavity. Use wire nuts or terminal blocks if needed. Keep wires organized for a clean, safe setup.
Attach The Doorbell Unit
Attaching the Arlo Wired Video Doorbell unit is a crucial step. It ensures the device stays firmly in place. Proper attachment also helps the doorbell work without issues. Follow these steps carefully to fit the unit correctly and safely.
Align And Snap Doorbell Onto Bracket
Start by holding the doorbell near the mounting bracket. Line up the doorbell edges with the bracket slots. Make sure the camera faces outward. Gently push the doorbell onto the bracket. You should hear a soft click as it snaps in place. This confirms the doorbell is properly aligned and attached.
Secure With Screws
Next, take the screws provided with your kit. Insert each screw into the bracket holes. Use a screwdriver to tighten them firmly. Do not overtighten to avoid damage. The screws hold the doorbell securely against your wall. Check that the doorbell does not move after tightening.
Restore Power And Test
After installing your Arlo Wired Video Doorbell, restoring power is the next step. This step ensures the doorbell receives electricity and functions properly. Testing the doorbell confirms your installation was successful. Let’s go through this process carefully.
Turn Power Back On
Locate your home’s circuit breaker panel. Find the switch that controls the doorbell’s power. Flip the switch back to the ON position. This action restores electricity to the doorbell. Wait a few seconds for the system to power up. Avoid rushing this step to prevent errors.
Verify Doorbell Functionality
Press the doorbell button once. Check if the doorbell chimes inside your home. Look at the doorbell’s camera light to confirm it turns on. Open the Arlo app on your phone. See if the live video feed appears quickly. Test the two-way audio feature by speaking through the app. These checks ensure your doorbell works perfectly.
Set Up The Arlo App
Setting up the Arlo app is the first step to using your Arlo Wired Video Doorbell. The app lets you control the doorbell from your phone. You get notifications, live video, and more. Follow the simple steps below to get started quickly.
Download And Install App
Search for “Arlo” in your phone’s app store. The app is free and works on both iOS and Android devices. Tap “Download” or “Install” to get the app on your phone. Open the app once it finishes installing. You will need to create an Arlo account if you do not have one.
Connect Doorbell To Wi-fi
Make sure your phone is connected to your home Wi-Fi network. In the app, select “Add Device” and choose the doorbell model. Follow the prompts to connect the doorbell to your Wi-Fi. Enter your network name and password carefully. Wait for the app to confirm the doorbell is online.
Customize Settings
After connection, explore the app’s settings menu. Adjust motion detection sensitivity to reduce false alerts. Set alert tones and notification preferences for your phone. Choose when the doorbell should record video. Customize these settings to fit your home and routine.

Credit: www.youtube.com
Troubleshooting Tips
Troubleshooting your Arlo wired video doorbell can be simple. Small issues may stop the doorbell from working right. Knowing common problems helps you fix them quickly. This saves time and avoids frustration.
Check each step carefully during installation. Sometimes, a tiny mistake causes big troubles. Use these tips to find and solve common problems fast.
Common Installation Issues
One common problem is no power to the doorbell. Check your wiring and make sure the power is on. Loose wires often cause this issue. Tighten all connections securely.
Another issue is weak Wi-Fi signal. The doorbell needs a strong connection to work well. Move your router closer or use a Wi-Fi extender if needed.
Some users face app connection problems. Restart your phone and the doorbell. Make sure you use the latest app version. Rebooting often fixes the problem.
When To Contact Support
Contact support if your doorbell still does not work after trying fixes. Do this if the device won’t power on or connect to Wi-Fi. Also, reach out if the video feed is missing or poor quality.
Support can guide you through advanced troubleshooting steps. They help with hardware issues or replacement questions. Save your purchase details before calling for faster help.
Frequently Asked Questions
How Do I Install An Arlo Wired Video Doorbell?
To install an Arlo Wired Video Doorbell, turn off power first. Mount the doorbell using the provided screws. Connect the wires to your existing doorbell transformer. Restore power and complete setup via the Arlo app. Follow on-screen instructions for final configuration.
What Tools Are Needed For Arlo Doorbell Installation?
You need a screwdriver, drill, wire stripper, and voltage tester. These tools help mount the doorbell and connect wires safely. Having a level can ensure straight installation. Always use insulated tools for electrical safety.
Can I Install Arlo Doorbell Without Existing Wiring?
No, Arlo Wired Video Doorbell requires existing doorbell wiring. It connects to a doorbell transformer for power. Without wiring, a wired model cannot function properly. Consider a battery-powered Arlo doorbell if no wiring exists.
How Do I Reset The Arlo Wired Video Doorbell?
Press and hold the reset button for 10 seconds. The doorbell will restart and restore factory settings. Resetting helps resolve connectivity or setup issues. Use this as a troubleshooting step only.
Conclusion
Installing an Arlo Wired Video Doorbell is simple with clear steps. Follow the instructions carefully for best results. Make sure your tools are ready before you start. Connect the wires securely to avoid any issues. Test the doorbell to confirm it works properly.
Enjoy the added security and convenience it brings. Stay safe and keep your home connected. This guide helps you set up your doorbell quickly and easily.