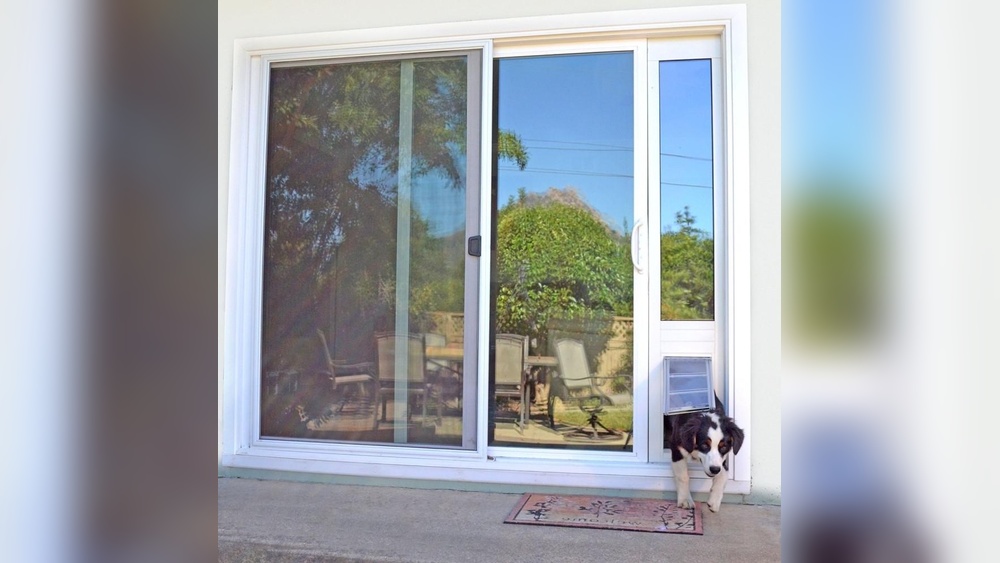
Are you tired of constantly opening and closing your door every time your pet wants to go outside? Installing a sliding glass pet door can make life easier for both you and your furry friend.
Imagine giving your pet the freedom to come and go as they please, without any hassle. In this guide, you’ll learn exactly how to install a sliding glass pet door step by step. Whether you’re a DIY beginner or just want clear, simple instructions, this article will help you get it done quickly and correctly.
Keep reading, and soon your pet will have their very own door to the outdoors!
Tools And Materials Needed
Installing a sliding glass pet door requires a few simple tools and materials. Having everything ready makes the job easier and faster. This section lists all essentials for the installation process.
Tools Needed
You will need a drill to make holes in the glass or frame. A measuring tape helps to mark the exact spot for the door. A screwdriver is necessary to tighten screws securely. Safety glasses protect your eyes during drilling. A pencil is useful to mark measurements clearly. A level ensures the pet door is straight and aligned.
Materials Needed
Start with the sliding glass pet door kit, which usually includes the door and frame. Silicone sealant helps to seal gaps and prevent drafts. Sandpaper smooths rough edges after cutting. Painter’s tape marks areas on the glass without damage. Replacement glass panels may be needed if cutting glass is required. Screws and mounting brackets come with most kits for secure fitting.

Credit: www.shoshitamam.com
Choosing The Right Pet Door
Choosing the right sliding glass pet door is important for your pet’s comfort and safety. The door must fit your pet well and work with your home’s style. This section explains how to pick the right door size and material.
Measuring Your Pet
Measure your pet’s height and width carefully. Measure from the ground to their shoulder for height. Measure the widest part of their body for width. Add a few inches to these numbers for easy movement. This ensures your pet can pass through without trouble.
Selecting Door Size
Choose a door size based on your pet’s measurements. The door opening should be bigger than your pet’s size. A door too small will make your pet uncomfortable. A door too large might let in cold air or insects. Pick a size that fits your pet well and keeps your home safe.
Material Options
Sliding glass pet doors come in plastic, aluminum, and vinyl. Plastic doors are light and easy to install. Aluminum doors are strong and last longer. Vinyl doors offer good insulation from heat and cold. Choose a material that fits your budget and your door’s frame. Consider durability and ease of cleaning too.
Preparing The Sliding Glass Door
Preparing the sliding glass door is the first step in installing a pet door. A clean, clear surface helps the pet door fit well. It also makes sure the door sticks properly. Taking time to prepare avoids problems later.
Cleaning The Surface
Start by wiping the glass and frame with a damp cloth. Remove dirt, dust, and grease. Use mild soap if needed. Dry the area completely with a clean towel. A clean surface helps the adhesive stick better. This step prevents the door from falling off.
Removing Obstructions
Check the door track and frame for any objects. Remove stones, leaves, or debris. Clear the sliding path to avoid damage. Make sure the door slides smoothly. This makes installation easier and safer. Clear space helps the pet door fit perfectly.
Marking The Installation Area
Marking the installation area is a key step in fitting a sliding glass pet door. This step ensures the door fits perfectly and works smoothly.
Take your time to measure and mark carefully. Clear, accurate marks guide the cutting and installation process.
Choose The Right Height For Your Pet Door
Start by measuring your pet’s height from the ground to its belly. Mark this height on the glass door. This spot will be the bottom of the pet door opening.
Use A Level To Draw Straight Lines
Place a level tool on the glass to draw horizontal lines. Straight lines keep the pet door balanced and easy to use. Make sure your marks are clear and visible.
Mark The Width And Height Of The Pet Door
Use the pet door template or the door’s frame to mark its full size. Mark the top, bottom, and sides carefully. Check that the space is enough for your pet to pass through comfortably.
Double-check All Measurements
Review all your marks before cutting. Measure twice, mark once. Double-checking prevents mistakes and saves time later.
Cutting The Glass Panel
Cutting the glass panel is a key step when installing a sliding glass pet door. This process needs care and precision. A clean and accurate cut ensures the pet door fits perfectly. It also keeps the glass strong and safe.
Safety Precautions
Wear safety glasses to protect your eyes from glass shards. Use thick gloves to keep your hands safe. Work in a clean, flat area with good lighting. Keep children and pets away from the cutting space. Have a first aid kit nearby for emergencies. Handle the glass gently to avoid cracks or breaks.
Cutting Techniques
Measure and mark the glass with a permanent marker. Use a glass cutter with a sharp wheel for a smooth cut. Score the glass firmly in one continuous line. Avoid going back and forth on the same line. Place the glass on a flat edge and apply gentle pressure to snap it along the score. Smooth the edges with a sanding stone or glass file. Take your time to ensure straight and clean cuts.

Credit: www.youtube.com
Installing The Pet Door Frame
Installing the pet door frame is a key step in adding a sliding glass pet door. The frame holds the door in place and ensures it works smoothly. Taking time to fit the frame correctly prevents problems later. Follow clear steps to align and secure the frame properly. This helps your pet use the door easily and keeps your home safe.
Aligning The Frame
Start by placing the frame in the sliding glass door track. Make sure the frame sits evenly along the edges. Check that the frame is straight and level. Use a small level tool for accuracy. Adjust the frame until it fits snugly without gaps. Proper alignment prevents drafts and keeps the door stable. Take your time to get this step right.
Securing The Frame
Once aligned, secure the frame to the glass door track. Use screws or clips that come with the pet door kit. Tighten them firmly but avoid over-tightening. Over-tightening can damage the frame or door track. Double-check that the frame stays level as you fix it in place. Test the frame by sliding it back and forth gently. A secure frame ensures the pet door works smoothly and lasts long.
Fitting The Pet Door Flap
Fitting the pet door flap is a key step in installing a sliding glass pet door. The flap allows your pet to go outside easily. It should fit well to keep the door secure and energy efficient.
Follow clear steps to attach the flap correctly. Check the flap size matches your pet’s needs. A proper fit helps your pet move freely.
Preparing The Flap For Installation
Remove the flap from its packaging carefully. Inspect it for any damage or defects. Clean the edges to remove dust or dirt. This ensures a smooth fit and prevents leaks.
Lay the flap flat on a soft surface. This prevents bending or warping before installation.
Attaching The Flap To The Frame
Align the flap with the frame’s hinge or mounting area. Make sure the flap swings in the right direction for easy use. Use screws or clips provided with the pet door kit. Tighten them securely but avoid over-tightening to prevent damage.
Testing The Flap Movement
Push the flap gently to check its swing. It should open easily without sticking. Close the flap and check for gaps around the edges. Adjust the screws or position if needed. A good seal keeps air and bugs out.
Testing The Door Functionality
Testing the door functionality is a key step after installing a sliding glass pet door. It ensures the door works smoothly and safely for your pet. Proper testing helps avoid problems like jamming or drafts.
Try the door several times to see if it slides easily. Check that the locking mechanism works well. Also, watch how your pet reacts to the new door.
Checking The Sliding Mechanism
Slide the door back and forth slowly. It should move without sticking or catching. Listen for any strange noises like grinding or squeaking. Clean the tracks if needed. Smooth sliding means your pet will use the door comfortably.
Testing The Lock And Security Features
Engage and disengage the lock several times. The lock should hold the door firmly in place. Make sure it is easy for you to operate. A secure lock keeps your pet safe inside or outside your home.
Observing Your Pet’s Interaction
Encourage your pet to try the door. Watch if your pet pushes or pulls the flap easily. Some pets may need practice to get used to it. Reward your pet for using the door correctly. This builds good habits and confidence.
Sealing And Finishing Touches
Sealing and finishing touches are the final steps in installing a sliding glass pet door. These steps protect your home from drafts, bugs, and water. They also make the door look neat and complete. Taking time here ensures the pet door works well for years.
Apply Weatherstripping Around The Frame
Start by adding weatherstripping to the edges of the pet door frame. This stops air and moisture from entering your home. Use foam or rubber strips designed for doors. Press them firmly so they stick well. Check all sides for gaps and seal them carefully.
Use Caulk To Seal Gaps
Next, apply caulk around the outside of the pet door frame. This fills small cracks between the door and wall. Use a paintable, waterproof caulk for best results. Smooth the caulk with your finger or a tool. Let it dry completely to form a strong seal.
Trim Excess Material For A Clean Look
Cut away any extra weatherstripping or caulk that sticks out. This creates a tidy finish that blends with your door. Use a utility knife or scissors for neat edges. Clean the area with a damp cloth to remove dust and debris.
Check The Sliding Mechanism
Test the pet door to ensure it slides smoothly. Clean the track and remove any dirt or hair. Lubricate the sliding parts with a silicone spray if needed. This keeps the door easy to open for your pet.
Paint Or Touch Up Surrounding Areas
Paint around the pet door frame to match your wall or door color. This hides any marks or damage from installation. Use a small brush for precision. Wait for paint to dry before letting your pet use the door.

Credit: www.youtube.com
Maintenance Tips For Longevity
Maintaining your sliding glass pet door keeps it working well for years. Regular care prevents damage and saves money on repairs. Follow these simple steps to extend your pet door’s life.
Cleaning The Door
Clean the door frame and glass often. Use a soft cloth with mild soap and water. Remove dirt, dust, and pet hair that can block the door.
Check the flap for any sticky spots. Wipe it gently to keep it flexible. Clean tracks where the door slides to avoid jams. Dry all parts well after cleaning.
Checking For Wear
Look at the door’s edges and seals regularly. Find cracks or tears in the flap that may let cold air in. Replace worn parts quickly to keep your pet comfortable.
Inspect the sliding mechanism for smooth movement. Lubricate tracks with a pet-safe lubricant if needed. Tighten any loose screws or bolts to keep the door stable.
Frequently Asked Questions
What Tools Are Needed To Install A Sliding Glass Pet Door?
You need a measuring tape, drill, screwdriver, utility knife, and safety glasses. These tools help cut and secure the pet door properly.
How To Measure The Sliding Glass Door For A Pet Door?
Measure the height and width of your pet at shoulder level. Ensure the pet door fits comfortably for easy access and safety.
Can I Install A Sliding Glass Pet Door Myself?
Yes, with basic DIY skills, you can install it. Follow the instructions carefully and use proper tools for safety.
What Types Of Pets Are Suitable For Sliding Glass Doors?
Sliding glass pet doors are ideal for cats and small to medium dogs. Larger pets may require bigger or specialized doors.
Conclusion
Installing a sliding glass pet door helps your pet move freely. The steps are clear and easy to follow. Measure carefully and use the right tools for best results. Take your time cutting and fitting the door panel. This project adds convenience and comfort for your pet and family.
Enjoy the freedom it brings inside your home. Your pet will thank you every day. Give it a try and see the difference yourself. Simple changes can make a big impact.