
Imagine looking into your mirror every morning and seeing more than just your reflection. What if your mirror could show you the weather, news, or your daily schedule while you get ready?
With a smart mirror made using film, you can turn this idea into reality—without spending a fortune or needing expert skills. In this guide, you’ll discover simple steps to create your own smart mirror that fits perfectly into your home.
Ready to transform your space and start your day smarter? Let’s dive in!
Materials Needed
Building a smart mirror with film needs some specific materials. Choosing the right supplies makes the project easier and the final mirror better. This section lists the essential items for your smart mirror.
Film Types For Smart Mirrors
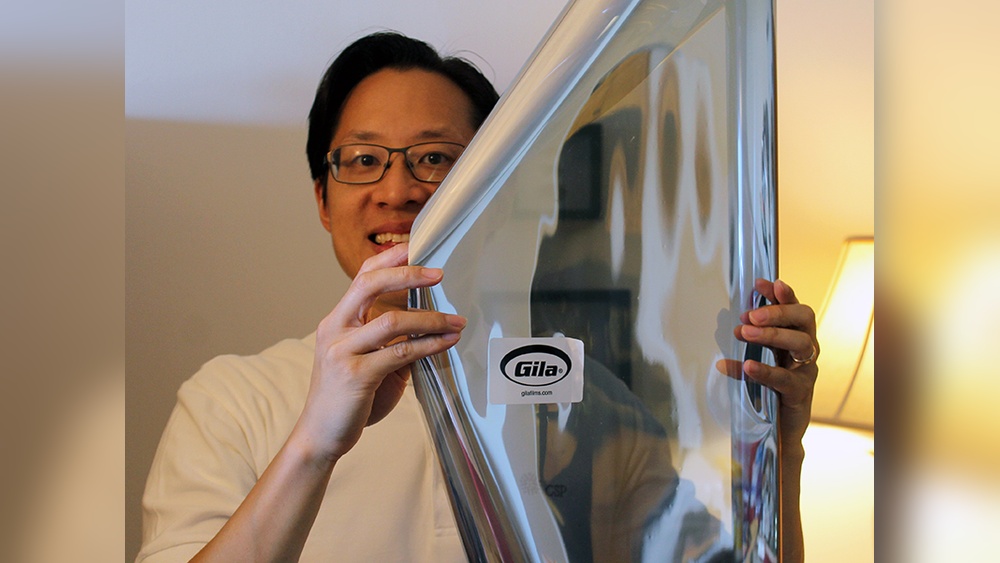
The film is the heart of the smart mirror. Two main types work well: one-way mirror film and two-way mirror film. One-way mirror film lets light pass through but reflects some. It creates a clear mirror effect while showing the screen behind. Two-way mirror film is thinner and often used for brighter displays. Select a film that fits your screen size and brightness needs.
Tools And Accessories
You need a few tools to apply the film smoothly. A squeegee helps remove air bubbles under the film. A spray bottle with soapy water allows easy repositioning during application. A sharp utility knife trims the excess film neatly. Use a measuring tape to size the film correctly. Also, keep a clean cloth handy to wipe the surface before applying the film. These tools ensure a clean and professional look.
Preparing The Mirror
Preparing the mirror is a crucial step in making a smart mirror with film. This process helps the film stick well and ensures the mirror looks clear and smooth. Taking time to prepare the mirror carefully will improve the final result and make your project easier.
Cleaning And Surface Prep
Start by cleaning the mirror surface thoroughly. Use a soft cloth and glass cleaner to remove dust and grease. Any dirt left can cause bubbles or wrinkles under the film. Avoid using abrasive materials that can scratch the mirror.
Dry the mirror completely before moving to the next step. Check for any spots that need extra cleaning. The surface must be smooth and spotless for the film to stick well.
Measuring And Cutting Film
Measure your mirror’s size with a ruler or tape measure. Add a small extra margin to the film size. This helps when applying and trimming the film later. Use a sharp blade or scissors to cut the film carefully.
Cut the film on a clean, flat surface. Make straight cuts to avoid uneven edges. Keep the film safe and clean until you apply it to the mirror.
Applying The Film
Applying the film to create a smart mirror is a careful process. It needs patience and a steady hand. The film must be smooth and clean on the glass. This step is important for a clear reflection and good touchscreen response.
Follow each part closely to avoid mistakes. Clean the glass well before starting. Dust or dirt can cause bubbles or wrinkles. Work in a dust-free place to get the best result.
Step-by-step Application
First, cut the film to the glass size. Leave a little extra on the edges for trimming. Remove the backing slowly to expose the sticky side. Hold the film by the edges to avoid fingerprints.
Start from one corner and press the film onto the glass. Use a plastic card or squeegee to push the film down. Move slowly and evenly across the surface. Keep pressing out air as you go.
Trim the extra film around the edges carefully. Use a sharp knife or blade for clean cuts. Make sure the film fits perfectly on the glass.
Avoiding Bubbles And Wrinkles
Bubbles and wrinkles spoil the mirror’s look and touch. To stop them, apply the film slowly and press firmly. Use a squeegee with smooth, even pressure. Work from the center out to the edges.
If bubbles appear, push them towards the edge. For stubborn bubbles, lift the film gently and reapply. Avoid stretching the film; it can cause wrinkles. Keep the film flat and smooth throughout the process.
Check your work under bright light. This helps spot any small bubbles or dust. Fix these issues before the glue fully sets.

Credit: www.amazon.com
Installing The Display
Installing the display is a key step in building a smart mirror with film. The display shows all the information behind the mirror surface. It needs to be clear and bright enough to read easily. Proper installation ensures the mirror looks sleek and works well.
Choosing The Right Screen
Select a screen with good brightness and contrast. LED or LCD screens work best. Pick a size that fits your mirror frame perfectly. The resolution should be high enough for clear text and images. A thin screen helps keep the mirror slim and neat.
Consider power consumption as well. Lower power screens run cooler and save energy. Make sure the screen has HDMI or USB inputs. These ports connect the screen to your computer or media device easily.
Positioning And Mounting
Place the screen behind the film evenly to avoid shadows. The display should align with the center of the mirror. Secure it firmly using brackets or double-sided tape. Avoid gaps between the screen and the film.
Keep cables tidy and out of sight. Use cable clips or channels to organize wires. Check that the screen does not block any sensors or cameras. Test the screen’s display before finalizing the mount. Proper positioning ensures your smart mirror works perfectly.
Connecting Smart Features
Connecting smart features to your smart mirror brings it to life. This step lets your mirror show useful information. Weather, news, and calendar updates appear right on the glass. Smart features make the mirror interactive and helpful every day.
Hardware Setup
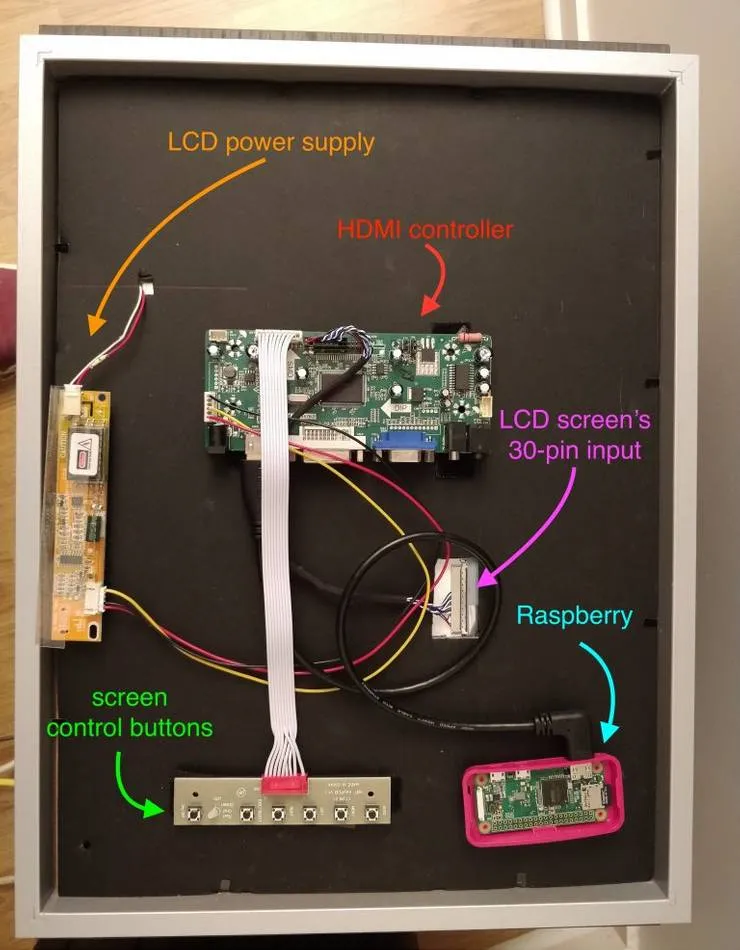
Start with a small computer like a Raspberry Pi. It acts as the brain of your smart mirror. Connect the computer behind the mirror using double-sided tape or a case. Add a monitor or screen to display information through the film. Attach sensors or a camera for voice or motion control. Power the setup with a reliable power supply. Ensure all wires are neat and hidden for a clean look.
Software Options
Choose software that fits your skill level and needs. MagicMirror² is popular for beginners and easy to customize. It runs on Raspberry Pi and shows widgets like weather and clock. Other options include Home Assistant or custom apps for advanced users. Install the software and connect it to the internet. Configure modules to display data you want on your mirror. Update software regularly for new features and security.
Credit: blog.theodo.com
Final Touches
After assembling the smart mirror, the final touches make a big difference. These steps ensure your mirror looks great and works well every day. Take your time to finish the project carefully. This part is about protecting your work and checking everything runs smoothly.
Sealing And Finishing
Seal the edges of the film to protect it from dust and moisture. Use clear tape or a thin strip of silicone for a neat finish. Avoid harsh chemicals that can damage the film surface. Clean the mirror gently with a soft cloth to remove fingerprints. This keeps your smart mirror looking clear and new. A smooth finish helps the mirror last longer.
Testing Functionality
Turn on the smart mirror and check all features work properly. Test the display for brightness and clarity. Make sure the touch or voice controls respond quickly. Check the connection to your smart devices. Fix any issues like lag or dim areas before final use. This step ensures the mirror gives a good user experience every time.
Troubleshooting Tips
Troubleshooting your smart mirror made with film helps keep it working well. Small problems can stop the mirror from showing information clearly. Fixing these issues quickly saves time and frustration.
This section covers common problems and easy ways to solve them. Follow these tips to get your smart mirror back to normal fast.
Common Issues
One issue is the film not sticking well to the glass. Air bubbles or wrinkles can appear under the film. These flaws block the display and reduce mirror clarity.
The screen behind the film might not turn on. Loose cables or power problems cause this. Sometimes the display shows only part of the information.
Another problem is the mirror reflecting too much light. This makes it hard to see the screen content. Poor lighting setup or wrong film type leads to this issue.
Quick Fixes
To remove bubbles, gently lift the film and smooth it down again. Use a plastic card to push air out from the center. Work slowly to avoid tearing the film.
Check all power connections and cables. Secure loose wires and test the power source. Restart the display device to refresh the screen.
Adjust the room lighting to reduce glare. Use dimmer lights or change the mirror’s angle. Choose a film that balances reflection and transparency well.

Credit: qz.com
Frequently Asked Questions
What Materials Are Needed To Make A Smart Mirror With Film?
You need a two-way mirror film, a monitor or tablet, a frame, and a microcontroller. These materials help create a functional smart mirror displaying useful information.
How Does Two-way Mirror Film Work For Smart Mirrors?
The film allows light to pass through from behind while reflecting the front image. This enables the display to show data clearly without losing the mirror effect.
Can I Install Smart Mirror Film Myself?
Yes, with careful handling, you can install the film on glass. Make sure to remove air bubbles and align it properly for best results.
What Software Is Required For A Smart Mirror Display?
You can use open-source platforms like MagicMirror². This software supports various widgets like weather, calendar, and news for your smart mirror.
Conclusion
Creating a smart mirror with film is a fun, simple project. It saves money and adds style to your space. You only need a few tools and some patience. The film helps the mirror show information clearly. You can customize your mirror to fit your needs.
Try different designs and features to make it yours. This project suits beginners and tech lovers alike. Enjoy your new smart mirror every day. Give it a try and see the results yourself.


