Are you tired of constantly opening the door for your pet every time they want to go outside? Installing a pet door in your drywall can give your furry friend the freedom they deserve—and make your life a lot easier.
But you might be wondering, “How do I put a pet door in my drywall without making a mess or causing damage? ” Don’t worry. In this guide, you’ll discover simple, step-by-step instructions that anyone can follow. By the end, you’ll have the confidence to create a perfect pet door that fits your wall and suits your pet’s needs.
Keep reading, and let’s make your home more pet-friendly today!
Choosing The Right Pet Door
Choosing the right pet door is important for your pet’s comfort and safety. The door should fit well and work smoothly. It should also match your wall and home style. This helps your pet move freely without problems. Consider your pet’s size and habits before picking a door.
Types Of Pet Doors
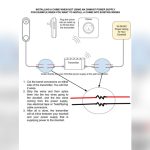
There are several types of pet doors. Some fit into walls, others go in doors or windows. Manual doors need your pet to push or pull them open. Electronic doors open only for your pet, using a collar sensor. Choose a type that suits your home and pet’s behavior.
Measuring Your Pet
Measure your pet carefully before buying a door. Measure height from floor to shoulder. Also, measure width across the widest part of your pet. Add a few inches for comfort. The door should be big enough for easy passing but not too big to cause drafts.
Material Considerations
Pet doors come in plastic, metal, or wood. Plastic doors are light and affordable. Metal doors are strong and last longer. Wooden doors match home decor but need more care. Pick a material that fits your wall and climate. It should also be easy to clean.
Gathering Tools And Materials
Before installing a pet door in your drywall, gather all necessary tools and materials. This step helps your work go smoothly. It saves time and avoids frustration. Being prepared means fewer interruptions during installation.
Collecting the right items also ensures safety and accuracy. You need tools for cutting, measuring, and securing the door. Safety gear protects you from dust and sharp edges. Extra supplies make the process easier.
Essential Tools
- Measuring tape to mark the door size accurately
- Stud finder to locate wall studs and avoid them
- Level to keep the door straight
- Drywall saw or jigsaw for cutting the wall
- Screwdriver or drill for attaching the pet door
- Pencil for marking cut lines
Safety Gear
- Safety goggles to protect your eyes from dust
- Dust mask to avoid inhaling drywall particles
- Work gloves to protect your hands from cuts
- Long sleeves to shield your arms
Additional Supplies
- Pet door kit suitable for drywall installation
- Painter’s tape to mark the cutting area
- Drop cloth to keep the floor clean
- Sandpaper to smooth rough edges after cutting
- Caulk or sealant to prevent drafts around the door
Preparing The Drywall
Preparing the drywall is the first step to install a pet door. It requires careful measuring and checking the wall. This preparation helps avoid damage and ensures a perfect fit for the door.
Locating Wall Studs
Use a stud finder to locate wall studs behind the drywall. Studs are vertical wooden beams that support the wall. Mark their edges with a pencil. Avoid cutting into a stud to keep the wall strong.
Marking The Cut Area
Measure your pet door size carefully. Draw the outline on the drywall using a pencil and a level. Double-check the measurements to make sure the door fits well. Mark straight and clear lines for a clean cut.
Checking For Wiring And Pipes
Look for electrical wires and water pipes inside the wall. Use a wire detector or inspection camera if possible. Avoid cutting near wires or pipes to prevent accidents. Call a professional if you find any hidden obstacles.
Credit: www.lowes.com
Cutting The Drywall
Cutting the drywall for a pet door is a key step. It needs care and precision to fit the door perfectly. A clean cut makes installation easier and keeps your wall looking good.
Using The Right Cutting Tools
Select tools that suit drywall cutting well. A drywall saw or a utility knife works best. A jigsaw can also cut clean lines if you have one. Make sure blades are sharp for smooth cutting. Dull tools can cause rough edges and damage.
Cutting Along The Marked Lines
Mark the pet door outline clearly on the drywall. Follow these lines closely as you cut. Take your time and cut slowly for accuracy. Avoid rushing to prevent mistakes or uneven cuts. Keep the saw steady and controlled throughout.
Smoothing The Edges
After cutting, check the edges carefully. Use sandpaper or a sanding block to smooth rough spots. This step helps the pet door fit snugly. Smooth edges also stop drywall from crumbling. Clean the area well before moving to the next step.
Installing The Pet Door Frame
Installing the pet door frame is a key step in putting a pet door in your drywall. This part ensures the door fits well and works smoothly. The frame holds the flap and keeps the door steady. Follow these simple steps to install the frame correctly for a neat and strong fit.
Fitting The Frame Into The Opening
Start by placing the pet door frame into the cut drywall opening. Check if the frame fits snugly without gaps. The frame should sit flush against the wall surface. Slight adjustments to the opening may be needed to get a perfect fit. Take your time to avoid forcing the frame in.
Securing The Frame
Use screws or fasteners to secure the frame to the drywall. Most pet door kits include screws for this purpose. Insert screws evenly around the frame edges to keep it stable. Avoid overtightening to prevent damaging the drywall. A firm frame ensures the pet door will last long and not wobble.
Sealing Around The Edges
Seal the edges of the frame with caulk or weatherstripping. This step prevents drafts and keeps insects out. Apply a thin, even layer of sealant around the frame edges. Smooth it out with a finger or tool for a clean finish. Proper sealing improves energy efficiency and protects your home.
Finishing Touches
Finishing touches make your pet door look neat and work well. These steps help your door fit perfectly into the wall. Your pet will also learn to use it easily. Follow these simple tips to complete the job.
Testing The Door Functionality
Check the door to see if it opens and closes smoothly. Push it gently to test the flap’s movement. Make sure it swings freely without getting stuck. Listen for any unusual sounds that might mean a problem. Fix any issues before moving on to other steps.
Painting And Blending With Wall
Match the paint color of your wall to the pet door frame. Use a small brush to carefully paint around the edges. Blend the paint well so it looks natural and clean. Let the paint dry completely to avoid smudges. This makes the pet door less noticeable in your room.
Training Your Pet To Use The Door
Show your pet how the door works by gently guiding them through it. Use treats or toys to encourage your pet to try the door. Be patient and praise your pet for every attempt. Practice daily until your pet feels confident using the door alone. This helps your pet enjoy their new freedom safely.
Troubleshooting Common Issues
Installing a pet door in drywall can be simple, but small problems may arise. These issues can affect how well the door works and how comfortable your pet feels using it. This section covers common problems and easy fixes to keep your pet door working smoothly.
Door Not Closing Properly
Sometimes, the pet door may not close all the way. Dirt or debris can block the flap. Check and clean the edges regularly. The flap might be misaligned. Loosen screws, adjust the frame, and tighten again. Warped flaps can cause gaps. Replace the flap if it is bent or damaged. A door that does not close can let air and bugs inside.
Drafts And Insulation
Pet doors can let cold or hot air enter your home. To stop drafts, add weather stripping around the frame. Use foam tape or rubber seals for better insulation. Some pet doors come with magnetic flaps that seal tightly. Consider adding a draft guard on the inside. Insulating around the door helps save energy and keeps pets comfortable.
Pet Reluctance
Pets may hesitate to use a new door. The flap might look strange or noisy. Train your pet with treats and praise near the door. Let them explore without pressure. Use a familiar blanket or toy by the door. Make sure the door size fits your pet comfortably. Patience and gentle encouragement help pets accept the new entrance.

Credit: www.youtube.com

Credit: www.amazon.com
Frequently Asked Questions
How Do I Choose The Right Pet Door For Drywall?
Select a pet door sized for your pet’s breed and weight. Ensure it fits easily in drywall. Opt for durable materials like plastic or metal for longevity and safety.
What Tools Are Needed To Install A Pet Door In Drywall?
You need a drywall saw, measuring tape, pencil, drill, screwdriver, and level. These tools help create a precise hole and secure the pet door firmly.
How To Cut Drywall Properly For A Pet Door?
Measure and mark the door’s outline carefully. Use a drywall saw to cut slowly along the lines. Avoid damaging wiring or pipes behind the wall.
Can I Install A Pet Door Without Damaging Drywall?
Minor damage is unavoidable, but careful cutting limits it. Use patching compound to repair edges if needed. Proper installation minimizes repair work later.
Conclusion
Installing a pet door in your drywall is easier than you think. Careful measuring and cutting create a perfect fit. Using the right tools helps avoid damage to walls. Taking time to follow each step ensures success. Your pet will enjoy more freedom and comfort.
A well-installed door adds convenience for your home. Try this project to make life simpler for both you and your pet. Simple work, great results.