
Your home’s safety depends a lot on your smoke detectors. If you have a hard wired smoke detector, knowing how to replace it can save you time, money, and keep your family protected.
This task might seem tricky, but with the right steps, you can do it yourself quickly and safely. Keep reading to discover simple tips and clear instructions that will guide you through replacing your hard wired smoke detector with confidence.
Don’t leave your safety to chance—take control now.
Tools And Materials Needed
Replacing a hard wired smoke detector requires some basic tools and materials. Having the right items makes the job safer and easier. Prepare everything before starting.
Essential Tools
You need a screwdriver, usually a flathead or Phillips. A voltage tester helps check power is off. Wire strippers remove insulation from wires. Pliers assist in twisting wires together. A ladder or step stool helps reach the detector on the ceiling.
Replacement Smoke Detector Options
Choose a smoke detector that fits your home’s wiring system. Some models have a battery backup for extra safety. Look for detectors with a silence button to stop false alarms. Make sure the new detector is compatible with your existing unit’s wiring.
Credit: www.reddit.com
Safety Precautions
Replacing a hard-wired smoke detector needs care and attention. Safety is the top priority. Follow simple steps to keep yourself safe and avoid accidents. This section covers key safety measures to take before starting the replacement process.
Power Shutdown
Turn off the power at the circuit breaker. This stops electricity from flowing to the smoke detector. Double-check the power is off by testing the detector or using a voltage tester. Never work on live wires. This reduces the risk of electric shock or injury.
Protective Gear
Wear gloves to protect your hands from sharp edges or wires. Use safety glasses to shield your eyes from dust or debris. A dust mask helps avoid breathing in dust or small particles. These simple tools keep you safe while working on the detector.
Removing The Old Smoke Detector
Removing the old hard wired smoke detector is the first step to install a new one. It needs care to avoid damage or injury. Follow the right steps to make the process safe and simple.
Turn off the power before starting. This stops electric shock and keeps you safe.
Locating The Detector
Find the smoke detector on the ceiling or high on the wall. Usually, it is near bedrooms or hallways. Check each room if unsure. Use a ladder to reach it safely.
Disconnecting Wiring
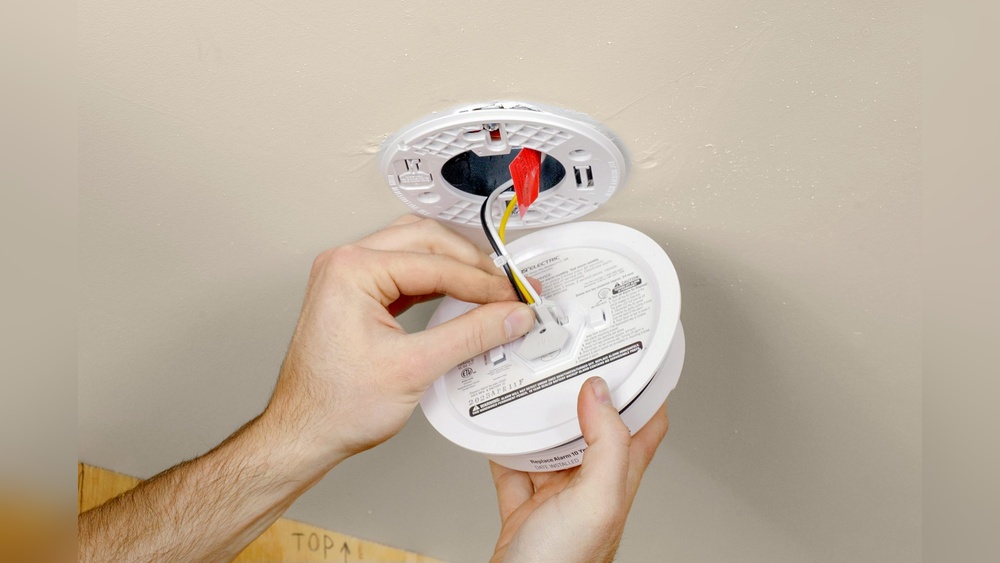
Switch off the power at the circuit breaker. Use a voltage tester to confirm no power flows. Gently remove the detector’s cover to see the wires. Carefully disconnect the wires from the smoke detector.
Removing The Unit
Hold the smoke detector and twist it counterclockwise. It should come off the mounting bracket. Place the old unit aside for disposal. Keep wires tucked safely to avoid shorts.
Installing The New Smoke Detector
Installing a new hard wired smoke detector is a key step for home safety. The process is simple and can be done with basic tools. Follow each step carefully to ensure the detector works well.
Connecting The Wires
Start by matching the wires from the ceiling to the new detector. Usually, there are three wires: black, white, and a red or yellow one. Connect the black wire to the black wire on the detector. Connect the white wire to the white wire. Then, connect the red or yellow wire to the remaining wire on the detector. Use wire nuts to secure each connection tightly. Make sure no bare wire is visible outside the nuts.
Mounting The Detector
Next, attach the mounting bracket to the ceiling box using screws. Align the bracket so the holes match the box holes. Then, snap or screw the new detector onto the mounting bracket. It should fit firmly and not wobble. Double-check that the detector is flush with the ceiling or wall.
Testing The Installation
Once mounted, test the new smoke detector. Press and hold the test button on the detector. You should hear a loud beep or alarm sound. If the sound is weak or absent, check the wiring again. Also, test other smoke detectors to confirm the system works. Replace the battery if needed, even if the detector is hard wired.
Troubleshooting Common Issues
Troubleshooting common problems helps keep your hard wired smoke detector working well. It saves time and avoids safety risks. Some issues are easy to fix. Others need careful checking. Below are common problems and simple tips to solve them quickly.
Detector Not Powering On
Check if the circuit breaker is on. Sometimes it trips and cuts power. Look at the wiring connections. Loose wires stop power flow. Make sure the detector is properly connected to the power source. Replace the backup battery if the detector uses one. A dead battery can stop it from turning on.
False Alarms
False alarms happen often with smoke detectors. Dust or insects inside the unit cause false triggers. Clean the detector gently with a soft brush or vacuum. Avoid placing the detector near kitchens or bathrooms. Steam and cooking smoke can set it off. Adjust the sensitivity settings if your model allows it.
Interconnection Problems
Hard wired detectors often connect to alert all units together. If they do not beep at the same time, check the wiring between units. Make sure all detectors share the same circuit. Reset the system by turning off power and turning it back on. Replace any damaged wire or faulty detector to restore interconnection.
:max_bytes(150000):strip_icc()/install-hardwired-smoke-detectors-1152329_FINAL-5233cb01c4f34ee1bae5860132624788.png)
Credit: www.thespruce.com
Maintenance Tips For Longevity
Keeping your hard wired smoke detector in good shape helps protect your home. Regular care extends its life and keeps it working well. Small steps can make a big difference in safety and reliability.
Regular Testing
Test your smoke detector once a month. Press the test button until the alarm sounds. This check confirms the detector works correctly. If it does not sound, fix or replace the unit immediately.
Cleaning The Detector
Dust and dirt can block the sensor. Use a soft brush or vacuum to clean the outside. Avoid spraying water or cleaners on the detector. Clean it every six months to keep it clear.
Battery Backup Checks
Many hard wired detectors have battery backups. Replace backup batteries twice a year. This keeps the alarm working during power outages. Check the battery light or beep to ensure power.

Credit: www.youtube.com
Frequently Asked Questions
How Do I Safely Replace A Hard Wired Smoke Detector?
Turn off the power at the circuit breaker before starting. Remove the old detector carefully. Disconnect wiring and replace with the new unit. Follow the manufacturer’s instructions for wiring and mounting. Restore power and test the detector to ensure it works properly.
Can I Replace A Hard Wired Smoke Detector Myself?
Yes, if you have basic electrical knowledge and follow safety steps. Always turn off the power first. If unsure, hire a licensed electrician to avoid risks. Proper installation is vital for your safety and compliance with local codes.
How Often Should Hard Wired Smoke Detectors Be Replaced?
Replace hard wired smoke detectors every 10 years. Over time, sensors lose sensitivity and may fail. Regular testing and maintenance are also important to ensure they function correctly between replacements.
What Tools Are Needed To Replace A Hard Wired Smoke Detector?
You’ll need a screwdriver, voltage tester, wire stripper, and possibly a ladder. Always use insulated tools for safety. Having the right tools ensures a smooth and safe replacement process.
Conclusion
Replacing a hard wired smoke detector is safer than leaving a broken one. Follow steps carefully for proper installation. Test the new detector to ensure it works well. Regular checks keep your home protected from fire risks. Stay calm and take your time during the process.
This small task brings peace of mind. Safety matters, and a working smoke detector helps protect lives. Keep your home safe with this simple upgrade.