
Are you tired of stepping out of the shower and grabbing a cold, damp towel? Installing an electric heated towel rack can change that simple moment into a warm, cozy experience every time.
You might think it’s complicated, but with the right steps, you can have your own heated towel rack up and running quickly. In this guide, you’ll discover easy-to-follow instructions that save you time and avoid costly mistakes. Ready to make your bathroom feel like a spa?
Keep reading, and you’ll learn exactly how to install your electric heated towel rack with confidence.

Credit: www.personamarketing.com.br
Choosing The Right Towel Rack
Choosing the right electric heated towel rack is key for comfort and style. The right towel rack keeps towels warm and dry. It also fits well in your bathroom space. Consider several factors before buying. This helps you avoid mistakes and find the best fit for your needs.
Types Of Electric Heated Towel Racks
Heated towel racks come in many styles. Wall-mounted racks save space and look neat. Freestanding racks can move and fit anywhere. Some racks have bars that heat quickly. Others offer gentle warmth over time. Choose a style that suits your bathroom and heating needs.
Size And Placement Considerations
Measure your bathroom space carefully. A large rack may crowd a small room. A small rack may not hold enough towels. Think about where you want to install it. Near the shower or sink works best. Make sure there is a power source close by. Proper placement improves convenience and drying efficiency.
Power Requirements
Electric towel racks need power to heat. Check the voltage and wattage before buying. Some use standard 120V outlets. Others need hardwiring into your electrical system. Know your bathroom’s electrical capacity. Avoid overloading circuits for safety. Choose a rack with power needs your setup can handle.
Gathering Tools And Materials
Before installing an electric heated towel rack, gather all tools and materials. This step saves time and avoids interruptions. Having everything ready helps the installation go smoothly. It also ensures safety and proper fitting.
Essential Tools
Start with a drill for making holes in the wall. Use a screwdriver to fix screws tightly. A level helps to align the towel rack straight. Wire strippers are needed to prepare electrical wires. A tape measure ensures correct placement on the wall. Pliers can help with small adjustments. Finally, have a pencil to mark drill spots.
Safety Equipment
Wear safety goggles to protect your eyes from dust. Use gloves to avoid cuts and shocks. A dust mask keeps you safe from inhaling particles. Make sure to have a voltage tester to check the power is off. Always unplug the main power before starting work. Safety first prevents accidents and injuries.
Preparing The Installation Site
Preparing the installation site is a key step before mounting your electric heated towel rack. It ensures the rack will work safely and efficiently. This stage includes finding a power source, marking where the rack will go, and checking the wall surface. Each step helps prevent problems later.
Locating Power Source
Find a nearby electrical outlet or wiring that can support the towel rack. The power source should be close to the installation spot. It must handle the rack’s voltage and current needs. Avoid using extension cords for safety and code reasons. Confirm the circuit can handle the extra load to prevent tripping breakers.
Marking Mounting Points
Use a pencil and level to mark where screws or brackets will go. Follow the manufacturer’s instructions for spacing and height. Double-check the marks to ensure the rack will be straight and balanced. Correct placement avoids future adjustments and keeps the rack secure.
Wall Surface Assessment
Check the wall where the rack will mount. Make sure it is strong enough to hold the weight. Drywall may need anchors or studs for support. Look for moisture or damage that could weaken the mount. A solid wall surface prevents accidents and ensures a long-lasting installation.
Mounting The Towel Rack
Mounting the electric heated towel rack properly ensures safety and durability. This step needs attention to detail for a firm hold. Prepare your tools and choose the right wall spot. Follow the instructions carefully to avoid damage or loose fitting.
Drilling And Anchoring
Mark the holes on the wall using the rack’s mounting bracket. Use a level to keep marks straight. Drill holes that match the size of the wall anchors. Choose anchors based on your wall type—drywall, tile, or concrete. Insert the anchors firmly to hold screws tightly. This step prevents the rack from falling or shifting.
Securing The Rack
Align the towel rack with the drilled holes. Insert screws through the mounting bracket into the anchors. Tighten the screws with a screwdriver but do not overtighten. Check if the rack feels steady and secure. Adjust screws if the rack wobbles. A secure rack lasts longer and holds towels safely.
Electrical Connections
Making the right electrical connections is key to installing an electric heated towel rack safely. This step ensures the rack heats properly and avoids any electrical issues. Understanding the basics of wiring and power connection helps complete the job with confidence.
Wiring Basics
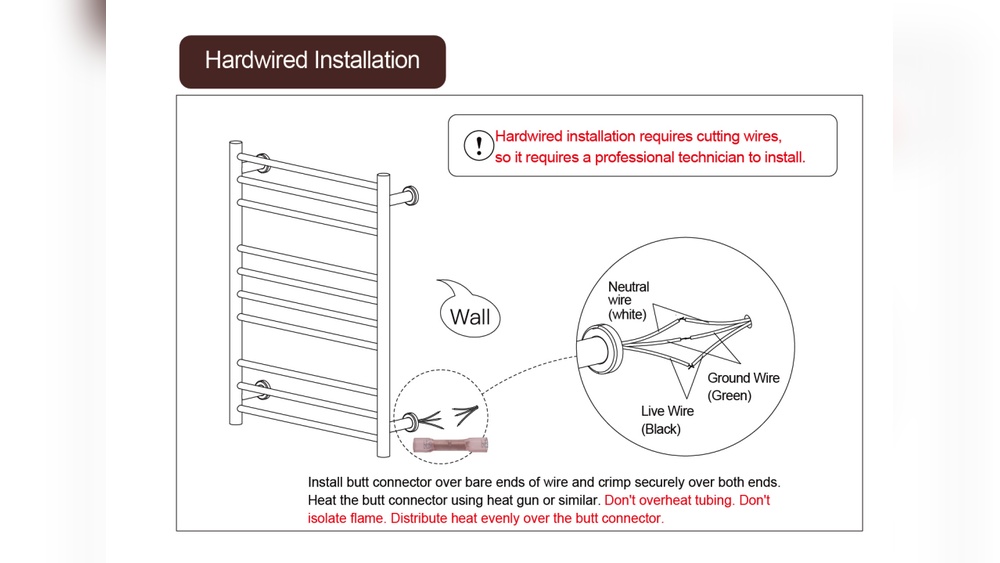
First, identify the wires in your wall. Usually, you will find a live wire, a neutral wire, and a ground wire. The live wire carries current to the rack. The neutral wire completes the circuit. The ground wire protects against electric shocks.
Use a voltage tester to check for power. Turn off the main switch before starting any wiring. This prevents accidents and shocks.
Connecting To Power
Connect the heated towel rack wires to the matching wall wires. Use wire nuts to join them tightly. Secure the ground wire to a metal screw or grounding point. Follow the manufacturer’s wiring diagram carefully.
Ensure all connections are firm and insulated. Loose wires can cause sparks or failures. Double-check the wiring color codes to avoid mistakes.
Testing The Electrical Setup
Turn the power back on after wiring is complete. Switch on the towel rack to see if it heats up. Use a multimeter to check the voltage at the rack terminals.
Look for any unusual sounds or smells. If the rack does not work, switch off power and recheck connections. Testing ensures the installation is safe and functional.
Credit: www.youtube.com
Final Setup And Safety Checks
After installing your electric heated towel rack, the final setup and safety checks are crucial. These steps ensure your towel rack works well and stays safe to use. Taking time to secure covers, check stability, and follow safety precautions protects your home and family.
Securing Covers And Panels
Start by putting back all covers and panels on the towel rack. Make sure each cover fits tightly and screws are fastened firmly. Loose covers can expose electrical parts, which is dangerous. Check that no wires are visible or loose. This keeps the rack safe and clean in appearance.
Verifying Stability
Next, test the towel rack’s stability. Gently shake the rack to see if it moves or feels loose. Tighten any screws or brackets if needed. A stable rack prevents accidents and damage. It also holds towels securely without risk of falling.
Safety Precautions
Finally, follow important safety steps before using the rack. Confirm the power is off while checking the rack. Use a voltage tester to ensure no current is flowing. Keep the rack away from water sources to avoid shocks. Read the manufacturer’s safety instructions carefully. These steps protect you from electrical hazards.
Maintenance Tips
Maintaining your electric heated towel rack is key to keeping it working well. Regular care helps avoid damage and keeps the rack clean and efficient. Follow these simple maintenance tips to extend the life of your towel rack.
Cleaning The Towel Rack
Turn off the power before cleaning the rack. Use a soft cloth dampened with mild soap and water. Avoid harsh chemicals that can damage the finish. Wipe the rack gently to remove dust and dirt. Dry it with a clean towel to prevent water spots. Clean the rack once every week or two for best results.
Troubleshooting Common Issues
If the towel rack does not heat up, check the power supply first. Make sure the plug is secure and the switch is on. Look for any visible damage to the cord or plug. If the rack overheats, turn it off and let it cool down. Reset the thermostat if your model has one. Contact a professional if problems continue or if you smell burning.

Credit: www.bathroombutler.com
Frequently Asked Questions
What Tools Are Needed To Install An Electric Heated Towel Rack?
You need a drill, screwdriver, level, measuring tape, wire stripper, and mounting hardware. Safety gear like gloves and goggles is also recommended for protection during installation.
How Do I Connect The Heated Towel Rack To Power Safely?
Turn off the main power before wiring. Connect the rack’s wires to a dedicated circuit or a GFCI outlet. Follow local electrical codes and consider hiring a licensed electrician for safety.
Can I Install A Heated Towel Rack Without Professional Help?
Yes, if you have basic electrical and DIY skills. Follow the manufacturer’s instructions carefully. However, consult a professional if you’re unsure about electrical connections or local regulations.
How Long Does It Take To Install A Heated Towel Rack?
Installation typically takes 1 to 2 hours. Time varies based on wall type and electrical setup. Proper planning and tools can speed up the process.
Conclusion
Installing an electric heated towel rack can improve your bathroom comfort. Follow the steps carefully for safe and proper setup. Double-check electrical connections to avoid any issues. Choose a spot near a power source for easy installation. Enjoy warm towels after every shower or bath.
Regular maintenance keeps the rack working well over time. This simple upgrade adds convenience and a touch of luxury to your home. A cozy bathroom experience is just a few steps away.