
Your home’s safety depends on reliable smoke detectors, and if yours is hard wired, knowing how to change it can save you time and keep your family protected. You might feel unsure about handling electrical connections, but this guide will walk you through each step clearly and safely.
By the end, you’ll have the confidence to replace your hard wired smoke detector without needing to call a professional. Keep reading—you’re just a few easy steps away from ensuring your home stays safe and secure.

Credit: www.youtube.com
Tools And Materials Needed
Changing a hard-wired smoke detector needs specific tools and materials. Having these ready makes the job faster and safer. Prepare everything before you start the replacement process.
Basic Tools
A screwdriver is essential for removing the old detector and attaching the new one. Use a voltage tester to check power is off. Wire strippers help prepare the wires for connection.
Safety Equipment
Wear safety goggles to protect your eyes from dust or debris. Use insulated gloves to reduce the risk of electrical shock. A sturdy ladder helps you reach ceiling-mounted detectors safely.
Replacement Parts
Buy a compatible smoke detector designed for hard-wired systems. Include a backup battery if your new detector supports it. Have wire nuts ready to secure electrical connections.
Additional Supplies
Keep electrical tape handy to wrap wire nuts and connections. A flashlight is useful if you need to work in low light areas. Carry a small container to hold screws and parts during the work.
Safety Precautions
Safety is the top priority when changing a hard-wired smoke detector. Working with electricity can be dangerous. Taking the right steps protects you and your home from harm. Follow these safety precautions carefully before starting the replacement process.
Turn Off The Power
Switch off the power at the circuit breaker. This stops electricity from flowing to the smoke detector. Double-check by testing the detector with a voltage tester. Never skip this step to avoid electric shock.
Use A Ladder Safely
Choose a sturdy ladder to reach the smoke detector. Place it on a flat surface to prevent falls. Keep your body balanced and do not overreach. Ask someone to hold the ladder for extra safety.
Handle Wires Carefully
Do not pull or tug on wires. Gently disconnect the smoke detector from its wires. Use insulated tools if needed. Avoid touching any bare wires to prevent shocks.
Wear Protective Gear
Put on safety glasses to protect your eyes from dust. Wear gloves to avoid cuts or scrapes. Dress in long sleeves to guard your skin.
Test The New Detector Safely
After installation, turn the power back on. Use the test button on the new smoke detector. Ensure it sounds loudly and clearly. This confirms it works and is ready to protect your home.
Turning Off Power
Turning off the power is the first step when changing a hard-wired smoke detector. It keeps you safe from electrical shocks. This step is very important. Always make sure the power is off before you start.
Follow these simple steps to safely turn off the power to your smoke detector.
Locate The Circuit Breaker Panel
Find your home’s main circuit breaker panel. It is usually in the basement, garage, or utility room. This panel controls electricity to your entire home.
Identify The Correct Breaker
Look for the breaker labeled for the smoke detector or the room it is in. If there is no label, you may need to turn off the main breaker. This stops power to the whole house.
Switch Off The Breaker
Flip the breaker switch to the “off” position. This cuts the power to the smoke detector. Double-check by pressing the test button on the detector. It should not beep if power is off.
Use A Voltage Tester For Safety
Use a voltage tester on the smoke detector wires. This tool confirms no electricity is flowing. It is an extra safety step before you touch any wires.
Credit: www.reddit.com
Removing The Old Detector
Removing the old hard wired smoke detector is the first step in replacing it. Safety is key. Always turn off the power to the detector at the breaker box. This prevents any electric shock during removal. The process involves three main steps: detaching the cover, disconnecting the wires, and removing the mounting bracket.
Detaching The Cover
Start by gently twisting or pulling the smoke detector cover. Some models have clips or tabs to press. Be careful not to break the cover. This exposes the wiring and mounting base underneath. Set the cover aside in a safe place.
Disconnecting The Wires
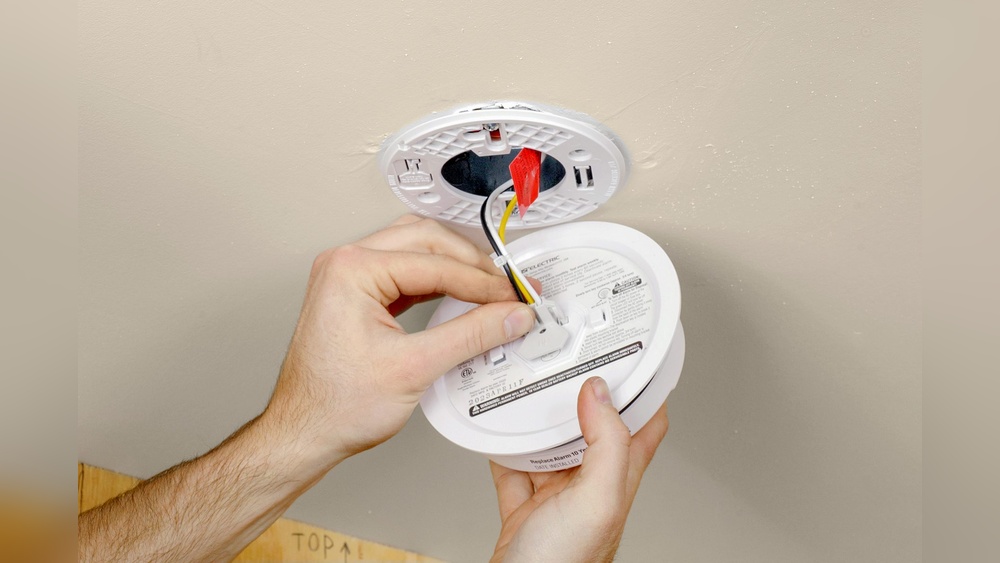
Locate the wire connector attached to the detector. Carefully unplug the connector or unscrew the wire nuts. Remember the wire colors and their connections. Use a small piece of tape to label them if needed. Do not pull the wires hard. Handle them gently to avoid damage.
Removing Mounting Bracket
Find the screws or clips holding the mounting bracket to the ceiling or wall. Use a screwdriver to remove the screws. Keep the screws for the new detector installation. Once loose, take down the bracket. Clean the area if necessary before installing the new detector.
Installing The New Detector
Installing the new smoke detector is a key step to ensure safety. This part needs careful attention to detail. Follow each step to make sure the device works properly. A well-installed detector can protect your home and family from fire risks.
Start by handling the wires carefully, then secure the mounting bracket. Finally, attach the detector to complete the installation. This process is simple with the right guidance.
Connecting The Wires
Turn off the power to the smoke detector circuit before starting. Match the wires from your ceiling to the wires on the new detector. Usually, black is for power, white is neutral, and red or yellow is for interconnect. Use wire nuts to join the matching wires tightly. Make sure no metal is exposed outside the wire nuts. A secure connection ensures the detector will get power and signal correctly.
Securing The Mounting Bracket
The mounting bracket holds the detector firmly on the ceiling or wall. Align the bracket with the existing holes or mark new ones. Use screws to attach the bracket tightly. Check that it does not wobble or move. A solid bracket keeps the detector steady and working well over time.
Attaching The Detector
Once the bracket is secure, place the detector onto it. Most detectors twist or snap into place. Turn the detector gently until it locks. Test by giving it a slight pull to make sure it is fixed. Restore power and press the test button to check the alarm. A properly attached detector will sound loud and clear.
Restoring Power And Testing
Restoring power and testing the smoke detector is the final step after replacement. This step ensures your safety and confirms the device works correctly. Follow these instructions carefully to avoid any electrical problems and to verify the unit’s operation.
Turning Power Back On
Find the circuit breaker that controls the smoke detector. Flip the switch back to the “on” position. This action restores electricity to the device. Wait a moment to let the detector power up fully. Check for any indicator lights that show it is active. Do not skip this step to avoid false alarms or device failure.
Testing The Detector Functionality
Press the test button on the smoke detector. Hold it for a few seconds until you hear a loud beep. This sound confirms the alarm is working correctly. If no sound occurs, check the power source again. Replace the detector if it still does not respond. Regular testing helps keep your home safe from fire hazards.
Troubleshooting Common Issues
Troubleshooting common problems with hard wired smoke detectors helps keep your home safe. These issues can stop the detector from working correctly. Fixing them quickly ensures your detector alerts you in time. Below are common problems and how to solve them.
Detector Not Powering On
Check the circuit breaker first. It may have tripped and cut power. Make sure the detector is properly connected to the wiring. Loose wires can stop power flow. Test the power at the detector with a voltage tester. Replace the backup battery if it is dead. Sometimes a reset button on the detector can restore power.
False Alarms
False alarms happen often and cause frustration. Clean the detector to remove dust or insects inside. Avoid placing detectors near kitchens or bathrooms where steam triggers alarms. Check for low batteries as they cause false signals. Replace old detectors every 10 years to reduce false alarms. Adjust the sensitivity if your model allows it.
Interconnected Detectors Not Syncing
Interconnected detectors should sound together. Check the wiring between units for loose connections. Each detector must be on the same circuit. Test if one unit works alone. Reset all detectors by cutting power for a few minutes. Replace any faulty unit that fails to communicate with others.
Maintenance Tips
Maintaining a hard-wired smoke detector is crucial for home safety. Simple steps help keep it working properly. Regular care prevents false alarms and ensures early fire detection. Follow these easy maintenance tips to protect your home and family.
Regular Cleaning
Dust and dirt can block the smoke detector’s sensors. Use a soft brush or vacuum to clean it gently. Avoid spraying water or cleaners directly on the device. Clean the smoke detector every six months for best results.
Battery Replacement
Even hard-wired detectors have backup batteries. Replace these batteries once a year. Use the type recommended by the manufacturer. Low batteries cause chirping sounds and reduce safety.
Periodic Testing
Test your smoke detector monthly. Press the test button until the alarm sounds. This check confirms the detector works properly. If it does not sound, replace the batteries or the unit immediately.
:max_bytes(150000):strip_icc()/install-hardwired-smoke-detectors-1152329_FINAL-5233cb01c4f34ee1bae5860132624788.png)
Credit: www.thespruce.com
Frequently Asked Questions
How Do You Safely Disconnect A Hardwired Smoke Detector?
Turn off the power at the circuit breaker before disconnecting. Remove the detector from the mounting bracket. Gently unplug the wiring harness to avoid damage. Always test the circuit with a voltage tester to ensure power is off.
How Often Should You Replace A Hardwired Smoke Detector?
Replace hardwired smoke detectors every 10 years. Aging detectors may fail to detect smoke effectively. Regular testing and maintenance ensure optimal safety and functionality.
Can You Replace A Hardwired Smoke Detector Yourself?
Yes, replacing a hardwired smoke detector is doable with basic electrical skills. Always switch off power first. Follow manufacturer instructions carefully. If unsure, consult a professional electrician for safety.
What Tools Are Needed To Change A Hardwired Smoke Detector?
You will need a screwdriver, voltage tester, and wire connectors. Turn off the power before starting. Have the replacement detector ready. These tools ensure a safe and efficient replacement process.
Conclusion
Changing a hard-wired smoke detector is simple and important. Always turn off the power first. Carefully remove the old detector and connect the new one. Test the new detector to make sure it works. Regular checks keep your home safe.
Stay alert and replace detectors every 10 years. Safety starts with small steps. Keep your family protected with working smoke alarms.