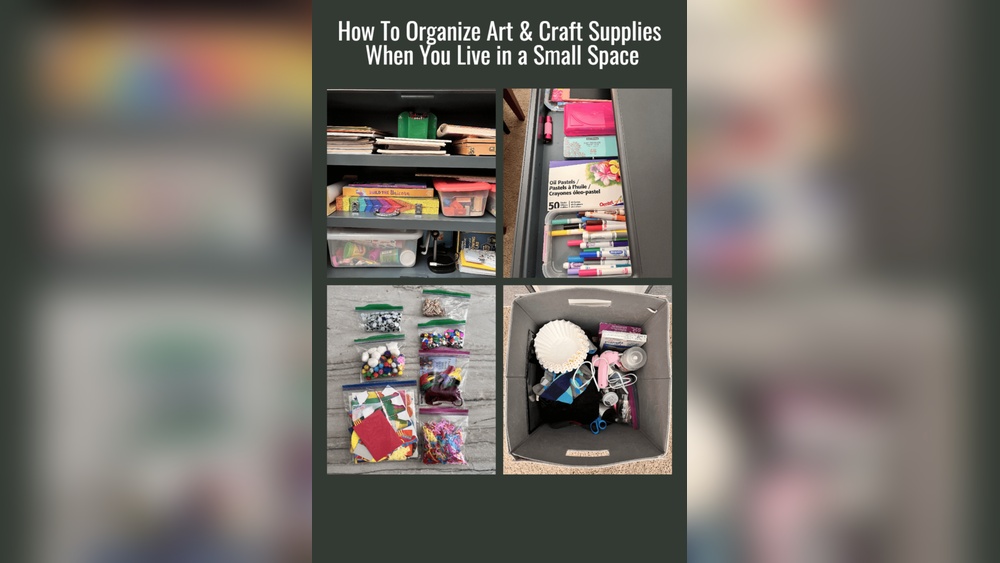
Struggling to keep your art supplies neat in a tight space? You’re not alone.
When every inch counts, finding smart ways to organize can transform your creative corner from cluttered chaos into an inspiring haven. Imagine being able to spot your favorite brush or paint without digging through piles. With simple strategies like using wall space, clear containers, and clever storage solutions, you can make your small area work harder for you.
Ready to unlock the secrets to a tidy, accessible art supply setup? Keep reading and discover easy tips that will help you create order and boost your creativity.
:max_bytes(150000):strip_icc()/82048335_167323611222490_3931314088127709386_n-b7e7d22d89334e28bf85a3bb5344b27f.jpg)
Credit: www.thespruce.com
Maximize Vertical Space
Maximizing vertical space is key in small areas. It frees up your work surface and keeps supplies visible. Using walls and doors lets you store more without clutter. Art tools stay easy to reach and tidy. Try these smart ideas to use every inch above your desk or workspace.
Pegboards For Tools
Pegboards hold brushes, scissors, and rulers neatly. Hang hooks to keep items organized and accessible. Change the layout anytime to fit new tools. Pegboards keep your supplies off the desk but close by. This method saves space and keeps everything in view.
Floating Shelves
Floating shelves add storage without floor clutter. Place jars with pens, paints, or markers on them. Use different heights to fit tall bottles or small boxes. Shelves make a clean display and free up drawer space. They also keep your supplies within easy reach.
Vertical Filing Systems
Vertical filing systems sort paper, sketchbooks, and canvases upright. This prevents bending or damage and saves room. Use labeled slots or magazine holders to separate art materials. It keeps your papers tidy and easy to find. Perfect for storing large or flat items.
Over-the-door Organizers
Over-the-door organizers use unused door space wisely. Store paints, glue, or small tools in pockets or containers. These organizers keep supplies off counters and desks. They are perfect for artists with limited wall space. Easy to install and remove as needed.

Credit: www.roomsneedlove.com
Use Clear Containers
Clear containers make organizing art supplies simple and efficient. They allow you to see everything at a glance. This saves time searching for specific items. Clear storage also keeps your space neat and visually calm. You can stack and arrange containers easily, maximizing small space use.
Stackable Bins And Jars
Stackable bins and jars save valuable space by going upward. Clear plastic bins fit snugly on top of each other. Jars with lids hold smaller items like beads or buttons. Stacking keeps supplies accessible without cluttering your work area. Choose uniform containers for a tidy, cohesive look.
Categorize By Item Type
Sort art supplies by type before storing them in clear containers. Group paints, brushes, pencils, and papers separately. This method speeds up finding what you need. Label each container clearly for quick identification. Categorizing keeps your small space organized and clutter-free.
Zip-top Bags For Small Supplies
Use clear zip-top bags for tiny items like erasers, clips, or glitter. These bags keep small pieces together and visible. They fit easily inside bins or drawers without spilling. Zip-top bags are flexible and reusable, perfect for saving space. They also make it easy to grab just what you need.
Multi-functional Furniture
Multi-functional furniture offers smart solutions for small art spaces. It combines storage and work areas in one piece. This reduces clutter and maximizes available space. You get both organization and convenience. These furniture pieces adapt to your needs and keep supplies tidy.
Rolling Carts
Rolling carts are easy to move around your space. They provide multiple shelves for different supplies. You can store paints, brushes, and paper on separate levels. When you need to work, roll the cart close to your desk. After finishing, tuck it away in a corner. Some carts have drawers for small items like pencils and erasers. Their compact size fits well in tight spots. The mobility keeps your supplies within reach and organized.
Furniture With Built-in Storage
Furniture with built-in storage saves room and organizes supplies neatly. Desks with drawers or shelves hold tools and materials. Benches with hidden compartments hide clutter out of sight. Shelving units with cubbies allow sorting by supply type. These designs use vertical space, freeing floor area. Built-in storage furniture looks clean and keeps art supplies ready. It helps maintain a clutter-free and efficient workspace.
Group Supplies By Use
Grouping art supplies by use simplifies your workspace and saves time. It helps you find tools quickly and keeps the area tidy. Organize items based on their function. This method works well in small spaces. Assign a specific spot for each type of supply.
Separate Paints And Brushes
Keep paints and brushes in different containers. Use jars or cups for brushes to keep bristles safe. Store paints upright to avoid spills. Group similar paint types together, like acrylics or watercolors. This separation prevents damage and makes your painting process smoother.
Organize Papers And Sketchbooks
Stack papers and sketchbooks by size or type. Use vertical holders or magazine racks to save space. Keep frequently used sketchbooks within easy reach. Store specialty papers in clear folders to protect them. This arrangement keeps your papers neat and easy to find.
Store Cutting Tools Together
Gather all cutting tools in one place. Use a small box or drawer to hold scissors, knives, and cutters. Add blade covers for safety. Keep cutting mats nearby to protect surfaces. This setup keeps sharp tools organized and easy to access.
Label Everything
Labeling art supplies helps keep your small space neat and efficient. Clear labels make it quick to find tools and materials. This saves time and reduces clutter. Labeling also encourages putting items back in their place. It creates a calm, organized workspace that inspires creativity.
Use Clear Labels
Choose labels that are easy to read. Use simple fonts and large letters. White labels with black text work well for visibility. Transparent labels keep the look clean and modern. Avoid fancy fonts that are hard to understand. Clear labels help you spot what you need fast. They reduce the chance of mixing up supplies. Stick labels on bins, jars, drawers, and shelves.
Consistent Labeling Style
Keep all labels uniform in size and color. Consistent style makes the space look tidy. Use the same font and label material everywhere. Group similar items with matching labels for easy recognition. This uniformity helps your brain organize visually. It also makes adding new labels simple. Consistent labeling supports long-term organization habits. Your small art space will feel more inviting and easier to maintain.

Credit: www.roomsneedlove.com
Maintain Order
Maintaining order in a small art space keeps creativity flowing and clutter away. It helps you find supplies quickly and saves time. A tidy workspace invites more art-making and less stress.
Regular Decluttering
Set a schedule to clear out unused or broken items. Toss dried-up markers and empty glue sticks. Keep only what you use often or truly love.
Sort supplies by type and condition during decluttering. Donate extras or share with friends to avoid waste. A clean space feels fresh and ready for new projects.
Reassess Storage Needs
Review your storage solutions every few months. Your art habits may change, so adjust containers and shelves accordingly.
Swap bulky bins for stackable boxes or drawer organizers. Use wall hooks or magnetic strips to free up desk space. Adapt your setup to fit new tools or materials.
Add Decorative Elements
Adding decorative elements to your art supply storage can make your small space feel bright and inspiring. It transforms clutter into a creative display. This approach helps you enjoy your supplies and keeps them easy to find.
Display Art Supplies As Decor
Show off your brushes, pencils, and markers in clear jars or vintage containers. Arrange them by size or color to create a neat, artistic look. Open storage turns everyday tools into eye-catching decor. It also saves space and keeps your supplies within reach.
Hang small shelves or pegboards to display your most-used items. You can add framed artwork or inspirational quotes around your supplies. This makes your art area feel personal and motivating. The space becomes both functional and beautiful.
Incorporate Colorful Containers
Choose bright, colorful boxes, bins, or baskets to store your art materials. Colorful containers add a fun vibe and make it easy to spot what you need. Use stackable containers to maximize vertical space. Label each container clearly for quick access.
Mix and match sizes and shapes to fit your available space. Use containers with lids to keep dust away from delicate items. With colorful storage, your small space will look tidy and lively at the same time. It invites creativity every time you enter the room.
Frequently Asked Questions
How To Organize Craft Supplies In A Small Space Diy?
Use pegboards, floating shelves, and wall storage to save space. Sort supplies by type in clear, stackable bins. Label containers for easy access. Use rolling carts for mobility. Regularly declutter to maintain order and maximize your small craft area efficiently.
How To Make An Art Supplies Organizer?
Install pegboards and floating shelves for vertical storage. Use clear bins to categorize supplies. Label containers and keep items accessible with rolling carts. Organize by type to maintain order and maximize space efficiently.
How To Organize An Art Supply Closet?
Group similar art supplies like paints, brushes, and sketchbooks together. Use clear bins, pegboards, and floating shelves to maximize space. Label containers and declutter regularly to maintain order. Incorporate rolling carts for mobility and easy access.
How To Organize Painting Supplies?
Organize painting supplies by grouping similar items like brushes, paints, and pencils in clear, labeled bins. Use pegboards and shelves to save space. Store tools vertically and keep frequently used items within reach for easy access and tidiness.
Conclusion
Organizing art supplies in a small space is simple with smart ideas. Use vertical storage like pegboards to save room. Group similar items in clear bins for easy finding. A rolling cart helps keep tools nearby and mobile. Label containers clearly to stay neat and focused.
Regularly remove unused supplies to prevent clutter. These steps create a tidy, inspiring workspace you enjoy. Start small, stay consistent, and watch your space transform.