When an emergency strikes, having the right information at your fingertips can make all the difference. You might think you’re prepared, but can you truly visualize what being ready looks like?
That’s where emergency preparedness pictures come in. They don’t just show you what to pack—they help you understand how to organize your supplies, set up your safe spaces, and react quickly when time is critical. You’ll discover clear, practical images that guide you step-by-step to build your own emergency kit and keep your loved ones safe.
Don’t wait for a crisis to test your readiness—see exactly what you need, how it fits together, and feel confident that you’re prepared for the unexpected. Keep reading to transform your emergency plan from vague ideas into vivid, actionable reality.
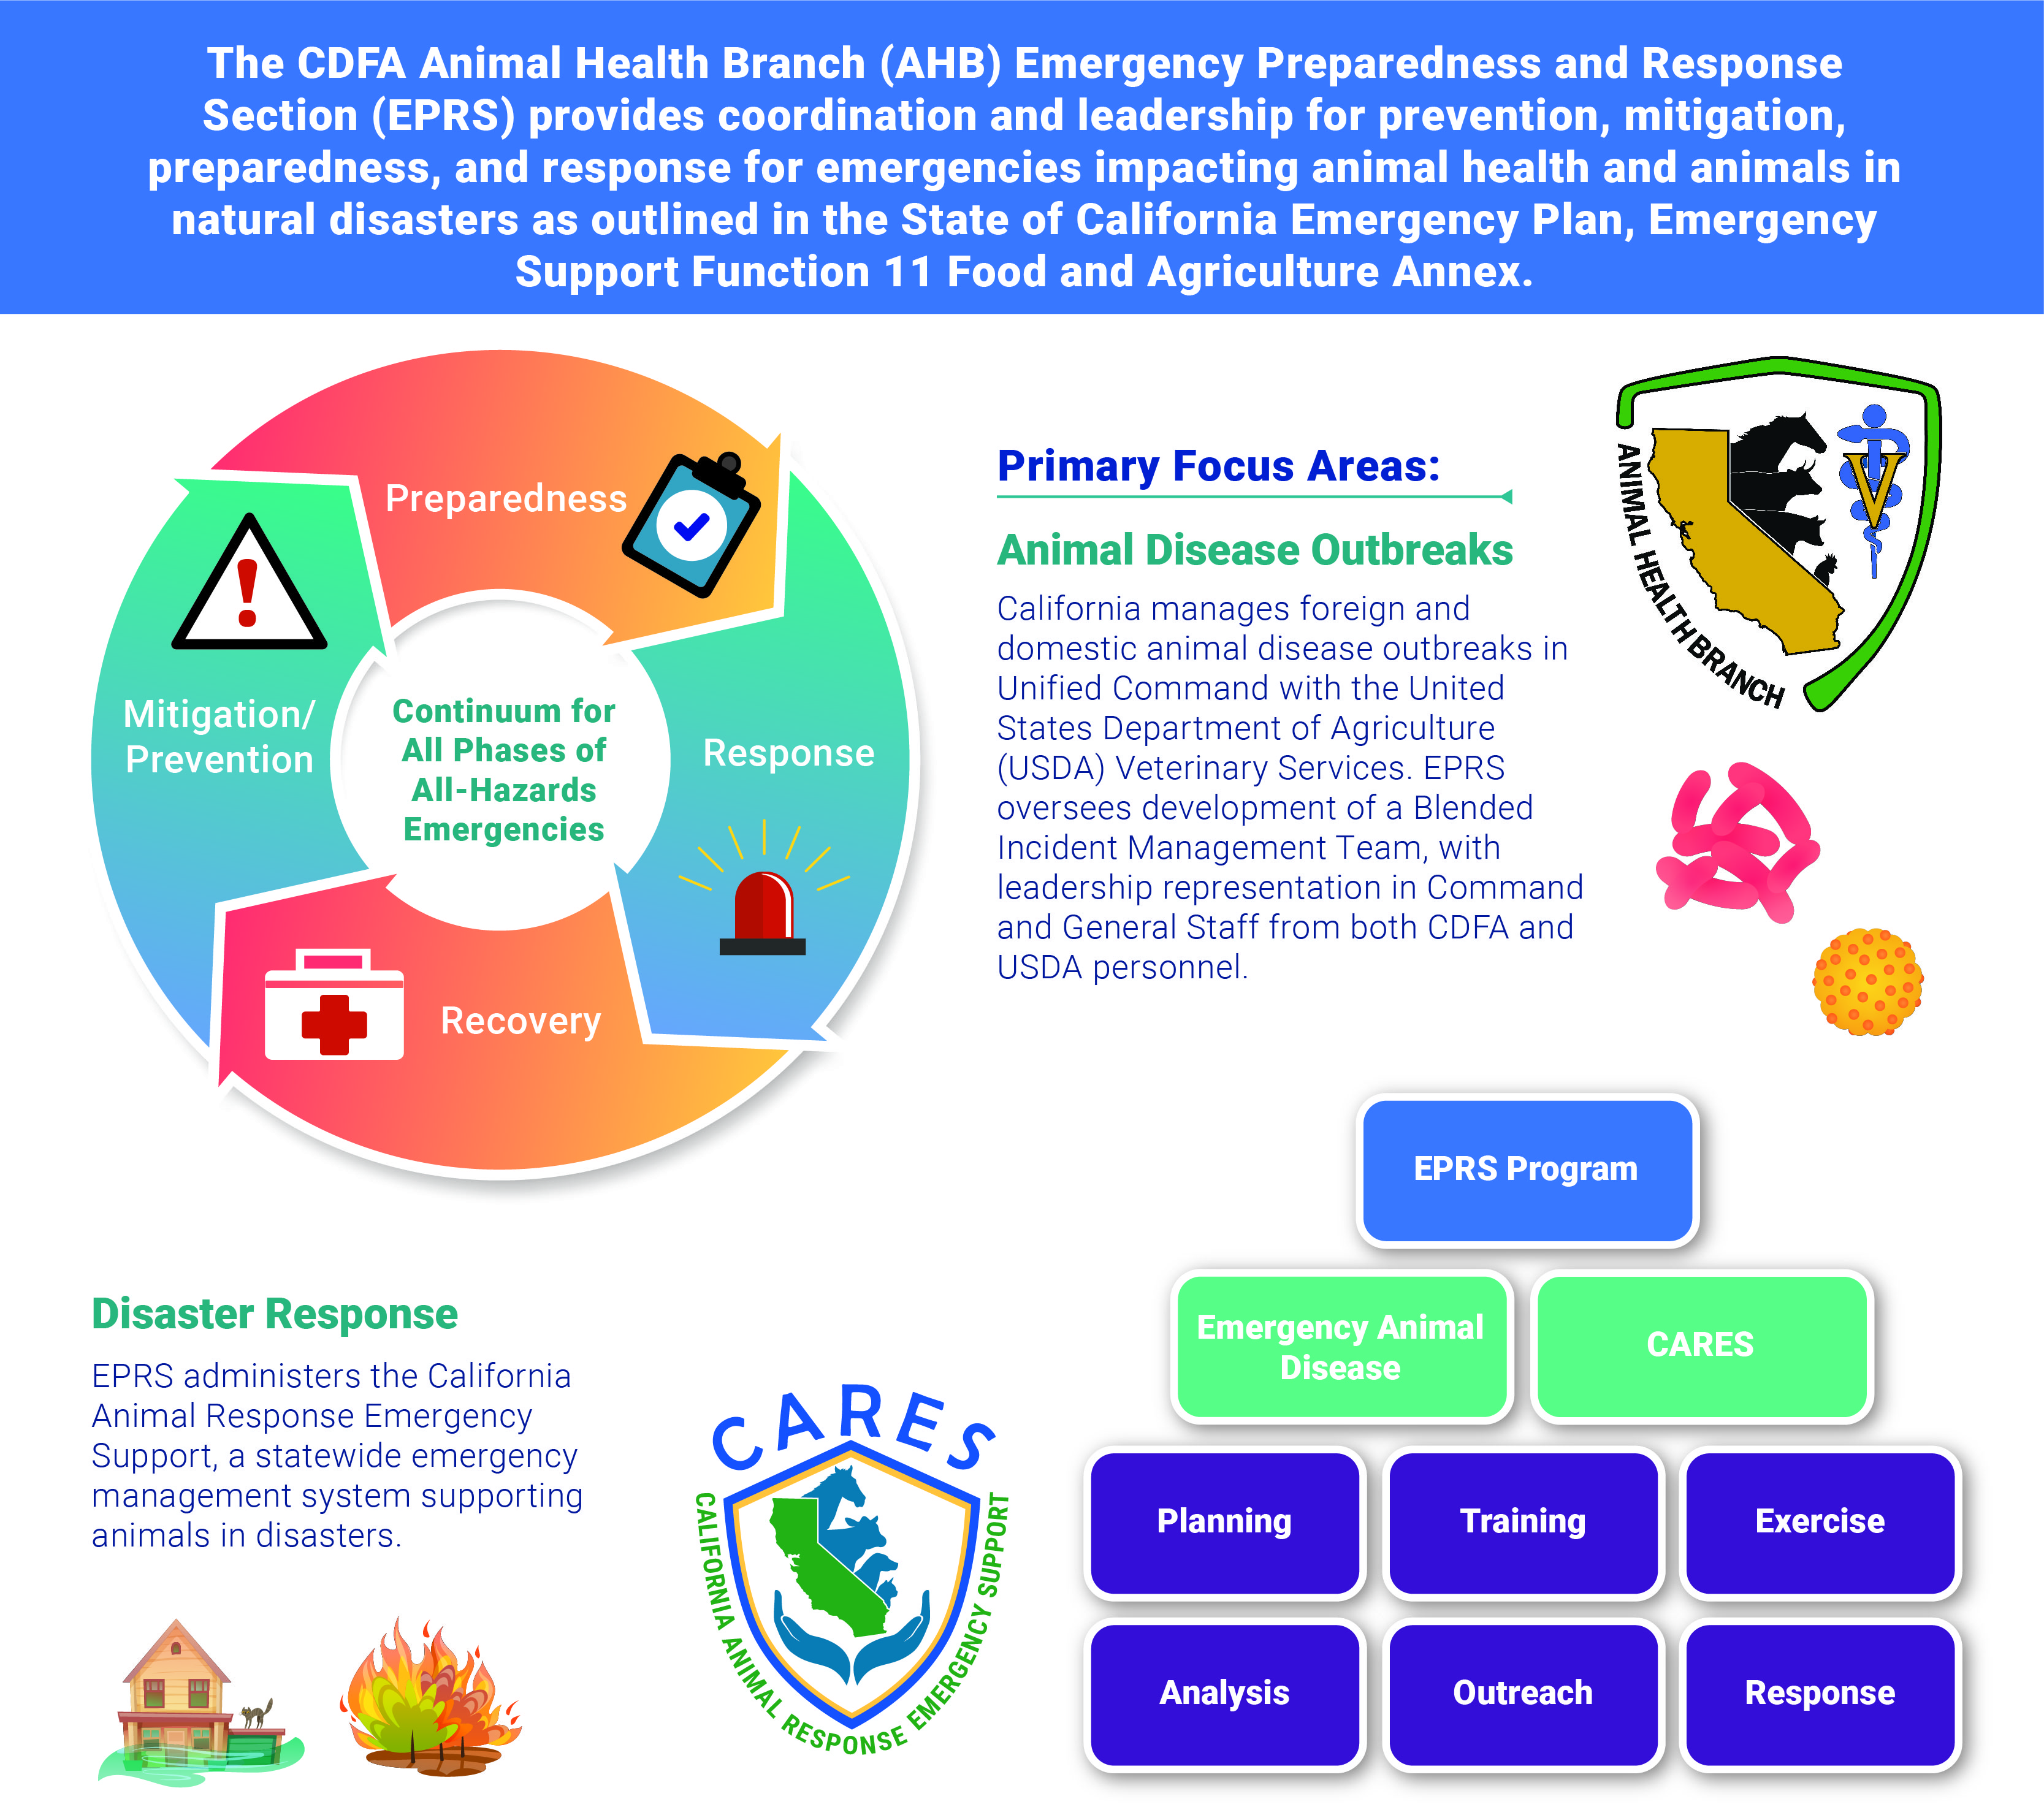
Credit: www.cdfa.ca.gov
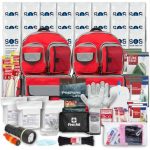
Key Survival Kit Items
Preparing a survival kit is a critical step in emergency readiness. The right items can support life and comfort during unexpected events. Prioritize essentials that cover basic needs like hydration, nutrition, health, and safety. Each category of supplies plays a unique role in survival. Organize your kit to include items from these key groups.
Water And Food Essentials
Water is vital. Store at least one gallon per person daily. Keep a supply for several days. Choose non-perishable foods that need little or no cooking. Examples include canned goods, energy bars, and dried fruits. Include a manual can opener to access canned food easily.
First-aid And Health Supplies
A basic first-aid kit is crucial. Stock bandages, antiseptic wipes, and pain relievers. Add any personal medications or allergy treatments. Include items like scissors, tweezers, and medical tape. These supplies help treat minor injuries and prevent infections.
Lighting And Communication Tools
Reliable light sources are important during power outages. Pack flashlights with extra batteries or a hand-crank lantern. Include a battery-powered or hand-crank radio to receive news and alerts. A whistle can signal for help. Keep a list of emergency contacts written down.
Sanitation And Hygiene Products
Maintain cleanliness to avoid illness. Pack moist towelettes, hand sanitizer, and toilet paper. Include plastic bags for waste disposal. Feminine hygiene products and diapers may be necessary. Cleanliness supports health and comfort in tough conditions.
Shelter And Important Documents
Shelter items keep you safe from weather. Pack a tarp, emergency blanket, and sturdy gloves. Secure important documents in a waterproof container. Include IDs, insurance papers, and medical records. Protecting documents helps with recovery after emergencies.
Choosing Effective Emergency Images
Choosing effective emergency images helps people understand safety steps quickly. Good pictures show important actions and gear clearly. They guide viewers through preparation without confusion. Visuals must be simple and easy to follow. This section explains how to pick the best emergency images for your content.
Clear Visuals Of Survival Gear
Show each survival item clearly in the picture. Use good lighting and simple backgrounds. Highlight key tools like water, food, and first-aid kits. People should see what gear looks like at a glance. Clear visuals build confidence in preparing emergency kits.
Step-by-step Preparation Photos
Use a series of photos showing each preparation step. For example, packing a bag or setting up a radio. Step-by-step images guide people through tasks easily. They reduce guesswork and help users follow instructions correctly. Each photo should focus on one clear action.
Depicting Safe Shelter Setup
Show how to create safe shelter with simple images. Include tents, securing windows, or making a safe space indoors. Pictures should reveal safety tips visually. This helps people understand shelter basics fast. Good shelter images prepare viewers for emergencies at home or outside.
Using Icons And Infographics
Icons and infographics simplify complex information. Use symbols for water, food, or warning signs. Infographics combine images and text for quick learning. They catch attention and improve memory. Use clean, easy-to-read designs that match your emergency message.
Designing Safety Visuals
Designing safety visuals plays a key role in emergency preparedness. Clear images help people act fast during crises. Visual aids guide individuals to safety without confusion. Effective design combines simplicity and clarity to communicate urgent messages. These visuals must be easy to understand for everyone, regardless of language skills or age. Thoughtful design reduces panic and improves response time. This section covers important techniques for creating impactful emergency preparedness pictures.
Color Coding For Quick Recognition
Colors trigger fast reactions in emergencies. Red often signals danger or stop. Green directs people to safe exits or first aid. Yellow warns about caution or hazards. Consistent use of colors helps users recognize meanings instantly. Avoid using too many colors to prevent confusion. Use bright, contrasting colors for visibility in low light. Color coding makes emergency information easier to remember and follow.
Simple And Universal Symbols
Symbols should be clear and easy to understand. Use icons that are recognized worldwide. A flame symbol means fire, a cross stands for medical help. Avoid complex or detailed images that slow comprehension. Simple shapes and lines make symbols effective. Test symbols with diverse groups to confirm clarity. Universal symbols bridge language barriers in emergencies.
Balancing Detail And Clarity
Details add important information but can clutter visuals. Keep images clean and focused on key messages. Use minimal text to support visuals only. Avoid unnecessary decoration or background elements. Clear visuals guide users quickly without overwhelming them. Balance detail by highlighting essential features only. A simple, clear image often saves more lives.
Using Realistic Vs. Illustrative Styles
Realistic images show exact scenes but may be complex. Illustrative styles are simpler and easier to understand. Choose style based on audience and context. Illustrations work well for quick recognition and broad audiences. Realistic images help when exact identification is critical. Both styles can be effective if designed with clarity in mind. Consistency in style maintains user confidence and trust.
Credit: www.tahd.org
Displaying Emergency Instructions
Displaying emergency instructions clearly is vital for quick action during crises. Pictures and visuals help people remember important steps. Clear images guide families and communities safely. Visual aids reduce confusion and stress. They support fast and correct responses. Preparing visuals ahead saves precious time.
Visual Checklists For Kits
Visual checklists show what items belong in emergency kits. Pictures of water, food, first-aid supplies, and tools make packing easier. Families can quickly compare their kits to the checklist. This prevents missing crucial items. Display checklists near kit storage for easy reference. Simple images help everyone understand what to prepare.
Evacuation Route Maps
Evacuation maps guide people to safe exits and shelters. Color-coded paths and landmarks make routes clear. Display these maps in homes, schools, and workplaces. Maps reduce panic by showing exact directions. Use large, readable fonts and simple icons. Update maps as routes or shelters change over time.
Signaling And Communication Tips
Pictures showing signaling methods improve communication in emergencies. Visuals of whistles, flashlights, and hand signals help people send alerts. Show how to use radios or phones safely. Clear instructions on communication tools avoid misunderstandings. Place these visuals where everyone can see and learn them.
Maintaining And Updating Visuals
Regularly check visuals for damage or outdated information. Replace faded images and update instructions as needed. Ensure maps reflect current evacuation paths. Keep checklists aligned with kit contents. Fresh visuals keep emergency plans accurate and reliable. This upkeep ensures preparedness stays strong.
Using Pictures In Public Campaigns
Using pictures in public campaigns helps spread emergency preparedness messages fast. Visuals catch attention and explain important actions clearly. People remember images better than words alone. This makes pictures a strong tool to teach safety steps. Campaigns that use pictures reach more people and create quick awareness.
Social Media And Online Platforms
Social media shares emergency pictures with many users instantly. Platforms like Facebook and Instagram allow easy posting. Short videos and infographics show what to do during a crisis. Online images help explain kit items and evacuation routes. Clear visuals increase sharing and engagement. This spreads preparedness tips quickly to wide audiences.
Printed Flyers And Posters
Flyers and posters use pictures to guide people in public spaces. Simple images show emergency steps in schools, offices, and parks. Bright colors and icons make messages stand out. Printed materials reach those without internet access. People can keep flyers for quick reference. Posters remind communities about safety actions daily.
Workshops And Community Events
Workshops use pictures to teach emergency skills clearly. Visual aids help explain complex ideas simply. Photos and charts support demonstrations of first aid or evacuation. Community events display posters and handouts with key images. These visuals keep attendees focused and improve learning. People leave with clear memories of safety tips.
Engaging Diverse Audiences
Pictures cross language and literacy barriers easily. Simple images help all ages and backgrounds understand messages. Using culturally relevant visuals increases trust and attention. Campaigns include different skin tones and settings for connection. Visual stories suit people with low reading skills. This makes emergency preparedness accessible for everyone.
Safety Visuals For Special Needs
Emergency preparedness must include visuals that serve everyone. Safety visuals for special needs help people understand and act quickly. Clear images reduce confusion during stressful times. They support better communication and ensure no one is left behind. Designing these visuals requires focus on accessibility, language, age, and culture.
Accessible Images For Disabilities
Visuals should be easy to see and understand for people with disabilities. Use large, clear icons with high contrast colors. Avoid complex designs that cause confusion. Include symbols recognized by disability communities. Alternative text descriptions help those using screen readers. Simple, direct images improve response and safety.
Multilingual Visual Guides
Emergency visuals must speak many languages without words. Use universal symbols that all can recognize. Include text in common local languages for clarity. Visual guides with minimal text help non-readers and language learners. Pictures showing steps clearly reduce misunderstandings. This approach aids quick, correct actions during emergencies.
Visuals For Children And Elderly
Children and elderly need easy-to-understand images. Use friendly characters and bright colors for kids. Show simple steps with few details to avoid overwhelm. For elderly, use larger fonts and clear symbols. Images should reassure, not frighten, these groups. Visual safety aids help them stay calm and safe.
Culturally Sensitive Imagery
Respect cultural differences in emergency visuals. Avoid images that may confuse or offend certain groups. Use culturally appropriate clothing and symbols. Show diverse people to reflect the community. This builds trust and encourages following safety instructions. Sensitive visuals improve engagement and effectiveness.
Resources For Emergency Images
Finding the right images for emergency preparedness content can improve understanding and engagement. Visual resources help explain safety tips, steps, and important information clearly. Various sources offer emergency-related pictures suitable for blogs, presentations, or educational materials. These sources include stock photo libraries, government sites, custom designs, and open source visuals. Each option has unique benefits for quality and usage rights.
Stock Photo Libraries
Stock photo libraries provide a wide range of emergency preparedness images. These include photos of first aid kits, emergency drills, and disaster scenarios. Popular sites like Shutterstock, iStock, and Getty Images offer high-resolution pictures. Most images come with licenses for commercial or personal use. These platforms allow easy searching using keywords such as “emergency kit” or “disaster safety.”
Stock photos save time and ensure professional quality. They suit bloggers and educators needing quick visual content. Some libraries offer free images, but paid options provide more variety and exclusivity.
Government And Health Agencies
Government and health agencies publish trustworthy emergency preparedness visuals. Agencies like FEMA, CDC, and local health departments share free photos and infographics. These images focus on correct safety practices and official guidelines. Using government resources guarantees accuracy and reliability in your content.
Many sites provide downloadable materials without copyright restrictions. These images often include step-by-step safety instructions and evacuation plans. They help build trust with your audience by showing up-to-date, expert information.
Custom Graphic Design Options
Custom graphic design allows unique and tailored emergency images. Designers create visuals based on specific needs and branding styles. Custom images stand out and explain complex topics simply. Infographics, icons, and step charts make safety tips easy to follow.
This option suits organizations or bloggers wanting original content. Hiring a designer or using design tools can produce clear, branded visuals. Custom graphics improve recognition and engagement on social media or websites.
Open Source Visual Materials
Open source visual materials are free to use and share. Platforms like Unsplash, Pixabay, and Wikimedia Commons offer emergency-related images. These images have licenses that allow modification and distribution. Open source images help small projects or those with limited budgets.
Users should verify license terms to ensure proper use. These visuals often include photos of emergency supplies, drills, and rescue efforts. Open source content encourages collaboration and wider access to important safety images.
Credit: www.matrixparents.org
Frequently Asked Questions
What Are The 5 P’s Of Preparedness?
The 5 P’s of preparedness are Proper Planning Prevents Poor Performance. This means planning, preparation, practice, protection, and persistence ensure readiness.
What Are The 10 Essential Survival Kit Items?
The 10 essential survival kit items are water, non-perishable food, first-aid kit, flashlight with batteries, radio, manual can opener, sanitation supplies, whistle, important documents, and warm blankets.
What Are The 5 Stages Of Emergency Preparedness?
The 5 stages of emergency preparedness are: mitigation, preparedness, response, recovery, and prevention. Each stage helps manage risks and impacts effectively.
What Are The 3 C’s Of Emergency Response?
The 3 C’s of emergency response are: Check, Call, and Care. Check the scene and victims, call for help, and provide care.
Conclusion
Emergency preparedness pictures help you see what to pack and how to stay safe. Clear images make it easier to remember essential items. They show what tools and supplies to have ready. Visual guides support quick action during emergencies. Keep these pictures handy to review your kit often.
Being ready protects your family and gives peace of mind. Simple steps and clear visuals improve your safety. Start today and stay prepared for any situation.