
Wiring a video doorbell might sound tricky, but with the right steps, you can do it yourself and boost your home’s security instantly. Imagine seeing who’s at your door from anywhere, right on your phone.
Sounds great, right? This guide will walk you through the process in simple terms, so you don’t have to worry about confusing wires or complicated setups. By the end, you’ll have your video doorbell up and running, making your home smarter and safer.
Ready to get started? Let’s dive in!
Credit: www.liftingitalia.com
Tools And Materials Needed
Preparing to wire a video doorbell requires certain tools and materials. Using the right equipment makes the task easier and safer. It also helps ensure your doorbell works correctly after installation.
Essential Tools
- Screwdriver set – for removing and securing screws
- Wire stripper – to remove insulation from wires
- Voltage tester – to check if wires have power
- Drill with bits – for mounting the doorbell
- Level – to make sure the doorbell is straight
- Measuring tape – to measure distances accurately
- Electrical tape – for securing wire connections
- Ladder – to reach the installation spot
Required Materials
- Video doorbell unit
- Mounting bracket or plate
- Wire connectors or wire nuts
- Low-voltage wiring (if needed)
- Power adapter or transformer (if not using existing doorbell wiring)
- Wall anchors or screws for mounting
Choosing The Right Doorbell
Choosing the right video doorbell is the first step to a secure home. It affects installation, use, and performance. Picking the best model saves time and avoids extra costs. Understand your needs and home setup before buying.
Wired Vs Wireless Models
Wired doorbells connect directly to your home’s electrical system. They offer a steady power supply and often better video quality. Wireless models use batteries and connect via Wi-Fi. They are easier to install and move if needed. Choose wired for reliability or wireless for flexibility.
Compatibility With Existing Wiring
Check your current doorbell wiring before installation. Some video doorbells need specific voltage or wiring types. Old or damaged wires may cause problems. Verify if your wiring matches the doorbell’s requirements. This step avoids installation issues and extra repairs.
Preparing The Installation Site
Preparing the installation site is the first step to wiring your video doorbell. This stage ensures a smooth setup and strong device performance.
Careful preparation helps avoid mistakes and safety issues during installation.
Selecting The Location
Choose a spot near your main door. It should have a clear view of visitors.
Pick a place protected from rain and direct sunlight. This keeps the device safe and working well.
Make sure the location is close to your existing doorbell wiring or power source. This reduces extra work and costs.
Height matters. Install the doorbell about 48 inches above the ground. This height captures faces clearly.
Turning Off Power
Safety is key. Turn off the power to your doorbell circuit at the breaker box.
Use a voltage tester to confirm the power is off. This prevents electrical shocks.
Do not start any wiring until you are sure the power is off.
Removing The Old Doorbell
Removing the old doorbell is the first step in installing a new video doorbell. This process helps prepare the wall and wiring for the new device. Taking care during removal protects the wiring and wall surface. Follow simple steps to remove the old doorbell safely.
Unscrewing And Disconnecting
Start by turning off the power to the doorbell from the circuit breaker. This stops any electrical shocks. Use a screwdriver to remove the screws holding the old doorbell to the wall. Keep the screws safe for later use or replacement.
Gently pull the doorbell away from the wall. You will see the wires attached at the back. Carefully disconnect these wires by loosening the screws or unclipping the connectors. Avoid pulling on the wires themselves to prevent damage.
Inspecting Existing Wiring
Check the wires for any damage or wear. Look for frayed insulation or corrosion. Clean the wire ends if needed to ensure a good connection. Measure the wire length and note the wire types. This helps confirm compatibility with your new video doorbell.
If wires look old or damaged, consider replacing them before installing the new device. Proper wiring ensures your video doorbell works correctly and lasts longer.
Wiring The New Video Doorbell
Wiring the new video doorbell is an important step in the installation process. This step ensures your device works properly and stays safe. Follow clear instructions and handle wires carefully to avoid mistakes. Proper wiring helps your video doorbell send clear video and audio signals.
Before starting, turn off power to the doorbell circuit. This prevents electric shock and damage. Use a voltage tester to confirm no current flows through the wires. Always prioritize safety during wiring tasks.
Connecting Wires Correctly
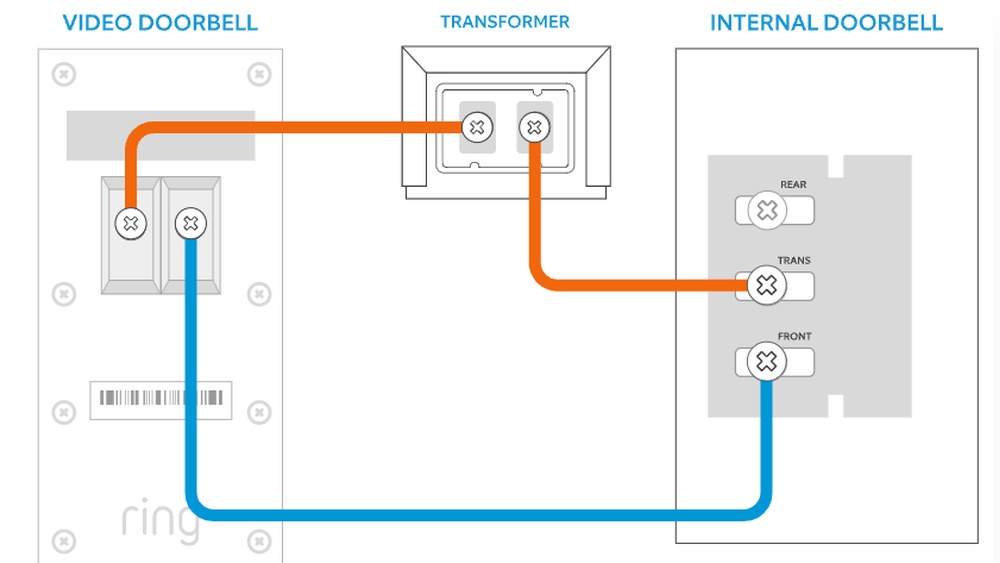
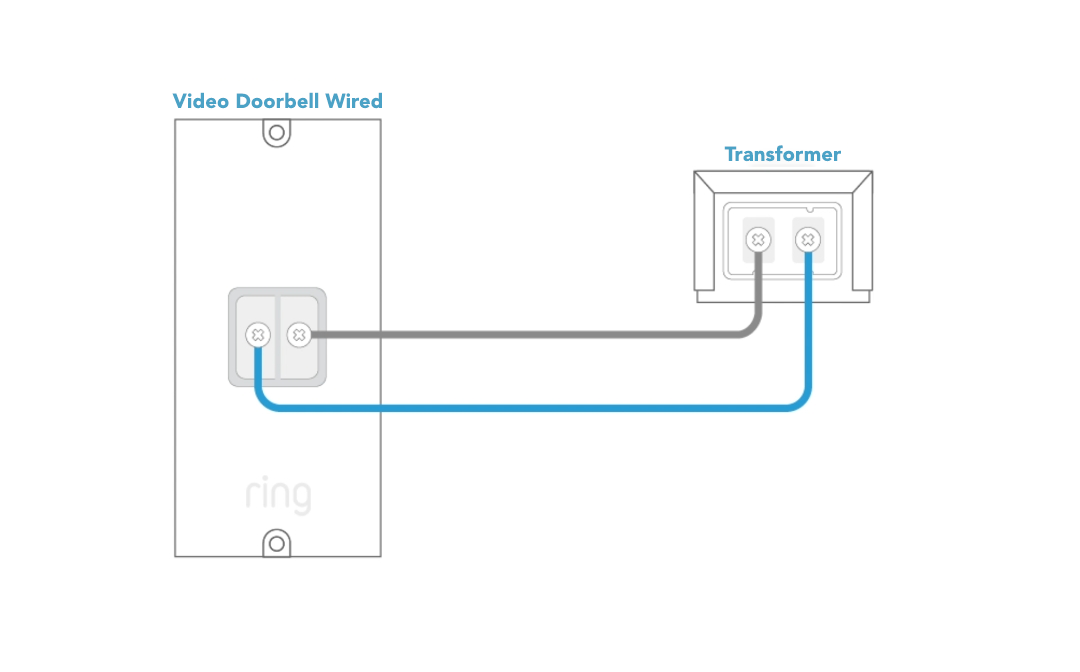
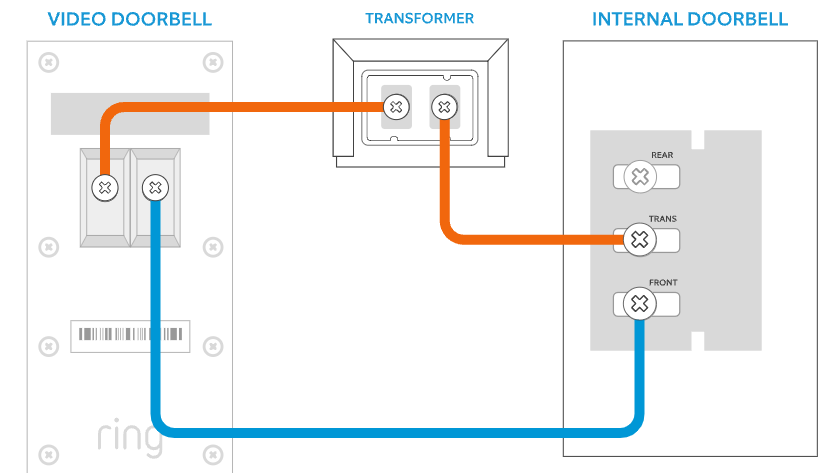
Identify the wires coming from your home’s doorbell system. Typically, two wires connect to the doorbell terminals. Attach each wire to the matching terminal on the video doorbell. Usually, these terminals are marked as “Front” or “Trans.”
Ensure wires fit tightly under the screws. Loose connections cause poor performance or device failure. If wires are frayed, trim and strip them carefully. Expose just enough copper to make a solid connection.
Securing Connections
Double-check that wires do not touch each other. Contact between wires can create a short circuit. Use electrical tape to wrap exposed wire ends for extra protection. This step keeps your wiring safe and reliable.
Once wires are connected, gently push them into the wall box. Avoid bending or pinching wires. Attach the video doorbell firmly to the mounting plate. Secure screws tightly to prevent movement or damage.
Mounting The Doorbell
Mounting the video doorbell is a key step in installation. It ensures the device stays secure and works well. Proper mounting helps the camera capture clear views. It also protects the unit from weather and damage.
Careful positioning lets you see visitors clearly. Follow the instructions from the manufacturer for best results. Prepare your tools and materials before starting.
Aligning And Fixing The Unit
Place the doorbell at eye level for easy use. Check the angle to cover the entryway fully. Mark the spots for screws using the mounting bracket.
Use a drill to make holes for the screws. Attach the bracket firmly to the wall or door frame. Snap the doorbell onto the bracket carefully. Ensure it fits tightly and does not wobble.
Ensuring Stability
Test the doorbell by gently pushing it. It should stay in place without moving. Tighten screws if the unit feels loose.
Check that wires are secure and hidden if possible. Loose wires can affect performance and look untidy. Use cable clips or conduit for extra support.
Stable mounting prevents damage and keeps the video clear. It also stops false alerts caused by movement.
Powering On And Testing
Powering on and testing your video doorbell is a key step after wiring. This step confirms the device works correctly. It ensures the video feed is clear and the chime sounds properly. Follow these simple actions for a smooth start.
Restoring Power
Turn the power back on at the circuit breaker. Make sure the breaker is fully switched on. Check the doorbell’s light or screen to see if it powers up. If there is no sign of power, double-check the wiring connections. Secure any loose wires and try again.
Testing Video And Chime Functions
Open the video doorbell app on your phone or tablet. Check the live video feed for clarity and responsiveness. Press the doorbell button to test the chime sound inside your home. Listen carefully to confirm the chime rings without delay or distortion. If the video or sound has issues, inspect your wiring and power source again.
Troubleshooting Common Issues
Troubleshooting common issues can save time and frustration. Video doorbells sometimes face power or connection problems. Simple checks often fix these issues quickly. Below are two common problems and how to solve them.
No Power Or Response
Check the power source first. Make sure the doorbell is connected to the right wires. Test the circuit breaker to see if it tripped. Loose wires can cause no power. Tighten all wire connections carefully. Confirm the doorbell’s transformer has the correct voltage. Sometimes a reset of the device helps. Follow the manufacturer’s reset instructions. If power still fails, try a different outlet or transformer.
Video Feed Problems
Check the Wi-Fi signal strength near the doorbell. Weak signals cause poor video quality or no feed. Move your router closer or use a Wi-Fi extender. Restart the doorbell and your router to refresh the connection. Make sure the doorbell’s firmware is up to date. Clean the camera lens for a clear image. Check the app settings to confirm video is enabled. If the video feed stops often, inspect for interference from other devices.
Maintaining Your Video Doorbell
Maintaining your video doorbell ensures it works well for a long time. Dirt and dust can block the camera lens. Software updates keep your device secure and fast. Simple care steps improve your doorbell’s performance daily.
Cleaning Tips
Use a soft cloth to clean the doorbell surface. Avoid harsh chemicals that can damage the lens. Gently wipe the camera lens to keep the video clear. Check for spider webs or dirt around the button. Clean these areas regularly for best results.
Regular Firmware Updates
Check your doorbell app for update notifications. Updates fix bugs and improve features. Install updates as soon as they are available. This keeps your doorbell secure against new threats. Regular updates help the device run smoothly every day.
Credit: yao.com.do
Credit: ring.com
Frequently Asked Questions
How Do I Safely Wire A Video Doorbell?
Turn off the power at the breaker before wiring. Use a voltage tester to ensure no electricity flows. Follow the manufacturer’s wiring diagram carefully. Connect wires to the correct terminals. Secure all connections and mount the doorbell firmly.
What Tools Are Needed To Wire A Video Doorbell?
You need a screwdriver, voltage tester, wire stripper, drill, and mounting screws. A drill helps create holes for mounting. The voltage tester ensures power is off. Wire strippers prepare the wires for connection. Screwdrivers tighten screws securely.
Can I Use Existing Doorbell Wires For Wiring?
Yes, most video doorbells work with existing low-voltage doorbell wiring. Check wire compatibility and voltage requirements. Ensure wires are in good condition and long enough. This saves time and avoids extra wiring work.
How Do I Connect A Video Doorbell To Power?
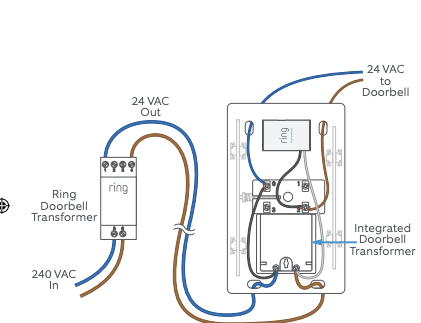
Connect the doorbell wires to your home’s low-voltage transformer or existing doorbell wires. Ensure the transformer provides the required voltage, usually 16-24 volts AC. Secure all connections and restore power to test the device.
Conclusion
Wiring a video doorbell can improve your home security easily. Follow the steps carefully to avoid mistakes. Make sure to turn off power before starting any work. Double-check all connections for safety and proper function. Test the doorbell after wiring to confirm it works well.
Enjoy the convenience of seeing visitors on your phone. Stay safe and confident with your new setup. Simple steps lead to a safer home.