
Your home’s safety depends on reliable smoke detection. Installing a hardwired smoke detector is one of the best ways to protect your family from fire hazards.
But maybe you’re worried it’s too complicated or expensive. What if you could do it yourself, step-by-step, without any confusion? In this guide, you’ll learn exactly how to install a hardwired smoke detector quickly and safely—even if you’ve never handled electrical work before.
Keep reading, and take control of your home’s safety today.
:max_bytes(150000):strip_icc()/install-hardwired-smoke-detectors-1152329-07-e423cc5f28c342089d65bd675e5d4e20.jpg)
Credit: www.thespruce.com
Tools And Materials Needed
Installing a hardwired smoke detector requires specific tools and materials. Having everything ready helps the job go smoothly. It saves time and avoids frustration.
Gathering the right tools ensures safety and proper installation. The materials you choose also affect the detector’s performance. This section lists essential items for the task.
Basic Tools For Installation
- Voltage tester to check electrical current
- Screwdriver set for mounting and wiring
- Wire strippers to prepare electrical wires
- Drill for making holes in walls or ceilings
- Measuring tape to mark placement accurately
Materials Required
- Hardwired smoke detector unit with battery backup
- Electrical wire compatible with your home wiring
- Wire nuts to secure wire connections
- Mounting bracket included with the detector
- Electrical box to house wiring safely
Safety Equipment
- Insulated gloves to protect from electric shock
- Safety goggles to shield eyes from debris
- Ladder for reaching high ceilings
Safety Precautions
Installing a hardwired smoke detector needs careful attention to safety. Taking the right precautions helps prevent accidents and ensures the device works well. Follow clear safety steps before and during installation.
Turn Off The Power
Switch off power at the main circuit breaker. Confirm power is off with a voltage tester. This stops electric shocks during installation. Never start work with power on.
Use Proper Tools And Equipment
Pick tools made for electrical work. Insulated screwdrivers and wire strippers reduce risk of injury. Avoid using damaged or worn tools to stay safe.
Wear Safety Gear
Wear gloves to protect hands from sharp wires. Safety glasses prevent dust or sparks from hitting eyes. Dress in comfortable clothes that cover arms and legs.
Follow Manufacturer Instructions
Read the smoke detector manual fully before starting. Follow all wiring diagrams and safety tips. This ensures the device installs correctly and safely.
Work In A Dry Area
Keep the work area dry to avoid slipping or electric shock. Do not install if floors or walls are wet. Wait for a dry day or dry the space well.
Choosing The Right Location
Choosing the right location for a hardwired smoke detector is very important. The location affects how well the detector senses smoke. A good spot helps keep your home safe. Poor placement can cause false alarms or missed warnings.
Think about where smoke would travel first in case of a fire. Place detectors where they detect smoke quickly. Avoid places where smoke may not reach or where false alarms happen often.
Ideal Spots For Installation
Install detectors on ceilings or high on walls. Smoke rises, so higher spots work best. Place detectors near bedrooms. This helps wake people if smoke appears at night.
Put detectors in hallways and living rooms. Avoid kitchens and bathrooms. Steam or cooking smoke can cause false alarms there. Install detectors on every floor, including basements.
Avoiding Common Mistakes
Do not place detectors near windows or vents. Airflow can blow smoke away from sensors. Avoid corners and dead air spaces. Smoke may not reach these spots quickly.
Do not install detectors too close to lights or fans. Heat and airflow can affect performance. Keep detectors at least 10 feet from cooking appliances.
Turning Off Power
Turning off power is the first and most important step before installing a hardwired smoke detector. This step keeps you safe from electric shock. It also protects your electrical system from damage during installation.
Always confirm the power is off before touching any wires. Safety comes first in every electrical task.
Locate The Circuit Breaker
Find your home’s main electrical panel. Look for the circuit breaker that controls power to the area where you will install the smoke detector. It usually has a label indicating the room or area.
Switch Off The Correct Breaker
Flip the circuit breaker to the OFF position. This stops electricity from flowing to the wires in the installation area. Double-check that you turned off the right breaker to avoid accidents.
Test The Power Is Off
Use a voltage tester or multimeter on the wires where you will work. The tester should show no power. This confirms it is safe to start installing the smoke detector.
Removing Old Smoke Detector
Removing the old smoke detector is the first step before installing a new hardwired unit. It keeps the process safe and smooth. This part may seem simple but requires care to avoid damage or injury.
Follow clear steps to disconnect and remove the old device safely. Proper removal helps the new detector work well and lasts longer.
Turn Off The Power
Switch off the power at the circuit breaker. This stops electricity flow to the smoke detector. Use a voltage tester to confirm no power is present. Safety first.
Remove The Smoke Detector Cover
Twist or pull the cover gently. This exposes the wiring and mounting plate. Avoid force to prevent breaking the cover or wiring.
Disconnect The Wiring
Locate the connector or wire nuts holding wires. Carefully separate them. Note wire colors and positions for the new detector.
Take Down The Mounting Plate
Unscrew the mounting plate from the ceiling or wall. Keep screws for reuse if possible. Remove the plate without damaging the surface.
Wiring The New Detector
Wiring the new smoke detector is a key step in installation. It ensures the device works with your home’s electrical system. This process needs careful attention to avoid hazards and guarantee safety. Follow simple steps to connect the wires correctly and securely.
Identifying Wires
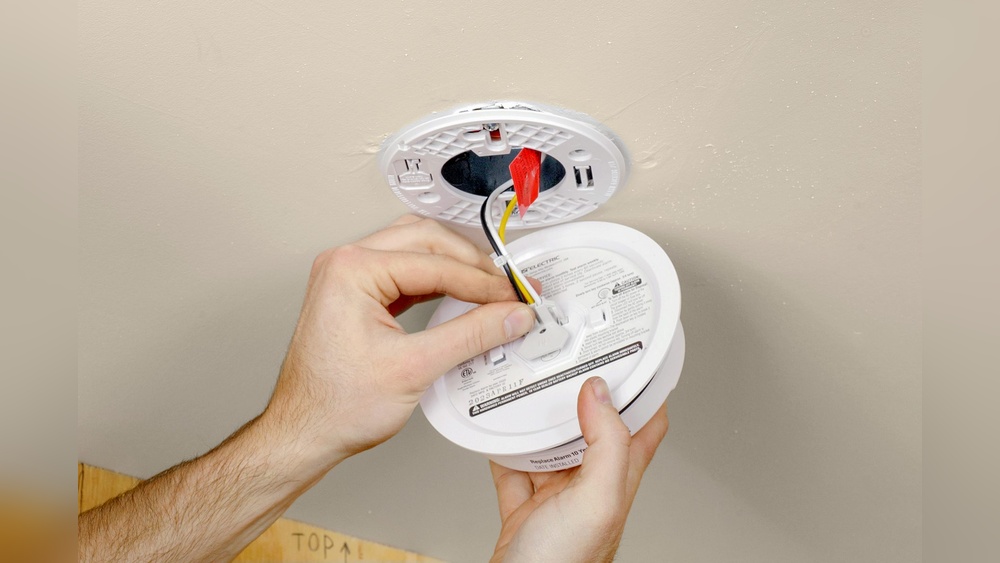
Look at the wires coming from your ceiling or wall. Usually, there are three wires: black, white, and red or sometimes yellow. The black wire is for power, the white is neutral, and the red or yellow is for interconnecting multiple detectors. Use a voltage tester to confirm the power wire. Label the wires if needed to avoid confusion later.
Connecting Wires Safely
Turn off the power at the breaker before touching any wires. Connect the black wire from the detector to the black power wire. Join the white wires together. Attach the red or yellow wire from the detector to the matching interconnect wire. Use wire nuts to secure all connections tightly. Tuck the wires neatly into the electrical box to prevent damage. Restore power and test the detector to ensure it works well.
Mounting The Detector
Start by choosing a spot on the ceiling away from corners. Attach the mounting bracket securely with screws. Connect the wires carefully, then snap the detector into place.
Mount the smoke detector on the ceiling or high on a wall. Smoke rises, so higher spots detect fires faster. Avoid corners and places near vents or fans. Keep it away from kitchens and bathrooms to reduce false alarms.
Marking And Drilling Holes
Hold the mounting bracket on the chosen spot. Use a pencil to mark the screw holes. Drill holes at the marks carefully. Use a drill bit size that matches your wall anchors. This ensures a secure fit.
Installing The Mounting Bracket
Insert wall anchors into the drilled holes. Place the bracket over the holes. Screw the bracket tightly to the ceiling or wall. Make sure it is stable and does not move. A solid mount keeps the detector safe.
Attaching The Smoke Detector
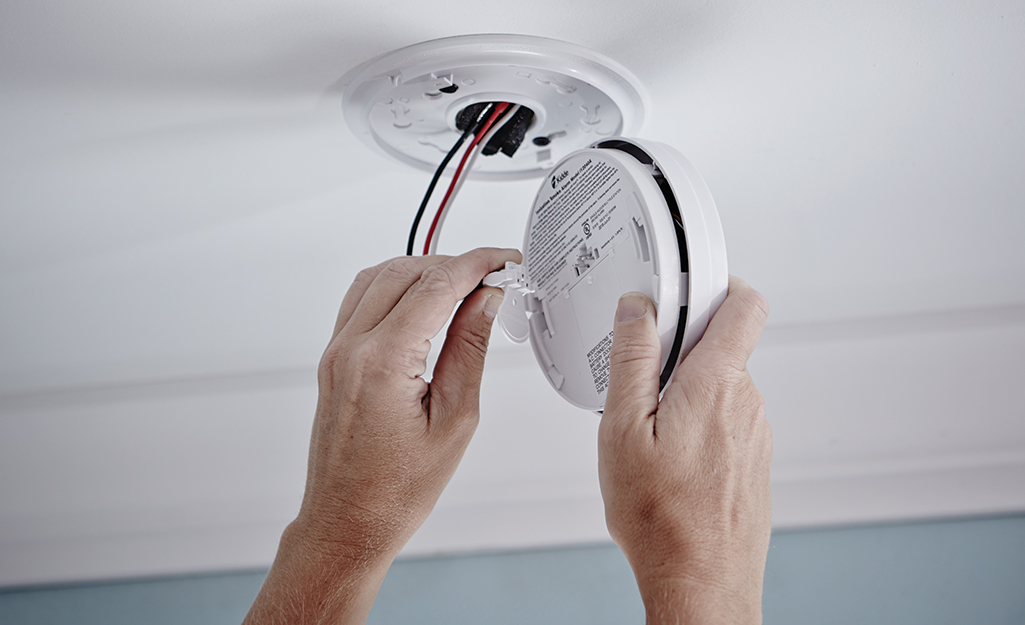
Connect the detector’s wiring as needed. Align the detector with the mounting bracket. Twist or snap the detector into place. It should fit securely without gaps. Test the detector to confirm it works.
Credit: www.homedepot.com
Restoring Power And Testing
After installing your hardwired smoke detector, restoring power is the next step. This ensures the device receives electricity and becomes fully operational. Proper power restoration is crucial for the alarm to work correctly and keep your home safe.
Once power is restored, testing the alarm confirms it functions as expected. Testing lets you catch any installation errors or faults early. It also gives you peace of mind that the smoke detector will alert you in an emergency.
Powering On
Locate the circuit breaker that controls the smoke detector’s power. Flip the breaker switch back to the ON position. You might hear a beep or see a light indicator on the detector. This confirms the device has power. Check the detector’s manual for specific signals during startup. Avoid turning off the breaker until testing finishes.
Testing The Alarm
Press the test button on the smoke detector. Hold it for a few seconds until the alarm sounds. The loud siren means the device is working correctly. If no sound occurs, check the wiring and power source. Test the alarm regularly to maintain safety. Replace batteries if your model has a backup battery. Remember, a functioning smoke detector saves lives.
Maintenance Tips
Maintaining your hardwired smoke detector is key to keeping your home safe. Regular care ensures the device works when you need it most. Simple steps help avoid false alarms and extend the detector’s life.
Regular Testing
Test your smoke detector every month. Press and hold the test button until the alarm sounds. This confirms the device is working properly. If no sound comes, check the power or wiring. Regular tests prevent surprises during emergencies.
Battery Replacement
Even hardwired smoke detectors have backup batteries. Replace these batteries at least once a year. Use the correct battery type for your model. Low batteries cause chirping sounds and reduce safety. Keep spare batteries handy for quick swaps.
:max_bytes(150000):strip_icc()/install-hardwired-smoke-detectors-1152329_FINAL-5233cb01c4f34ee1bae5860132624788.png)
Credit: www.thespruce.com
Frequently Asked Questions
How Do I Wire A Hardwired Smoke Detector?
To wire a hardwired smoke detector, turn off power first. Connect the detector’s wiring to your home’s electrical circuit. Follow manufacturer instructions carefully for proper connections. Secure the detector to the ceiling or wall. Restore power and test the alarm to ensure functionality.
Can I Install A Hardwired Smoke Detector Myself?
Yes, you can install a hardwired smoke detector yourself if you have basic electrical knowledge. Always turn off power before starting. Follow the manufacturer’s wiring diagram and safety guidelines. Use proper tools and test the detector after installation. If unsure, consider hiring a professional electrician.
What Tools Do I Need To Install A Smoke Detector?
You need a screwdriver, wire stripper, drill, voltage tester, and wire connectors. These tools help safely connect and mount the smoke detector. Always use insulated tools to prevent electrical shock. Having the right tools ensures a smooth, safe installation process.
Where Should I Place Hardwired Smoke Detectors In My Home?
Install smoke detectors inside each bedroom, outside sleeping areas, and on every floor. Position them on ceilings or high on walls, away from vents. Avoid placing detectors near kitchens or bathrooms to reduce false alarms. Proper placement ensures optimal safety and early fire detection.
Conclusion
Installing a hardwired smoke detector improves home safety. It helps detect fires early and saves lives. Follow the steps carefully to ensure proper setup. Test the device regularly to keep it working well. Remember, safety starts with the right tools and actions.
Stay alert and protect your home with a reliable smoke detector.