Are your hard wired smoke detectors showing signs of age or malfunction? Replacing them might seem like a tough job, but it’s easier than you think—and it’s crucial for your safety.
You rely on these devices to protect your home and loved ones every day. If your alarms aren’t working right, you need to act fast. In this guide, you’ll learn simple, step-by-step instructions to replace your hard wired smoke detectors safely and effectively.
Stick with me, and you’ll have peace of mind knowing your home is protected once again.
Tools And Materials Needed
Replacing hard wired smoke detectors requires specific tools and materials. Having the right items makes the process safer and easier. Prepare everything before you start the work.
Safety Gear
Use safety gear to protect yourself. Gloves and safety goggles shield your hands and eyes. A dust mask helps keep dust and particles away from your face.
Basic Tools
Gather a screwdriver set with both flathead and Phillips heads. A voltage tester ensures the power is off. Wire strippers help prepare wires for connection.
Replacement Smoke Detector
Choose a compatible hard wired smoke detector. Make sure it matches your home’s wiring system. Check the detector’s battery backup feature for extra safety.
Electrical Tape And Wire Nuts
Use electrical tape to secure wire connections. Wire nuts join wires safely and prevent shorts. Have extra wire nuts in case connections need reinforcement.
Ladder Or Step Stool
A sturdy ladder or step stool helps reach ceiling detectors. Ensure it is stable and tall enough. Safety is important while working at heights.
Safety Precautions
Safety is the top priority when replacing hard wired smoke detectors. These devices connect to your home’s electrical system. A small mistake could cause injury or damage. Take steps to protect yourself before starting the work.
Follow safety rules carefully. Turn off the power and test that no electricity flows. Use the right tools and wear safety gear. Stay alert and work slowly. These measures keep you safe during the replacement process.
Turn Off Power At The Circuit Breaker
Find the circuit breaker that controls the smoke detector. Switch it off to cut power. Do not rely on the wall switch alone. Test the wires with a voltage tester. Make sure no current is running before touching wires.
Wear Protective Gear
Wear safety glasses to protect your eyes. Use insulated gloves to avoid shocks. Long sleeves help protect your arms. Keep a flashlight handy in case light is low. These items reduce risk of injury while working.
Use The Right Tools
Use tools with insulated handles. A voltage tester is essential. Screwdrivers, wire strippers, and pliers help with wiring. Avoid makeshift tools that could slip or break. Proper tools make the job safer and easier.
Work Slowly And Carefully
Move with caution during each step. Double-check connections before tightening screws. Keep the workspace clear of clutter. Take breaks if you feel tired. Careful work prevents mistakes and accidents.
Turning Off Power
Turning off power is a crucial first step when replacing hard wired smoke detectors. It keeps you safe from electric shock. Never work on electrical devices without cutting the power first.
Power in your home usually comes from a circuit breaker box. You need to find the right breaker that controls the smoke detectors. Switching off this breaker stops electricity from reaching the device you want to replace.
Locate Your Circuit Breaker Panel
The circuit breaker panel is often in a basement, garage, or utility room. It is a metal box with a door. Inside, you will see rows of switches or breakers.
Each breaker controls power to different parts of your house. Some panels have labels to show which breaker controls what. Look for labels like “smoke detectors” or “fire alarms.”
Switch Off The Correct Breaker
Flip the switch for the breaker that controls your smoke detectors to the OFF position. This stops electricity flow to the detectors.
Do not turn off the main breaker. This cuts power to the whole house and is not necessary. Only switch off the breaker for the smoke detectors.
Confirm Power Is Off
Test the smoke detector to make sure power is off. Press the test button on the detector. If the alarm does not sound, power is off.
You can also use a voltage tester or multimeter. Check the wires at the detector to confirm no electricity is present.

Credit: www.reddit.com
Removing The Old Detector
Removing the old hard wired smoke detector is the first step in replacement. It requires care and attention to safety. Power must be cut off to avoid electric shocks. The process is simple but important to follow correctly.
Turn Off The Power
Locate the circuit breaker for the smoke detector. Switch it off to stop electricity flow. Test the detector by pressing the test button. No sound means the power is off. This step protects you from electric shock.
Remove The Detector Cover
Hold the base of the detector. Twist the cover counterclockwise. Some models may have a tab to press. Gently pull the cover away from the ceiling. Set the cover aside carefully.
Disconnect The Wiring
Look for the wiring harness or connector. Press the release tab to unplug it. If wires are connected with wire nuts, unscrew them. Keep the wires separated to avoid short circuits. Remember their position for the new detector.
Unscrew The Mounting Bracket
Find the screws holding the detector base. Use a screwdriver to remove them. Support the base with your hand while unscrewing. Take down the base from the ceiling. The old detector is now ready to be replaced.
Inspecting Wiring And Mounting
Inspecting the wiring and mounting is an important step before replacing hard wired smoke detectors. It helps ensure safety and proper installation. Take your time to check all parts carefully. This step can prevent future problems and electrical hazards.
Check The Wiring Condition
Turn off the power at the circuit breaker first. Look for any damaged or frayed wires in the smoke detector box. Wires should be intact and not burnt or loose. Use a voltage tester to confirm no electricity flows through the wires. This step keeps you safe while working.
Examine The Mounting Bracket
The mounting bracket holds the smoke detector in place. Check for cracks or broken plastic parts. The bracket should fit tightly on the ceiling or wall. Remove old screws or nails and prepare new holes if needed. A secure bracket ensures the new detector stays firmly attached.
Identify The Wiring Connections
Note how wires connect to the old smoke detector. Usually, there are three wires: black (hot), white (neutral), and a red or yellow wire (interconnect). Label the wires or take a photo to remember their positions. Correct wiring is key to the detector working properly.
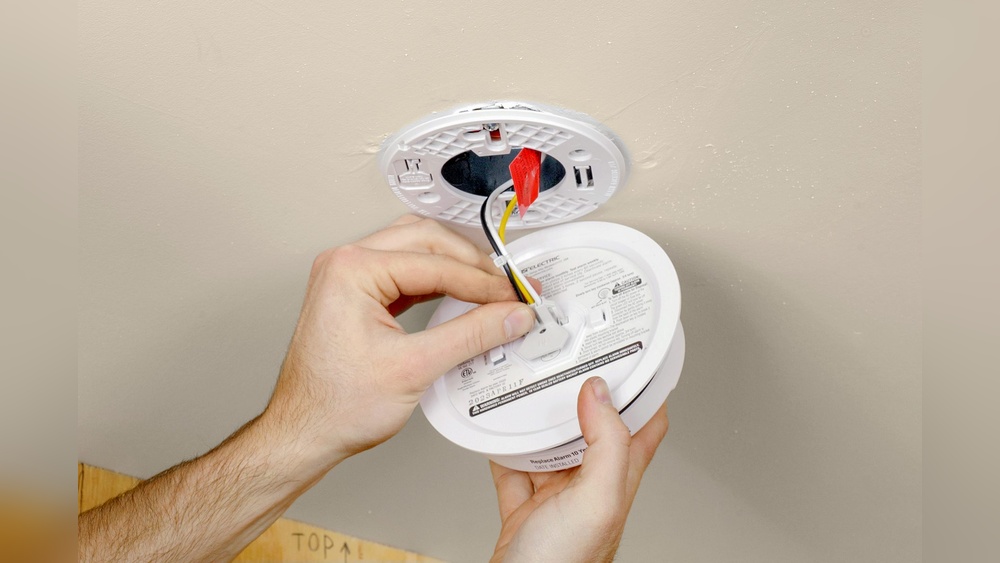
Connecting The New Detector
Connecting the new hard-wired smoke detector is a key step. It ensures your home’s safety system works properly. Follow these simple steps for a secure and correct connection. Safety first: always turn off power at the breaker before starting.
Identify The Wires
Look at the wires from the ceiling. Usually, there are three: black, white, and red or yellow. Black is the hot wire, white is neutral, and red or yellow is the interconnect wire. Match these with wires on your new detector.
Attach The Wires To The Detector
Connect the black wire to the black terminal on the detector. Connect the white wire to the white terminal. Then connect the red or yellow wire to the red terminal. Make sure each wire is secure and tight.
Secure The Detector To The Mounting Plate
Once the wires are connected, push them gently into the electrical box. Align the detector with the mounting plate. Twist or snap it into place. It should fit snugly without forcing.
Mounting The New Detector
Mounting the new smoke detector is a key step in replacing your hard-wired unit. Proper installation ensures the device works well and keeps you safe. Follow each step carefully to set the detector in place securely.
Prepare The Mounting Base
Start by removing the old mounting base from the ceiling or wall. Clean the area to remove dust and debris. Align the new base with the existing holes or mark new spots. Use a level to keep the base straight.
Attach The Mounting Base
Use screws that came with the detector or ones suitable for your surface. Drill pilot holes if needed to avoid cracking. Secure the base tightly, so it does not wobble or fall.
Connect The Wires
Match the wires from your home to the wires on the detector base. Usually, black is live, white is neutral, and a red or yellow wire is for interconnect. Twist wire connectors to join wires firmly. Double-check the connections to avoid loose wires.
Secure The Detector To The Base
Place the detector onto the mounting base. Twist or snap it into place following the product instructions. Make sure it fits well and does not move. Test the detector’s fit by gently pulling it to confirm it is secure.

Credit: www.youtube.com
Restoring Power And Testing
After installing your new hard wired smoke detector, restoring power is the next key step. This process makes sure the device works properly and keeps your home safe. Testing the smoke detector confirms the installation was successful and the unit is ready to protect your family.
Restoring power is simple but must be done carefully. Follow safety steps to avoid any electrical issues. Testing the detector checks both the power and the alarm system. A working smoke detector is essential for early warning in case of fire.
Turning The Circuit Breaker Back On
Locate the circuit breaker panel in your home. Find the switch that controls the smoke detector’s power. Flip the switch back to the ON position slowly. Listen for any unusual sounds or smells after restoring power. This ensures electricity flows to the detector.
Performing A Manual Test On The Detector
Press and hold the test button on the smoke detector. The alarm should sound loudly within a few seconds. Release the button once the alarm sounds. If the alarm is weak or silent, check the wiring and power source. Repeat the test after corrections.
Checking For Proper Functionality
Observe the detector’s indicator light for normal operation. A steady or blinking light usually means it works fine. Test multiple detectors in your home to confirm all are functional. Replace any units that do not respond correctly during testing.
Troubleshooting Common Issues
Troubleshooting common issues helps keep hard wired smoke detectors working well. Problems can stop your smoke detector from protecting your home. Fixing these issues quickly ensures your safety.
Most issues are easy to find and fix with simple steps. Understanding these problems saves time and avoids extra costs.
Checking Power Supply And Connections
Hard wired smoke detectors need constant power from your home’s wiring. A loose wire or faulty connection can cause failure. Turn off the power before inspecting the wires. Look for any loose or disconnected wires. Tighten connections and secure wires properly. Restore power and test the detector.
Resetting The Smoke Detector
Sometimes, smoke detectors need a reset to clear errors. Press the reset button on the unit. Hold it for 15-20 seconds. This action resets the internal circuit. If the alarm still sounds, try disconnecting power for a few minutes. Reconnect and test the detector again.
Replacing The Backup Battery
Even hard wired detectors have backup batteries. A weak or dead battery causes frequent beeping. Open the battery compartment carefully. Remove the old battery and insert a new one. Use the battery type recommended by the manufacturer. Close the compartment and test the alarm.
Cleaning The Smoke Detector
Dust and dirt block the sensor and cause false alarms. Turn off power before cleaning. Use a soft brush or vacuum to remove dust. Clean the vents and sensor area gently. Avoid using water or sprays. Turn on power and check if the detector works correctly.
Testing The Smoke Detector Regularly
Regular testing ensures your smoke detector is ready to work. Press the test button once a month. The alarm should sound loud and clear. If it does not, check power and connections again. Replace the unit if it fails multiple tests.

Credit: www.youtube.com
Frequently Asked Questions
How Do I Safely Turn Off Power To Smoke Detectors?
Turn off power at the circuit breaker before replacing detectors. Test with a voltage tester to ensure no electricity flows. This prevents shocks and ensures safe handling during replacement.
What Tools Do I Need To Replace Hardwired Smoke Detectors?
You’ll need a screwdriver, wire stripper, voltage tester, and new detector. These tools help safely remove old units and install new ones properly.
Can I Replace Hardwired Smoke Detectors Myself?
Yes, if you follow safety steps and instructions carefully. However, consider hiring an electrician for complex wiring or if unsure about electrical work.
How Do I Connect Wires When Installing New Detectors?
Match wire colors: black to black (hot), white to white (neutral), and connect the red or yellow wire if present for interconnect. Secure connections with wire nuts.
Conclusion
Replacing hard wired smoke detectors keeps your home safe and secure. Follow each step carefully to avoid mistakes. Test your new detector to ensure it works properly. Regular checks help catch any issues early. Staying alert protects your family from fire risks.
Easy to do with the right tools and instructions. Safety starts with good smoke detectors in every room. Take action today for peace of mind tomorrow.