
Are you ready to upgrade your home security with a smart video doorbell? Installing the Google Nest Hello Wi Fi Video Doorbell is easier than you think, and it can give you peace of mind by letting you see and talk to visitors from anywhere.
In this guide, you’ll find simple, step-by-step instructions to help you set it up quickly and correctly. By the end, you’ll have a powerful tool protecting your home and keeping you connected. Let’s get started!
Prepare For Installation
Preparing for the installation of your Google Nest Hello Wi Fi Video Doorbell is an important first step. It helps ensure a smooth setup and avoids problems later. Taking time to prepare makes the process faster and easier.
Before you start, check if your home and devices are ready. Collect all the tools you need and make sure your doorbell has enough power. These simple actions save time and effort during installation.
Check Compatibility
Verify your existing doorbell system works with Nest Hello. The device requires a wired doorbell with a transformer of 16-24 volts AC. Check if your home’s wiring matches this need. Confirm your Wi-Fi network is strong near the doorbell location. A stable connection is crucial for video and alerts.
Gather Required Tools
Collect all tools before starting the install. You will need a screwdriver, drill, level, and wire stripper. Keep your smartphone nearby to set up the app. Having tools ready saves time and prevents interruptions during the process.
Charge Your Doorbell
Charge your Google Nest Hello fully before installation. A charged battery ensures the device powers on and updates smoothly. Follow the charging instructions in the manual. This step avoids delays caused by low battery during setup.
Credit: www.hellotech.com
Turn Off Power
Turning off the power is a crucial step before installing your Google Nest Hello Wi-Fi Video Doorbell. It keeps you safe from electrical shocks. It also protects the device from damage during installation. Always take this step seriously to avoid accidents.
Locate Circuit Breaker
First, find the main circuit breaker box in your home. It is usually in the basement, garage, or a utility room. Open the panel to see the switches. Each switch controls power to different parts of your house. Look for the one labeled for your front door or porch area. This switch controls the power to your doorbell wiring.
Ensure Power Is Off
Flip the correct circuit breaker to the off position. This stops electricity from flowing to your doorbell wires. Use a voltage tester to check if the power is really off. Touch the tester to the wires where you will work. No light or sound means no power. If the tester shows power, turn off the main breaker for the whole house.
Remove Old Doorbell
Removing your old doorbell is the first step to install the Google Nest Hello Wi Fi Video Doorbell. This task needs care and attention. You must work safely to avoid damage and injury. Follow clear steps to remove the existing device without trouble.
Unscrew Existing Doorbell
Locate the screws holding your old doorbell in place. Use a screwdriver to turn them counterclockwise. Keep the screws in a safe spot; you might need them later. Gently pull the doorbell away from the wall. Be careful not to pull too hard.
Disconnect Wires Safely
Check the wires connected to the doorbell. Turn off power from the breaker to avoid electric shock. Use a voltage tester to confirm no power is flowing. Loosen the wire screws or clips. Carefully separate the wires from the doorbell. Do not let the wires touch each other.
Credit: www.wideworldofindoorsports.com
Install Mounting Plate
Installing the mounting plate is a key step in setting up your Google Nest Hello Wi-Fi Video Doorbell. This plate holds the doorbell securely on your wall. A proper installation ensures the device works well and stays safe.
Choose Mounting Location
Select a spot near your front door that has a clear view. Check for good Wi-Fi signal strength here. Avoid places too high or too low for easy use. The plate should be flat on the wall. Look for a spot without direct sunlight or heavy rain exposure.
Attach Plate To Wall
Hold the mounting plate against the wall at the chosen spot. Use a pencil to mark the screw holes. Drill holes where you marked. Insert wall anchors if needed for extra support. Screw the mounting plate firmly to the wall. Make sure it feels steady with no wobble.
Connect Wires
Connecting the wires is a key step to install the Google Nest Hello Wi-Fi Video Doorbell. Proper wiring ensures the doorbell works smoothly and safely. Follow the steps carefully to avoid damage or poor connection.
Use caution when handling wires. Turn off the power at the circuit breaker before starting. This prevents any risk of electric shock or short circuits.
Identify Wire Terminals
First, locate the wire terminals on your existing doorbell. Usually, there are two terminals where the wires are attached. These terminals supply power to your doorbell.
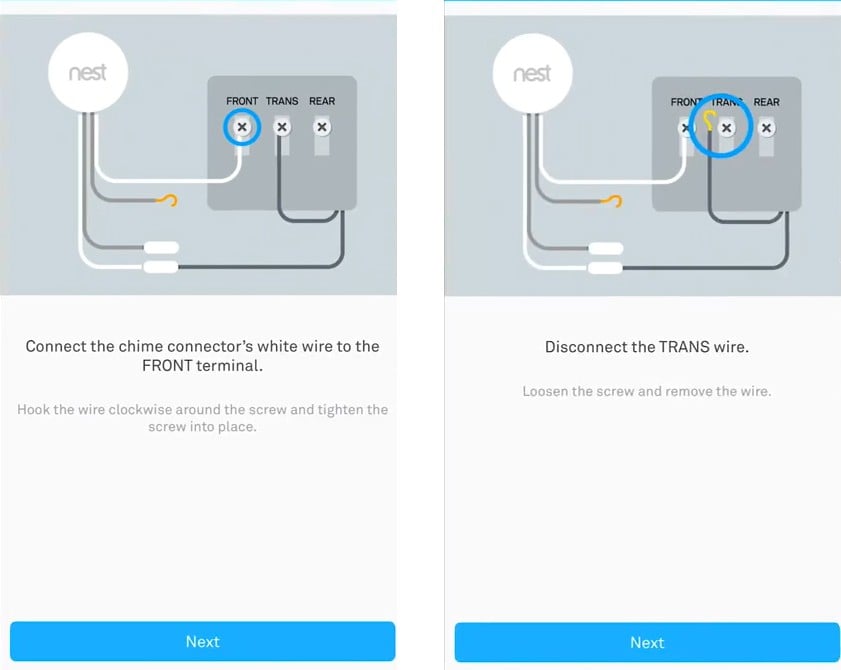
Look for labels or markings near the terminals. Labels like “trans” or “front” often appear. Make a note of which wire connects to each terminal. This helps during installation of the Nest Hello.
Attach Wires To Doorbell
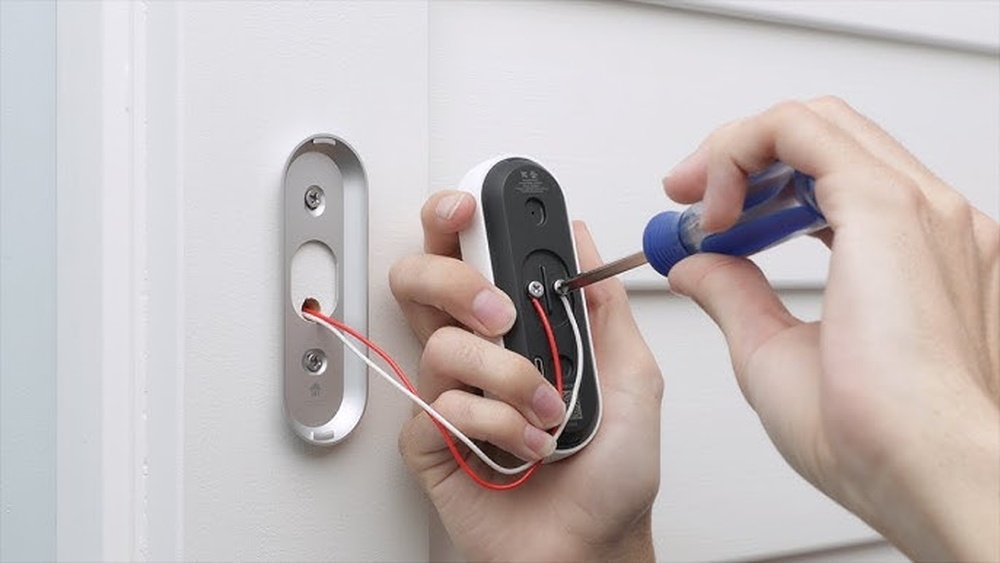
Next, connect the wires to the Nest Hello doorbell terminals. Match each wire to the correct terminal. Tighten the screws to secure the wires firmly.
Ensure no bare wire is exposed outside the terminal. This prevents short circuits and electrical hazards. Once connected, gently tug the wires to check they are secure.
After connecting, restore power at the circuit breaker. Test the doorbell to confirm it works properly.
Credit: vixencomposites.com
Attach Doorbell To Plate
Attaching the Google Nest Hello Wi Fi Video Doorbell to the mounting plate is a crucial step. This connection holds the doorbell securely and ensures it functions properly. Take your time to align the doorbell with the plate carefully. The plate usually has hooks or slots that fit the doorbell’s back.
Follow the instructions to snap or slide the doorbell onto the plate. Make sure the edges fit perfectly. This attachment keeps the doorbell stable and ready for use.
Secure Doorbell In Place
After aligning the doorbell with the plate, push it gently but firmly. You should feel it click or lock into position. This click confirms the doorbell is secure. Check that it does not move side to side. Use screws if your model requires extra security.
Use a screwdriver to tighten screws without overdoing it. Too much force can damage the doorbell or plate. Properly securing the doorbell protects it from falling or theft.
Test Physical Stability
Once attached, test the doorbell’s stability by giving it a slight shake. It should stay firmly in place without wobbling. Check all sides and the bottom for any movement. A stable doorbell ensures good video quality and proper operation.
If the doorbell moves, remove it and try reattaching. Make sure the plate is mounted correctly on the wall. Stability is key for long-lasting performance and safety.
Restore Power
Restoring power to your Google Nest Hello Wi Fi Video Doorbell is a crucial step. It ensures the device works correctly after installation. Without power, the doorbell cannot function or connect to Wi Fi.
Follow these steps carefully to restore power safely and effectively. This will help you enjoy your new doorbell without issues.
Turn Circuit Breaker On
Locate the circuit breaker box in your home. Find the switch for your doorbell’s power circuit. Flip the switch to the ON position. This restores electricity to the doorbell wiring. Listen for a click sound that confirms the switch is on. If unsure, use a flashlight to see clearly in the breaker box. Turning on the correct breaker is vital for your doorbell to power up.
Verify Power To Doorbell
Check the doorbell for lights or sounds after turning on the breaker. A small LED light or chime indicates power is reaching the device. Use a voltage tester on the doorbell wires to confirm power presence. This tool shows if electricity flows through the wires. If no power is detected, recheck the breaker or wiring connections. Ensuring power reaches the doorbell prevents installation delays and malfunctions.
Set Up With Google Home App
Setting up the Google Nest Hello Wi-Fi Video Doorbell is simple with the Google Home app. The app guides you through each step. It helps connect your doorbell to your home network.
This process lets you see visitors from your phone. It also sends alerts when someone rings the bell. Follow these steps to get started quickly.
Download And Open App
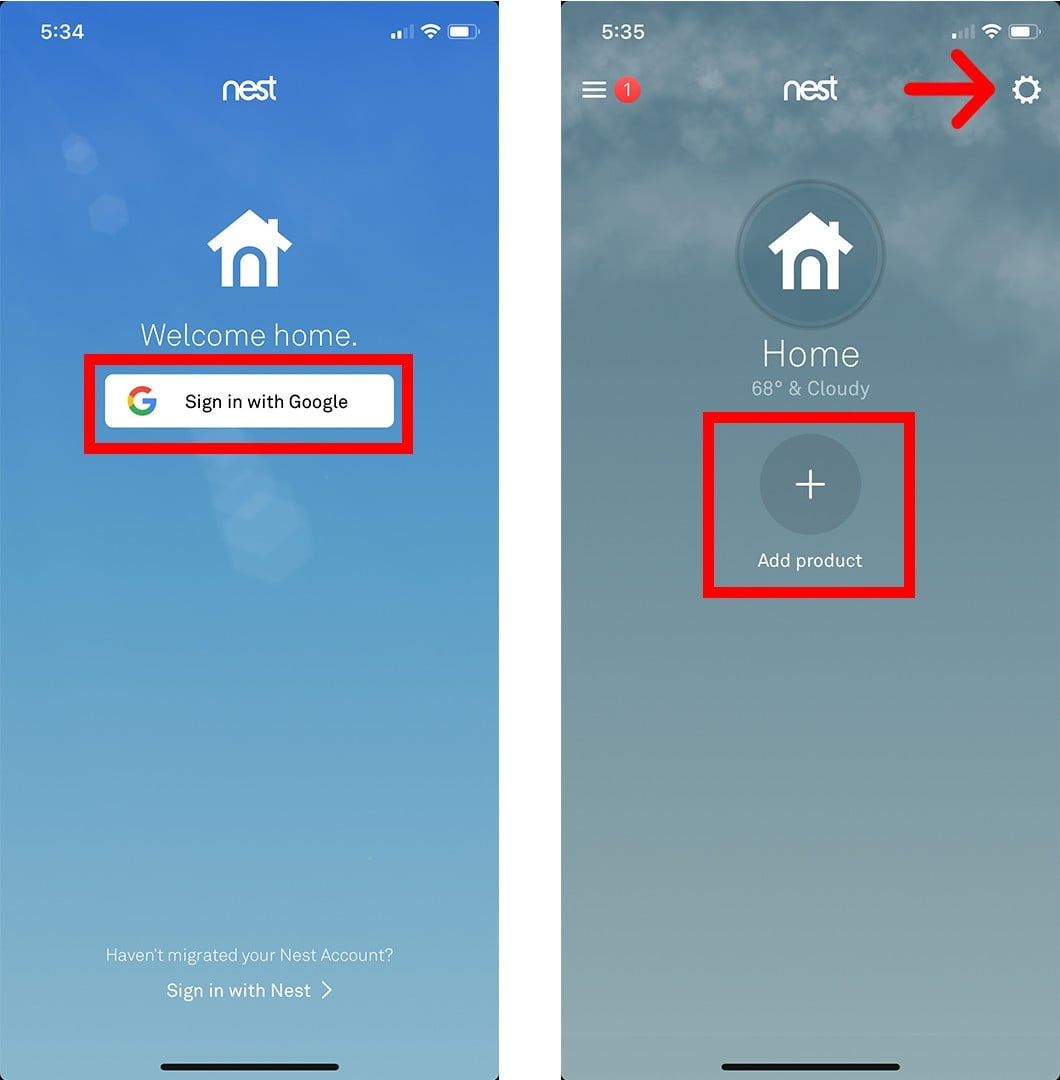
First, download the Google Home app from the App Store or Google Play. Open the app after installation. Sign in using your Google account. This account links your devices and settings.
Add New Device
Tap the plus (+) icon to add a device. Choose “Set up device” from the menu. Select “New devices” in your home. The app will search for your Nest Hello doorbell.
Follow the on-screen instructions to continue. This process pairs your phone with the doorbell.
Connect To Wi-fi
Choose your home Wi-Fi network from the list. Enter your Wi-Fi password carefully. The doorbell needs a strong, stable connection. The app confirms when your device is online.
Once connected, your Nest Hello is ready to use. You can start customizing settings and notifications.
Customize Settings
After installing your Google Nest Hello Wi Fi Video Doorbell, customizing its settings helps you get the best use. Setting it up to match your home’s needs improves security and convenience.
Adjusting the settings lets you control how the doorbell reacts to visitors and alerts. This section explains simple steps to adjust motion sensitivity, set notification preferences, and enable video recording.
Adjust Motion Sensitivity
Open the Nest app and select your doorbell device. Find the motion settings option. Slide the bar to set how sensitive the doorbell is to movement. Higher sensitivity detects small motions. Lower sensitivity reduces false alerts from cars or pets. Test different levels to find what works best for your space.
Set Notification Preferences
Choose which alerts you want to receive on your phone. You can get notifications for all motion, only people, or just when someone rings the doorbell. Turn notifications on or off for each event. This helps avoid too many alerts. Customize sounds or vibration for each alert type in your phone settings.
Enable Video Recording
Video recording stores clips when motion or doorbell rings occur. Go to the video recording section in the app. Turn on recording to save video clips. You can review these clips anytime to see who visited. Some plans offer longer storage time. Enable this feature to keep a record of activity at your door.
Troubleshoot Common Issues
Installing the Google Nest Hello Wi-Fi Video Doorbell is simple, but some common issues might occur. These problems can stop the doorbell from working well. Troubleshooting helps fix these issues fast. Below are common problems and easy ways to solve them.
Wi-fi Connectivity Problems
Weak Wi-Fi signals cause connection drops. Move your router closer to the doorbell. Avoid thick walls and metal objects between them.
Restart your router and doorbell to refresh the connection. Check if your Wi-Fi password is correct in the app. Use a 2.4 GHz network; Nest Hello does not support 5 GHz.
Power Supply Issues
The doorbell needs a steady power source. Check the doorbell transformer voltage matches Nest Hello’s requirements. Loose wiring can stop power flow. Tighten all connections securely.
Use a multimeter to test voltage at the doorbell terminals. If power is low, replace the transformer. Avoid using batteries; Nest Hello depends on wired power.
App Syncing Errors
Syncing problems happen if the app is outdated. Update the Google Home app to the latest version. Close and reopen the app to refresh.
Sign out and sign back into your Google account. Check your phone’s internet connection. Restart your phone if the app still won’t sync.
Frequently Asked Questions
How Do I Connect Google Nest Hello To Wi-fi?
To connect Nest Hello to Wi-Fi, open the Google Home app. Follow the app’s setup instructions. Ensure your phone is near the doorbell. Choose your Wi-Fi network and enter the password. This process completes the connection smoothly and securely.
What Tools Are Needed To Install Nest Hello Doorbell?
You need a drill, screwdriver, and voltage tester. The Nest Hello package includes mounting screws and a template. Having a level helps for proper alignment. Always turn off power at the breaker before installation for safety.
Can I Use Nest Hello With Existing Doorbell Wires?
Yes, Nest Hello works with existing doorbell wires. It requires 16-24 volts AC and 10-40VA. The wires power the device and charge its battery. If unsure, check compatibility before installation to avoid issues.
How Long Does Nest Hello Installation Take?
Installation typically takes 20 to 30 minutes. This includes mounting, wiring, and app setup. Time may vary depending on your doorframe and Wi-Fi strength. Following the instructions carefully ensures a quick setup.
Conclusion
Installing the Google Nest Hello Wi-Fi Video Doorbell is simple and quick. Follow each step carefully for best results. Make sure your Wi-Fi is strong and stable. Test the doorbell after installation to confirm it works well. Enjoy the added security and convenience it brings.
Stay safe and connected with your new video doorbell every day.