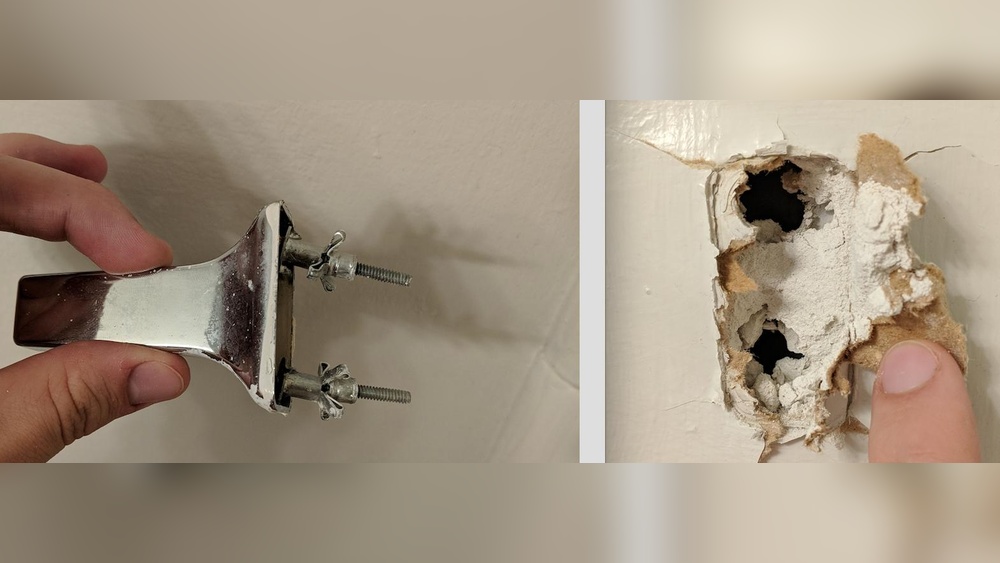

Have you ever noticed a loose or damaged hole where your towel rack should be? It can be frustrating when your towel rack wobbles or falls off the wall, leaving unsightly holes behind.
But don’t worry—you don’t need to call a handyman or spend a fortune to fix it. You’ll discover simple, step-by-step ways to repair those holes quickly and easily. By the end, your towel rack will be sturdy again, and your wall will look as good as new.
Ready to get started? Let’s fix that towel rack hole together!
Identify The Damage
Before fixing a towel rack hole, you must identify the damage. Understanding the problem helps you choose the right repair method. A clear view of the damage saves time and effort. Let’s explore how to check the hole size and assess the wall material.
Check Hole Size And Depth
Start by measuring the hole’s width and depth. Use a ruler or tape measure for accuracy. Small holes may only need simple patching. Large or deep holes might need stronger repairs. Knowing the size helps you pick the right tools and materials. Mark the measurements for easy reference during repair.
Assess Wall Material
Next, identify the wall type around the hole. Common materials include drywall, plaster, or tile. Each material needs a different repair approach. Drywall holes can be filled with spackle or patch kits. Plaster walls may require special plaster mix. Tile walls might need adhesive and grout. Recognize the wall material to avoid damage during repair.

Credit: www.wallshark.com
Gather Repair Materials
Before fixing a towel rack hole, gather all repair materials. Having the right tools and supplies makes the job easier. It saves time and ensures a smooth repair process.
Tools Needed
Start with basic tools. You will need a screwdriver to remove the towel rack. A putty knife helps apply filler smoothly. Sandpaper is essential to smooth the surface after filling. A clean cloth is useful to wipe dust and debris. These tools prepare the surface for repair.
Choosing The Right Filler
Select a filler that matches your wall type. For drywall, use spackling paste or joint compound. Wood filler works best for wooden walls. Pick a filler that dries fast and is easy to sand. This choice ensures a strong, invisible fix. Check the label for drying time and sanding instructions.
Prepare The Area
Preparing the area is the first step to fix a towel rack hole. A clean and clear surface helps the repair last longer. It also makes the process easier and faster.
Proper preparation stops problems like weak holds or crumbling walls. Take time to get this right before moving on.
Clean The Hole
Start by removing dust and dirt from the hole. Use a small brush or cloth. Wipe inside the hole gently but thoroughly. This creates a good surface for repair materials to stick to. A clean hole improves the strength of the fix.
Remove Loose Debris
Check for loose pieces of plaster or drywall around the hole. Use a screwdriver or your fingers to pull out any weak parts. Loose debris can stop the filler from holding well. Clearing these bits makes the repair smooth and solid.
Fill The Hole
Filling the hole left by a towel rack is an important step in fixing your wall. This process makes the surface smooth and ready for painting. It also helps prevent damage and keeps the wall looking clean.
Apply Spackle Or Filler
Choose a spackle or wall filler that matches your wall type. Use a putty knife to scoop some filler. Press it firmly into the hole to fill the space completely. Apply enough to slightly overfill the hole. This ensures the hole is fully covered after drying.
Smooth The Surface
Wait for the filler to dry fully. Use fine sandpaper to gently smooth the surface. Sand until the patch blends with the surrounding wall. Remove any dust with a damp cloth. A smooth surface helps paint stick better and look neat.
Let The Repair Dry
Letting the repair dry is a key step in fixing a towel rack hole. The filler or patch material must harden fully. This ensures the repair holds strong and lasts long. Rushing this step can cause the patch to break or peel away.
Patience is important here. Drying times vary based on the filler type and room conditions. A well-dried repair provides a smooth surface for sanding and painting. It also prevents moisture damage later on.
Recommended Drying Times
Most wall fillers need 24 hours to dry completely. Some quick-dry fillers set in 1 to 3 hours. For deep or large holes, drying can take up to 48 hours. Check the product label for exact times. Avoid touching or sanding before the repair feels hard.
Tips To Speed Up Drying
Increase air circulation with a fan or open window. Warm air helps water evaporate faster. Use a hairdryer on low heat, holding it a few inches away. Avoid high heat to stop cracking. Keep the room dry and avoid steam or humidity. These steps can cut drying time safely.
Sand And Finish
After filling the towel rack hole, sanding and finishing are key steps. These help smooth the surface and prepare it for painting or texture. Proper sanding removes rough edges and blends the patch with the wall.
Finishing touches make the repair less visible. This process ensures the wall looks even and clean. Use the right tools and materials for the best results.
Sanding Techniques
Start with medium-grit sandpaper to even out the filled hole. Sand gently in a circular motion. This helps avoid creating new scratches.
Switch to fine-grit sandpaper for a smooth finish. Focus on blending the patch edges with the wall. Clean dust with a soft cloth after sanding.
Touch Up Paint Or Texture
Match the wall paint color exactly to hide the repair. Use a small brush or roller for touch-ups. Apply thin coats and let each dry fully.
If the wall has texture, use a texture spray or compound. Dab lightly to mimic the surrounding pattern. Let it dry before painting.
Reinstall Towel Rack
Reinstalling a towel rack is a simple fix after repairing the hole. It helps keep your bathroom neat and organized. Proper steps make sure the rack stays strong and safe to use. Follow these steps to reinstall the towel rack correctly.
Choose Proper Anchors
Pick anchors that fit your wall type. Drywall needs plastic or metal anchors for strength. Use anchors rated for the weight of the towel rack. Avoid using just screws in drywall; they can loosen over time. Proper anchors keep the rack steady and prevent damage.
Secure The Rack Firmly
Align the towel rack with the repaired holes. Insert screws through the rack’s mounting holes into the anchors. Tighten screws until the rack is snug against the wall. Do not overtighten; it can break the anchors. Check the rack’s stability by gently pulling it. A firm rack holds towels safely without wobbling.

Credit: www.reddit.com
Prevent Future Damage
Preventing future damage to your towel rack is important. Repairing holes can take time and effort. Taking simple steps can help keep your walls safe. This saves you from fixing the same problem again.
Use the right tools and avoid putting too much weight on the rack. These small actions make a big difference in durability and appearance.
Use Appropriate Hardware
Select screws and anchors made for your wall type. Drywall, tile, and plaster need different hardware. Using the correct type keeps the rack secure. It stops the rack from loosening or pulling out. This reduces stress on the wall and hole.
Heavy-duty anchors work well for heavy towel racks. Plastic anchors suit lightweight racks. Metal anchors offer strong support in drywall. Make sure screws fit anchors tightly. Loose screws cause wobbling and damage.
Avoid Overloading
Do not hang too many towels or heavy items. Overloading adds pressure to screws and wall. This pressure can widen holes or cause racks to fall. Spread towels evenly on the rack. Use multiple racks for many towels.
Check rack weight limits before use. Follow manufacturer instructions for best results. Light use extends the life of your towel rack and wall. Your wall stays clean and damage-free longer.

Credit: www.youtube.com
Frequently Asked Questions
How Do I Repair A Large Towel Rack Hole?
Fill the hole with a wall repair patch or wood filler. Sand it smooth once dry. Then, repaint or reinstall the rack securely.
What Tools Are Needed To Fix Towel Rack Holes?
You need a putty knife, sandpaper, wall filler, paint, and a drill. These help fill and cover holes effectively.
Can I Reuse The Same Towel Rack After Fixing Holes?
Yes, after the hole is repaired and dry, you can reinstall the rack safely. Ensure the anchors fit tightly.
How Long Does It Take To Fix A Towel Rack Hole?
Typically, it takes about 30 minutes to fill and sand. Drying time varies but usually takes a few hours.
Conclusion
Fixing a towel rack hole is easier than it seems. Small repairs can make your wall look neat again. Use the right tools and materials for best results. Take your time and follow simple steps carefully. This saves money and avoids bigger problems later.
A tidy wall adds to your bathroom’s charm. Now, you can enjoy a clean, secure towel rack every day. Give it a try and see how well it works.