Are you looking to remove your Arlo Video Doorbell but unsure where to start? Whether you’re upgrading to a new model or simply need to take it down temporarily, the process doesn’t have to be confusing or stressful.
In this guide, you’ll find clear, step-by-step instructions that make removing your Arlo Video Doorbell quick and easy. Keep reading, and you’ll have it done in no time—without any hassle or damage to your doorframe.
Tools Needed
Removing an Arlo Video Doorbell needs the right tools. Using the correct tools makes the process safe and easy. This section lists all tools required for the job.
Screwdriver
A screwdriver is essential to remove screws holding the doorbell. Usually, a Phillips head screwdriver fits best. Check your doorbell screws before starting.
Voltage Tester
A voltage tester ensures no electricity flows before touching wires. Safety first. Test the wires after turning off the power at the breaker.
Wire Nuts
Wire nuts cover and protect wires after removal. They keep wires from touching and causing shorts. Have a few handy for safety.
Electrical Tape
Use electrical tape to wrap wires securely. It adds an extra layer of protection. Wrap wires individually after removing the doorbell.
Ladder
A ladder helps reach your doorbell safely. Use a stable ladder that fits your door height. Avoid standing on unstable surfaces.
Bucket Or Container
Keep screws and small parts in a container. This stops losing them during removal. Use a small bowl or box nearby.

Credit: www.amazon.com
Power Off The Doorbell
Powering off the Arlo Video Doorbell is the first step in safely removing it. This step stops the doorbell from working and prevents any damage during removal. It also protects you from electrical shocks.
The process is simple and quick. Follow the instructions carefully to avoid problems later.
Turn Off The Circuit Breaker
Locate the circuit breaker for your doorbell’s power supply. Flip the switch to the off position. This cuts the electricity to the doorbell and ensures safety.
Confirm The Doorbell Is Off
Press the doorbell button to check if it rings or lights up. If nothing happens, the power is off. If it still works, turn off the breaker again.
Disconnect The Doorbell From Power
Remove the doorbell from its mount carefully. Use a screwdriver if needed. Disconnect the wires from the back of the doorbell to fully cut power.
Remove The Faceplate
Removing the faceplate is the first step in taking off your Arlo Video Doorbell. The faceplate covers the camera lens and buttons. It protects the device from weather and damage. Taking it off carefully helps avoid scratches or breaks.
Start by preparing a flat surface to place the faceplate safely. Use a small flat tool or your fingernail to lift the edges gently. The faceplate snaps into place, so a little pressure can release it. Avoid using too much force to prevent damage.
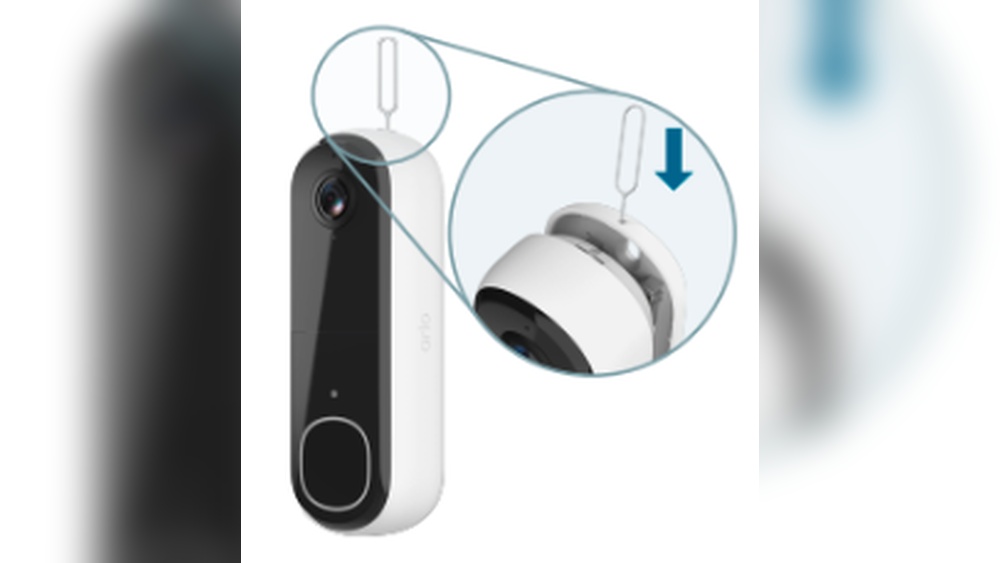
Locate The Release Tab
Find the small release tab on the bottom or side of the faceplate. This tab locks the faceplate onto the doorbell. Pressing or sliding the tab unlocks the faceplate. Keep your hand steady to avoid dropping the plate.
Gently Pry The Faceplate Off
Insert a flat tool or your finger under the edge of the faceplate. Slowly lift it away from the doorbell body. The clips holding it will loosen with gentle pressure. Work around the edges until the faceplate comes off.
Handle The Faceplate With Care
Place the faceplate on a soft surface to prevent scratches. Avoid touching the camera lens or buttons directly. Use a clean cloth if you need to wipe it. Keep the faceplate safe for reinstallation or storage.

Credit: www.arlo.com
Unscrew The Doorbell Unit
Removing the Arlo Video Doorbell starts with unscrewing the doorbell unit. This step is simple but important. It allows you to safely detach the device from your door frame or wall. Preparing the right tools before you begin will make the process smooth and quick.
Use a small screwdriver that fits the screws on your doorbell. Check for screws at the bottom or sides of the unit. These screws keep the doorbell fixed securely in place. Unscrewing them gently prevents damage to the device or your door.
Locate The Screws On The Doorbell
Look closely at the edges of the Arlo Video Doorbell. You will find small screws holding the unit. Usually, these screws sit at the bottom or sides. Identifying their positions helps you avoid mistakes. It also stops you from scratching the doorbell surface.
Choose The Right Screwdriver
Pick a screwdriver that matches the screw heads. Most Arlo doorbells use a small Phillips or flat-head screwdriver. Using the wrong tool can strip the screws. A good fit ensures you turn the screws smoothly and safely.
Unscrew Carefully And Keep Screws Safe
Turn the screws counterclockwise to loosen them. Do this slowly to avoid slipping. Keep the screws in a small container or safe place. You will need them if you plan to reinstall the doorbell later. Handle the doorbell gently as you remove the last screw.
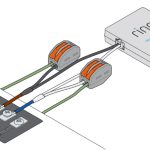
Disconnect The Wires
Disconnecting the wires is a key step to remove your Arlo Video Doorbell safely. It stops the power supply and helps avoid damage or injury. Follow these easy steps to disconnect the wires correctly.
Turn Off Power At The Circuit Breaker
Find the circuit breaker that controls your doorbell. Switch it off to cut electricity. This step protects you from electric shock while handling wires.
Remove The Doorbell From The Wall
Use a screwdriver to take out screws holding the doorbell. Gently pull the device off the wall to see the wires behind.
Loosen Wire Connectors
Look for wire connectors or terminal screws on the back of the doorbell. Unscrew or loosen them carefully to free the wires.
Disconnect The Wires Safely
Pull each wire out gently. Keep the wires separated and away from metal surfaces. Wrap wire ends with electrical tape to avoid short circuits.
Remove The Mounting Bracket
Removing the mounting bracket is the next step after detaching the Arlo Video Doorbell itself. This part holds the doorbell firmly to the wall. Taking it off carefully prevents damage and prepares the area for any new setup or repair. Follow these steps to remove it safely and easily.
Gather The Right Tools
Start by collecting the tools needed. Usually, a screwdriver fits the screws on the bracket. Check if you need a Phillips or flathead screwdriver. Having the correct tool makes the process smooth and quick.
Locate The Screws On The Bracket
Look closely at the mounting bracket. Find the screws holding it to the wall. They are often at the corners or near the edges. Identifying all screws is important before starting to unscrew.
Unscrew The Mounting Bracket
Turn the screws counterclockwise using the screwdriver. Apply steady pressure but do not force it. If screws are tight, a little extra effort is okay. Remove each screw completely and keep them safe for future use.
Remove The Bracket From The Wall
Once all screws are out, gently pull the bracket away from the wall. If it sticks, wiggle it slightly to loosen. Avoid using sharp tools to pry it off. Check the wall for any damage or leftover anchors.
Tips For Safe Removal
Removing your Arlo Video Doorbell needs care to avoid damage. Follow simple tips for a safe and smooth removal process. These steps help protect the device and your home wiring.
Turn Off Power At The Breaker
Start by switching off the power to the doorbell. This prevents electric shock and protects the doorbell’s wiring. Use the circuit breaker to cut power safely.
Use The Right Tools
Gather tools like a screwdriver and a small pry tool. Using correct tools avoids damage to the doorbell or wall. Avoid forcing parts apart to keep everything intact.
Remove Screws Carefully
Unscrew the doorbell mounting screws slowly. Keep screws safe for later use or disposal. Do not strip the screw heads to make reinstallation easier.
Handle The Doorbell Gently
Pull the doorbell away from the wall with care. Avoid pulling on wires or connectors directly. Hold the device firmly to prevent dropping it.
Disconnect Wires Safely
Note the wire connections before disconnecting. Loosen wire nuts or clips gently. Secure exposed wires to avoid shorts or damage.
Troubleshooting Common Issues
Troubleshooting common issues with your Arlo Video Doorbell can save time and prevent frustration. Many problems have simple fixes you can try at home. This section helps you identify and solve these issues quickly.
Checking Power And Battery
Power problems cause many doorbell issues. Ensure the battery is charged or the doorbell is connected to power. Replace batteries if needed. A low battery stops the doorbell from working properly.
Verifying Wi-fi Connection
A poor Wi-Fi connection disrupts video and notifications. Move your router closer or use a Wi-Fi extender. Check your internet speed to make sure it supports video streaming. Restart your router to fix minor connection errors.
Resetting The Doorbell
Resetting fixes many errors. Hold the reset button for 10 seconds until the light blinks. This clears bugs and refreshes settings. You will need to set up the doorbell again after a reset.
Updating Firmware
Outdated software causes glitches. Open the Arlo app and check for updates. Install the latest firmware for better performance and new features. Updates also fix known bugs.
Checking App Notifications
No alerts can mean app settings need review. Make sure notifications are on in the Arlo app and your phone’s settings. Allow the app to send alerts and access your camera.

Credit: www.youtube.com
Frequently Asked Questions
How Do I Safely Remove An Arlo Video Doorbell?
Turn off power at the breaker before removal. Unscrew the doorbell from the mount. Disconnect the wiring carefully to avoid damage.
Can I Uninstall Arlo Video Doorbell Without Damaging It?
Yes, by following proper steps. Power off, unscrew, and gently disconnect wires. Handle the device carefully to keep it reusable.
What Tools Are Needed To Remove Arlo Video Doorbell?
You’ll need a screwdriver and voltage tester. A ladder might be required for high installations. Always use insulated tools for safety.
How To Disconnect Arlo Video Doorbell From The App?
Open the Arlo app, select your doorbell. Go to device settings and choose “Remove Device. ” Confirm to unlink it from your account.
Conclusion
Removing your Arlo Video Doorbell is simple and quick. Follow the steps carefully to avoid any damage. Keep your tools ready and work slowly. Take care not to harm wires or the wall. Once removed, clean the area for a neat look.
Store your doorbell safely if you plan to reuse it. This guide helps you remove it without stress. Now, you can switch or upgrade your doorbell easily. Safe and smooth removal makes your task easier.