Are you ready to boost your home’s security and never miss a visitor again? Installing the Ring Video Doorbell 2 is easier than you might think, and it can change how you protect your home.
In this guide, you’ll get simple, step-by-step instructions to set up your doorbell quickly and correctly. Whether you’re tech-savvy or a beginner, by the end, you’ll feel confident using your new device to keep your home safer and stay connected with what’s happening right outside your door.
Let’s get started!
Gathering Required Tools
Before installing your Ring Video Doorbell 2, gathering the right tools is important. Having everything ready saves time and avoids frustration. It also helps the installation go smoothly and safely.
Prepare a list of tools and materials. Check your workspace for comfort and safety. These steps make the process easier and more efficient.
Tools And Materials Checklist
Start with the Ring Video Doorbell 2 package. It comes with some parts you need.
- Ring Video Doorbell 2 unit
- Mounting bracket
- Screws and anchors
- Security screwdriver
Also gather common household tools:
- Drill with bits
- Phillips screwdriver
- Level tool
- Measuring tape
- Wire stripper (if wiring)
- Voltage tester (for safety)
- Ladder (if high mounting)
Have these ready before starting. It prevents delays and keeps you organized.
Preparing Your Workspace
Choose a well-lit, dry area near your door for work. Clear the space of any obstacles.
Place tools in a small box or tray. This keeps them close and avoids losing small screws.
Wear safety glasses and gloves for protection. Check weather conditions if working outside.
Ensure your phone or tablet is charged. You will need it to set up the device after installation.
Credit: vixencomposites.com
Preparing The Doorbell
Preparing your Ring Video Doorbell 2 is an important first step before installation. It ensures the device works smoothly and connects well to your home network. Follow these simple steps to get your doorbell ready for use.
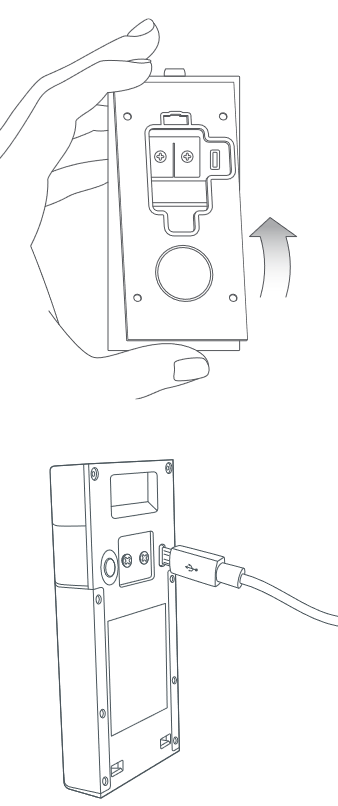
Charging The Battery
Start by removing the battery from the Ring doorbell. Use the included USB charging cable to charge it fully. A full charge takes about 5 to 10 hours. The battery light turns green when charging is complete. Never install the doorbell with a low battery. This helps avoid interruptions during setup and use.
Setting Up The Ring App
Download the Ring app on your smartphone or tablet. Open the app and create a new account or log in. Follow the prompts to add a new device. Scan the QR code on the doorbell or enter the setup code manually. Connect the doorbell to your Wi-Fi network. The app guides you through each step clearly.
Removing The Old Doorbell
Removing the old doorbell is the first step to install your Ring Video Doorbell 2. It prepares your door for the new device. This process keeps you safe and protects your home’s wiring. Follow these simple steps to remove the existing doorbell carefully.
Turning Off Power
Safety comes first. Turn off power to the doorbell at the circuit breaker. This stops electric shocks while working on wires. Check that the doorbell button does not light up or make sound. Use a voltage tester to be sure the power is off.
Detaching Existing Doorbell
Remove the screws holding the doorbell to the wall. Keep the screws safe; you might need them later. Gently pull the doorbell away from the wall. If wires are attached, do not pull hard. Unscrew the wire connectors or carefully pull the wires loose. Make sure wires do not touch each other.

Credit: www.youtube.com
Installing The Mounting Bracket
Installing the mounting bracket is a key step in setting up your Ring Video Doorbell 2. This part holds the doorbell firmly on your wall or door frame. Proper installation makes sure the device works well and stays safe from falling or damage.
Choosing The Installation Spot
Pick a spot near your front door. The doorbell should cover the main entry area clearly. Avoid places that block the camera view. Make sure the spot is within reach for easy installation and charging. Check for a power source if you plan to use wired power. A good height is about 48 inches from the ground. This height captures faces well and is easy to reach.
Mounting The Bracket Securely
Use the screws that come with the bracket. Drill holes into the wall or door frame at the marked points. Insert wall anchors if you mount on drywall or stucco. Screw the bracket tightly so it does not move. Align the bracket so the doorbell fits perfectly. Test the bracket by gently pulling it to confirm stability. This step prevents the doorbell from falling or tilting.
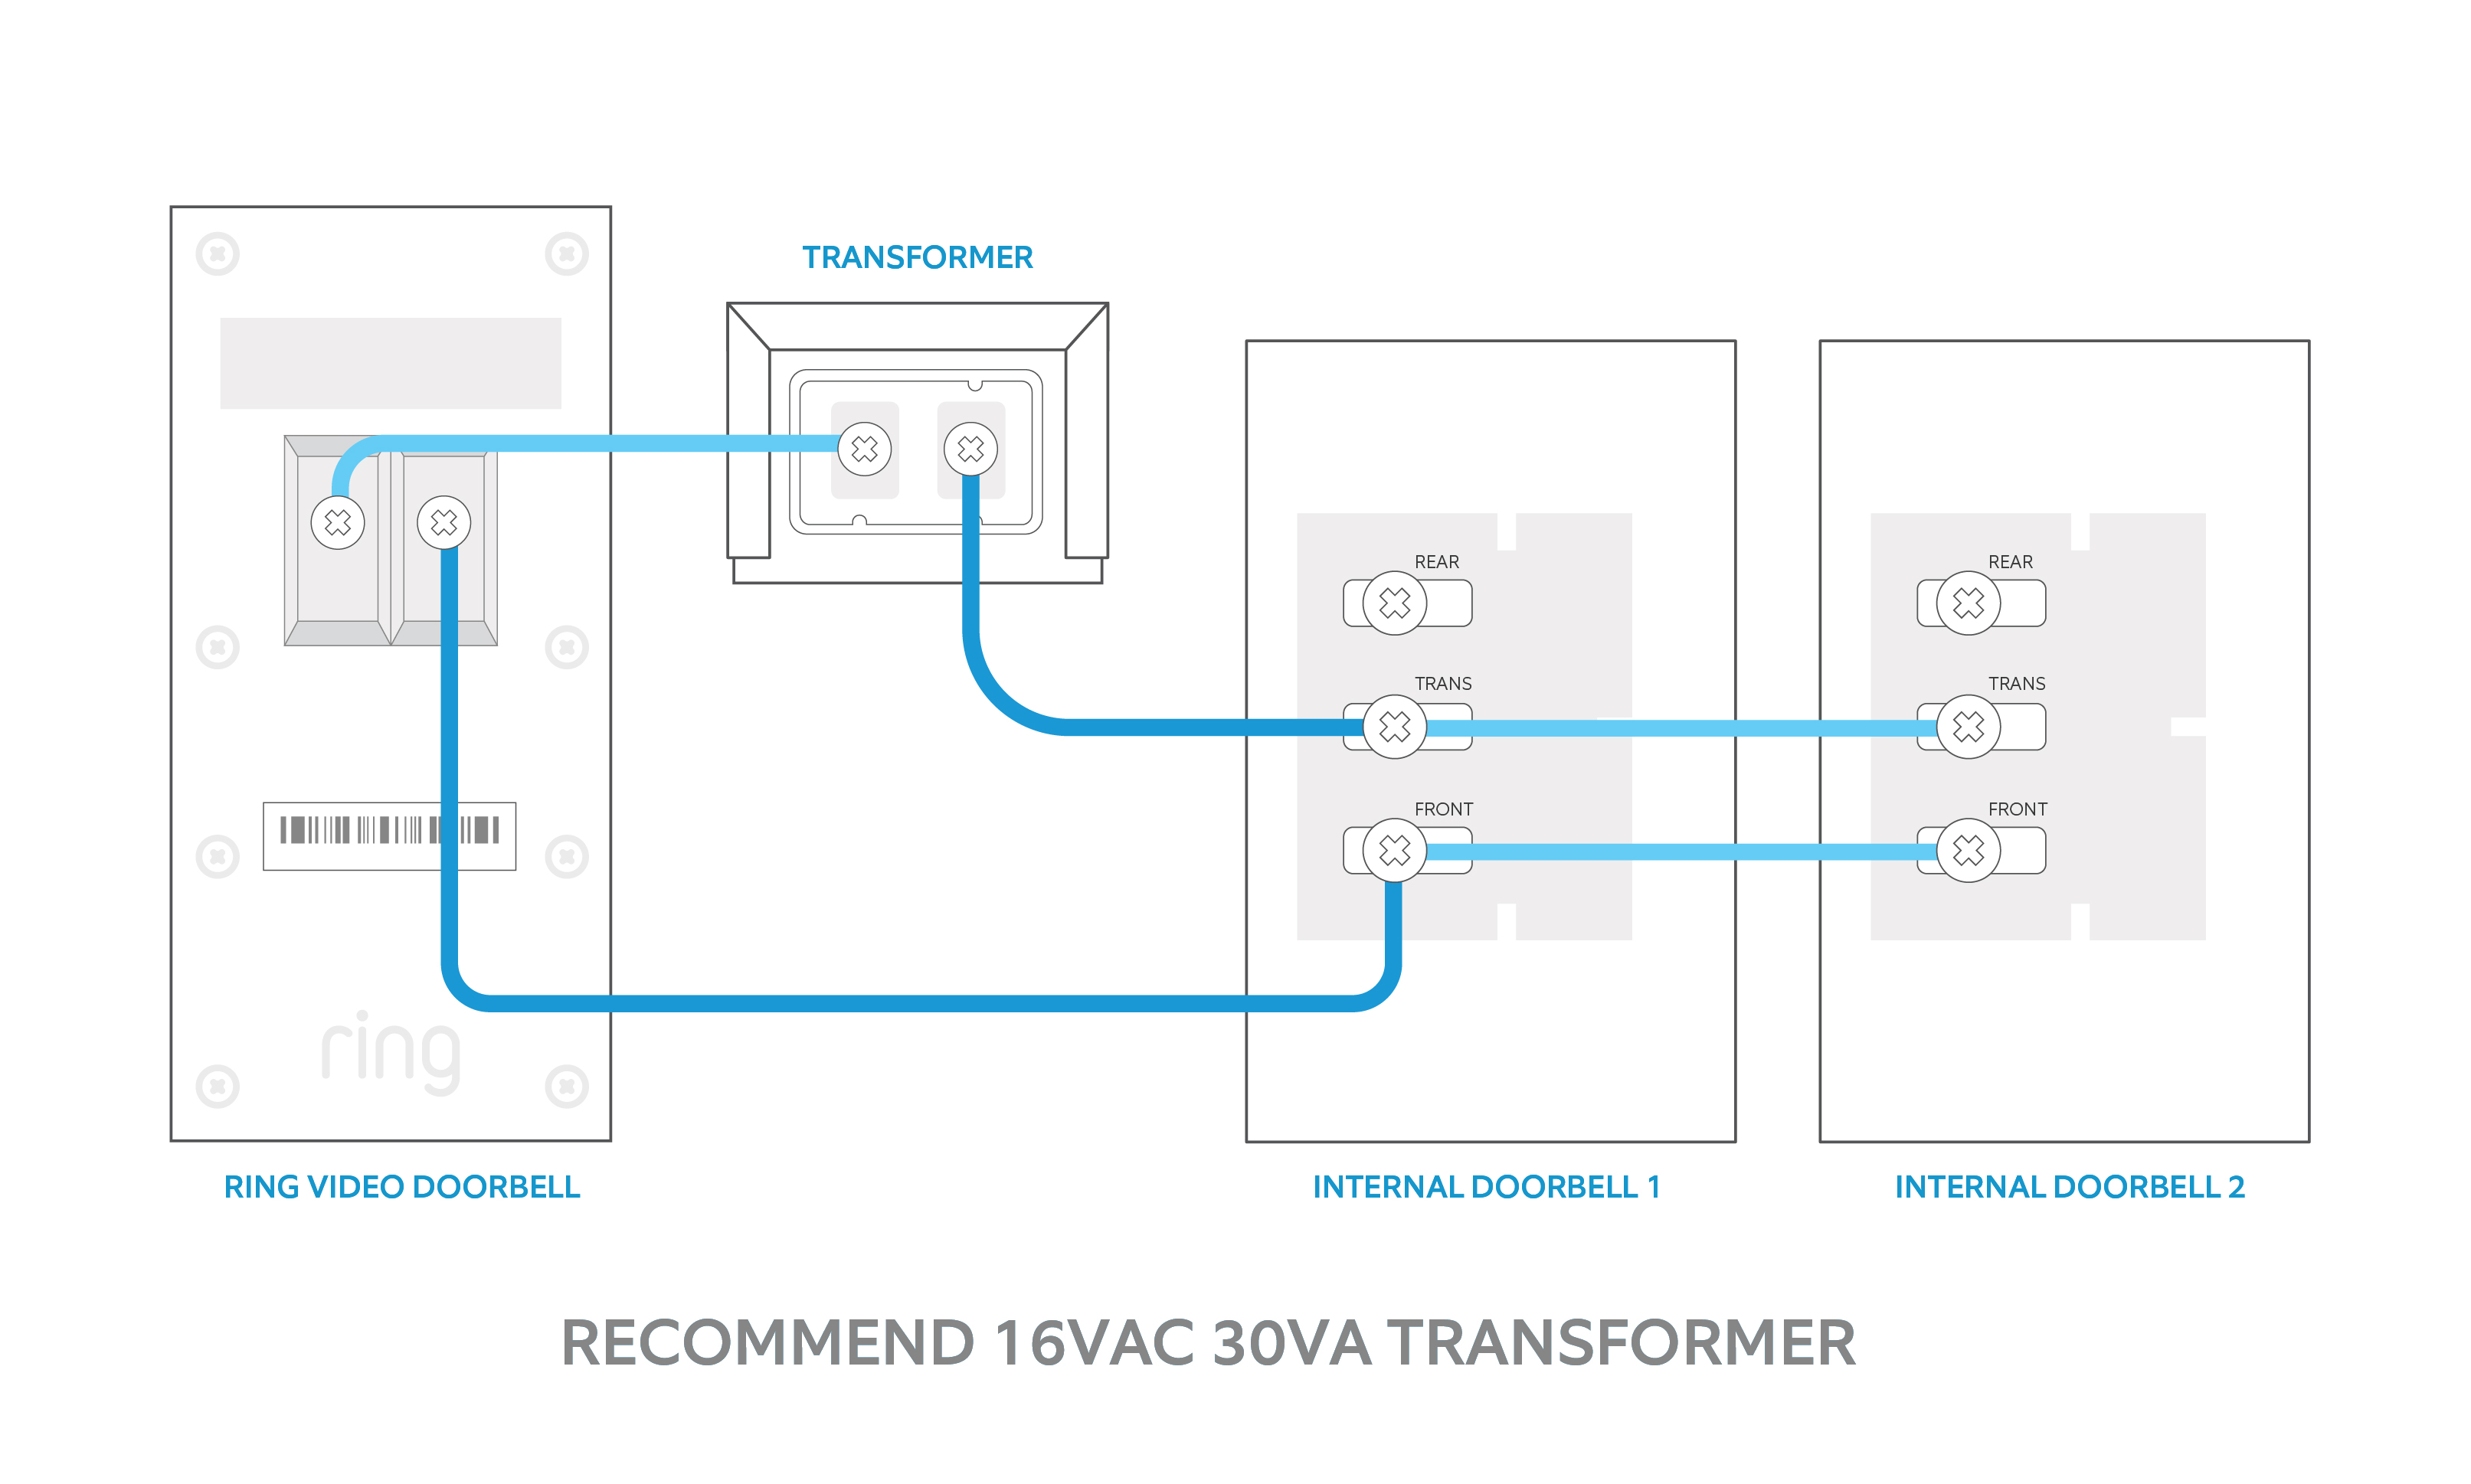
Wiring The Doorbell
Wiring the Ring Video Doorbell 2 is a key step in installation. It powers the device and connects it to your home’s existing doorbell system. Careful wiring ensures your doorbell works smoothly and safely. This guide helps with simple, clear steps for wiring your doorbell properly.
Connecting Wires Safely
Turn off the power at your home’s circuit breaker first. This avoids electrical shocks. Remove the old doorbell from the wall to access the wires. Identify the two wires connected to the old doorbell. Connect each wire to the screws on the Ring doorbell’s back plate. Tighten the screws to hold the wires firmly. Avoid letting wires touch each other to stop short circuits. Use electrical tape if needed for extra safety. Restore power only after all connections are secure.
Troubleshooting Wiring Issues
Check the doorbell’s voltage using a multimeter. The correct range is usually 16-24 volts AC. If no power shows, recheck the circuit breaker and wiring connections. Loose wires cause most connection problems. Ensure wires are wrapped tightly around screws. Inspect wires for damage or corrosion. Replace wires if they look worn out. If issues persist, test the doorbell on a different doorbell transformer. This helps find if the problem is with your wiring or the doorbell itself.
Attaching The Ring Doorbell 2
Attaching the Ring Video Doorbell 2 is a key step for a secure setup. The device needs to be fixed firmly to your chosen spot. This ensures it works well and stays safe from theft or damage.
Follow clear steps to mount the doorbell correctly. Use the right tools and parts that come with your Ring package. This process keeps your device stable and ready for use.
Securing The Device
Start by placing the mounting bracket on the wall. Make sure it is level and aligned with your door. Use the screws provided to fix the bracket tightly. Check that it does not move or wobble.
Next, attach the Ring Doorbell 2 to the bracket. Slide the device down until it clicks. The doorbell should sit flush against the wall with no gaps. Test the fit by gently pulling on it.
Locking Mechanism Setup
The Ring Doorbell 2 has a locking screw to keep it secure. Use the small security screwdriver included in the box. Insert the screw into the bottom of the doorbell. Turn it until it is tight but avoid over-tightening.
This locking step prevents easy removal by others. It adds a layer of protection for your device. Keep the screwdriver in a safe place for future use.
Configuring The Device Settings
Configuring the device settings is an important step after installing your Ring Video Doorbell 2. Proper setup makes sure your doorbell works smoothly. It also helps you get the alerts you need without any problems.
This section covers how to connect your Ring Doorbell 2 to Wi-Fi and customize your notifications. Both steps are simple and improve your user experience.
Connecting To Wi-fi
Start by opening the Ring app on your phone. Go to the device settings and select “Set Up a Device.” Choose your Ring Video Doorbell 2 from the list.
Follow the app instructions to connect your doorbell to your home Wi-Fi. Make sure you select the right network and enter your password carefully. A strong Wi-Fi signal is important for good video quality.
Wait until the app confirms the connection. This process usually takes a few minutes. Your doorbell will update itself and be ready to use after connecting.
Customizing Notifications
Open the Ring app and go to your device settings. Find the “Notification Settings” option. Here, you can choose which alerts you want to receive on your phone.
Turn on alerts for motion detection and doorbell rings. You can also set quiet hours to stop notifications at certain times. Customize these settings to match your daily routine.
Adjust the alert tone and vibration settings if your phone supports it. This helps you notice alerts quickly. Save your changes before exiting the app.
Testing The Doorbell
After installing your Ring Video Doorbell 2, testing it is essential. This step ensures everything works well. Check video quality, sound, and app functions. Confirm the doorbell captures clear images and sounds. Verify the app receives notifications on time. Testing helps avoid future issues and improves security.
Video And Audio Check
Start by pressing the doorbell button. Watch the live video feed on your phone. Ensure the image is clear and bright. Check different light conditions for best results. Listen to the audio coming from the doorbell. Make sure you hear visitors clearly. Speak through the app to test two-way talk. Adjust the volume if the sound is low. Proper video and audio make your doorbell effective.
App Functionality Test
Open the Ring app on your smartphone. Check if you get instant alerts when the doorbell rings. Test live view to see real-time video. Try recording a video clip to save important moments. Verify the motion detection settings work correctly. Customize alerts based on your needs. Make sure the app connects smoothly to the doorbell. App functionality is key for easy control and security.
Maintaining Your Ring Doorbell
Keeping your Ring Video Doorbell 2 in good shape is important. It works best when you care for it regularly. Proper maintenance helps your doorbell last longer and keeps it running smoothly. Simple steps can protect your device and improve its performance.
Battery Care Tips
Charge your Ring doorbell battery often. Avoid letting the battery drain completely. Removing the battery during long storage helps keep it healthy. Use the original charger or a trusted one. Keep the doorbell dry to protect the battery. Cold weather can reduce battery life. Bring the doorbell inside to charge in winter.
Software Updates
Check for updates regularly through the Ring app. Updates fix bugs and add new features. Install updates as soon as possible. A connected Wi-Fi helps your doorbell update automatically. Updates improve security and device performance. Don’t ignore update notifications. Keeping software current ensures your doorbell works well.
Credit: vicentetorns.com
Frequently Asked Questions
How Do I Install Ring Video Doorbell 2 Step-by-step?
First, charge the battery fully. Next, attach the mounting bracket to the wall. Then, connect the doorbell to the bracket. Finally, set up the device using the Ring app for Wi-Fi and settings.
What Tools Are Needed For Ring Doorbell 2 Installation?
You need a drill, screwdriver, level, and screws. The Ring Doorbell 2 package includes most mounting hardware. A smartphone with the Ring app is also essential for setup.
Can I Install Ring Doorbell 2 Without Existing Doorbell Wires?
Yes, Ring Video Doorbell 2 works wirelessly using a rechargeable battery. You can mount it without wiring. However, connecting to existing doorbell wires allows continuous charging.
How Do I Connect Ring Doorbell 2 To Wi-fi?
Open the Ring app and select “Set Up a Device. ” Follow the in-app instructions to connect your doorbell to your Wi-Fi network. Ensure your Wi-Fi signal is strong near the doorbell location.
Conclusion
Installing the Ring Video Doorbell 2 is simple and quick. Follow each step carefully for the best results. Test the doorbell to ensure it works properly. Secure the device firmly to avoid any issues. Enjoy better home security and easy visitor alerts.
This guide helps you set up your doorbell with confidence. Now, your home stays connected and safe at all times.