Are your pool towels always scattered or left to dry on the ground? Imagine having a simple, stylish rack that keeps your towels organized, dry, and ready for your next swim.
Making your own pool towel rack is easier than you think, and it can save you money while adding a personal touch to your pool area. In this guide, you’ll discover step-by-step how to create a sturdy, attractive towel rack that fits your space perfectly.
Ready to transform your poolside routine? Let’s dive in!
Choosing The Right Materials
Choosing the right materials for your pool towel rack is key. It affects the rack’s look, strength, and how long it lasts. Your choice depends on style, budget, and how much care you want to give it.
Materials must resist water and sun damage. They should hold up well in outdoor conditions. Picking the best materials makes your rack both useful and beautiful.
Wood Vs Metal Options
Wood offers a warm, natural look. Cedar and teak resist water and bugs well. Wood feels softer and is easy to work with.
Metal options include aluminum and stainless steel. These metals stand strong against rust and wear. Metal racks look modern and need less maintenance.
Essential Tools Needed
Gather simple tools before starting. A saw helps cut wood or metal to size. A drill is needed for making holes.
Screwdrivers or a power driver attach parts securely. Sandpaper smooths rough edges on wood. For metal, a file removes sharp bits.
Selecting Durable Finishes
Finishes protect your rack from weather damage. Use outdoor paint or waterproof sealant on wood. These keep moisture out and prevent cracking.
Metal racks benefit from powder coating or rust-proof sprays. These finishes stop rust and keep the rack looking new. Choose finishes that last long under sun and rain.
Planning Your Design
Planning your pool towel rack design helps create a useful and stylish addition. Start by thinking about the space available and the number of towels you want to store. Good planning saves time and money later.
Consider how the rack will fit with your pool area style. Simple or decorative designs each have benefits. Also, adding hooks or shelves can increase the rack’s function.
Measuring Space And Towels
Measure the wall or area where you want to place the rack. Note the width, height, and depth available. Think about how many towels you usually keep by the pool. Count the towels to estimate rack size.
Make sure the rack size fits the space without blocking walkways. Leave room for easy towel access and drying.
Simple Vs Decorative Styles
Simple racks focus on function with clean lines and few details. They suit modern or minimal looks. Simple designs are easy to build and maintain.
Decorative racks add style with patterns, colors, or shapes. They can match outdoor furniture or pool themes. Decorative racks may take more time and skill to create.
Choose a style that fits your skill level and pool area design.
Incorporating Hooks And Shelves
Add hooks for hanging wet towels or swim gear. Hooks keep towels off the floor and help them dry faster. Space hooks evenly to avoid crowding.
Shelves provide storage for sunscreen, pool toys, or extra towels. Use sturdy materials that resist water and sun damage. Combine hooks and shelves to make the rack more useful.
Cutting And Preparing Components
Cutting and preparing components is a key step in making a pool towel rack. This step shapes the wood pieces to the right size. Proper preparation makes assembly easier and the rack stronger. Follow these tips to get accurate cuts and smooth edges. Safety matters during every cut.
Marking Measurements Accurately
Use a tape measure to check each piece twice. Mark the cutting lines with a pencil clearly. Draw straight lines to guide your saw. Double-check each measurement before cutting. Precise marks help avoid mistakes and wasted wood.
Safe Cutting Techniques
Wear safety glasses and gloves for protection. Use a stable work surface to cut your wood. Keep fingers away from the saw blade. Cut slowly and follow the marked lines carefully. Use clamps to hold wood steady if needed. Stay focused and take breaks if tired.
Sanding And Smoothing Edges
Sand all cut edges with medium-grit sandpaper first. Remove splinters and rough spots. Then use fine-grit sandpaper to smooth the surface. Sand along the wood grain for best results. Smooth edges prevent snags and make the rack look neat.

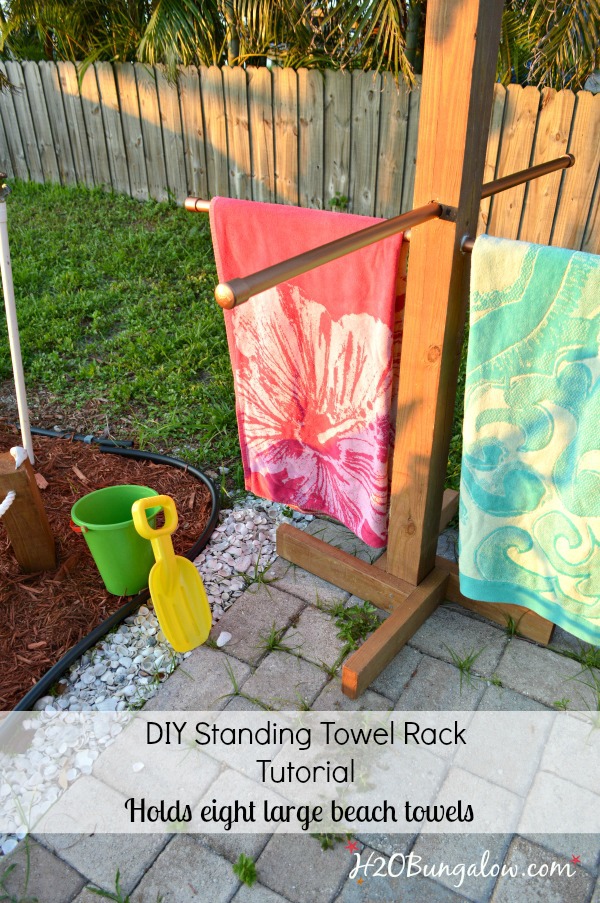
Credit: ashadeofteal.com
Assembling The Rack
Assembling the pool towel rack is a crucial step in your project. It shapes the rack and ensures it holds towels safely. Careful assembly adds strength and durability to the rack. Follow simple steps to build a sturdy towel rack that lasts.
Joining Pieces Securely
Start by fitting the wood pieces together tightly. Use clamps to hold pieces in place. Check that edges meet evenly without gaps. Proper joining keeps the rack firm and aligned. Take time to adjust pieces before fixing them.
Using Screws And Adhesives
Apply wood glue along the edges before joining. Glue adds extra hold and prevents movement. Next, drill pilot holes for screws to avoid splitting wood. Insert screws carefully and tighten without overdoing it. Screws and glue work well as a pair.
Ensuring Stability And Balance
Stand the rack upright to check balance. Adjust legs or base to prevent wobbling. Add support braces if needed for more strength. Test by placing a towel to see if it holds steady. A balanced rack is safer and more reliable.
Finishing Touches
Finishing touches make your pool towel rack both beautiful and strong. These final steps protect the wood and prepare it for daily use. A well-done finish keeps the rack safe from water and sun damage. Follow these simple tips to complete your project with care.
Applying Paint Or Stain
Choose paint or stain that suits outdoor use. Paint covers the wood completely and adds color. Stain lets the wood grain show through. Apply thin, even coats for the best look. Let each coat dry fully before adding another. This helps the finish last longer and look smooth.
Adding Protective Coating
Use a clear protective coat over paint or stain. This layer guards against water, sun, and dirt. Choose a sealant made for outdoor wood. Apply it evenly with a brush or spray. Allow it to dry in a clean, dry place. This step boosts the rack’s durability and keeps it fresh.
Installing Mounting Hardware
Select strong screws or brackets for secure mounting. Mark the spots on your wall or fence clearly. Drill pilot holes to prevent wood splitting. Attach the rack firmly and check for stability. Proper mounting ensures your towel rack holds up well. Now, your pool towel rack is ready to use.
Mounting And Organizing Towels
Mounting and organizing towels is key for a tidy pool area. Proper placement keeps towels dry and easy to reach. A well-installed rack helps maintain order and saves space. It also adds to the pool area’s look. Follow simple steps to mount and arrange towels smartly.
Choosing The Best Location
Select a spot near the pool or shower for quick access. Avoid direct sunlight to prevent towels from fading. Choose a wall that stays dry to stop mold and mildew. Make sure the location does not block walkways or entrances. Consider height so everyone can reach the towels easily.
Proper Installation Techniques
Use a level to keep the rack straight. Mark drill holes clearly before drilling into the wall. Choose screws and anchors that fit your wall type. Tighten all screws securely to support heavy, wet towels. Check stability by gently pulling the rack before hanging towels.
Tips For Neat Towel Arrangement
Fold towels the same way for a uniform look. Use hooks or bars to separate each towel. Group towels by size or purpose, like hand towels and bath towels. Leave space between towels to help them dry faster. Replace damp towels regularly to keep the rack fresh.
Maintenance And Care Tips
Keeping your pool towel rack in good shape helps it last longer. Proper care stops damage and keeps the rack looking nice. Regular checks and simple steps keep your rack strong and clean.
Cleaning The Rack Regularly
Wipe the rack with a damp cloth every week. Use mild soap to remove dirt and sweat. Avoid harsh chemicals that can harm the material. Dry the rack fully after cleaning to stop water spots. Clean racks look fresh and last longer.
Preventing Rust And Damage
Choose a rack made from rust-resistant material for pool areas. Check for signs of rust or wear often. Fix small rust spots with sandpaper and paint. Keep the rack away from standing water. Proper care stops rust and keeps the rack strong.
Refreshing The Finish Over Time
Apply a fresh coat of paint or sealant every year. Use outdoor paint made for metal or wood racks. Lightly sand the surface before painting for better grip. This step protects the rack from sun and water damage. A fresh finish makes your rack look new.
Credit: h2obungalow.com
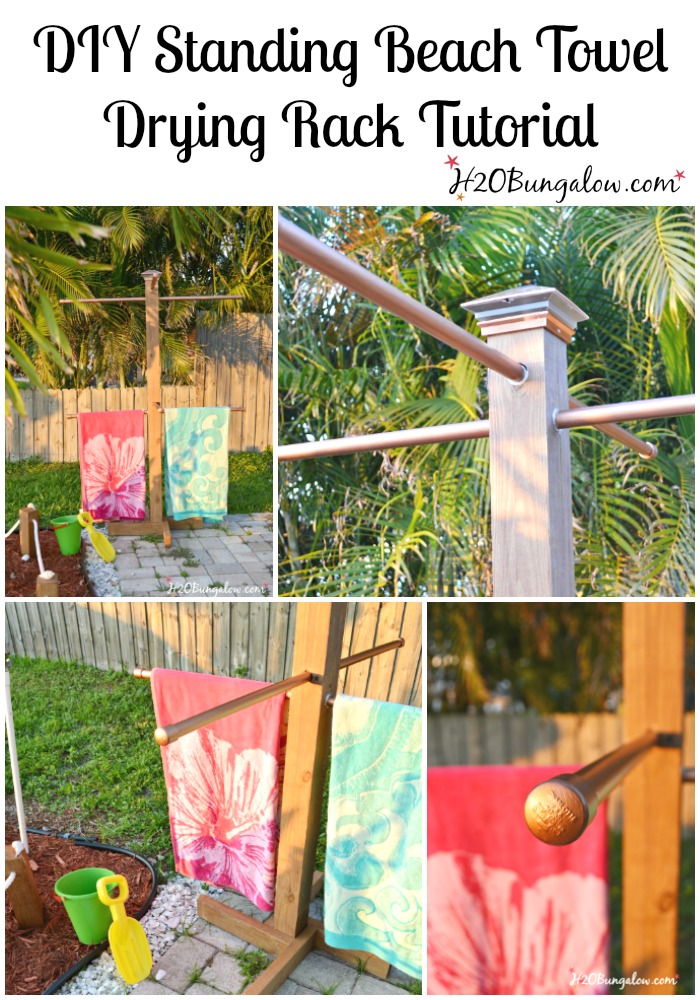
Credit: h2obungalow.com
Frequently Asked Questions
What Materials Are Needed To Make A Pool Towel Rack?
You need wood or metal, screws, brackets, a drill, measuring tape, sandpaper, and paint or finish. These materials ensure durability and style for outdoor use.
How Do You Choose The Best Location For A Towel Rack?
Place it near the pool or entrance for convenience. Ensure it’s shaded to keep towels dry and avoid direct sun damage.
Can I Build A Towel Rack Without Professional Tools?
Yes, simple racks can be made with basic tools like a screwdriver and hand saw. Choose easy-to-handle materials to simplify the process.
How Do I Maintain My Pool Towel Rack?
Clean it regularly and apply protective finish to prevent weather damage. Check screws and brackets often to keep it stable and safe.
Conclusion
Making a pool towel rack is simple and useful. It keeps towels dry and organized by the pool. You only need a few materials and some basic tools. Building your own rack saves money and adds a personal touch to your space.
Enjoy having a neat area for towels after swimming. Try this easy project and see the difference it makes. A small effort brings big convenience. Give it a try today.