Are you ready to bring your LED light strings to life with a professional touch? Knowing how to solder LED light strings can save you time, money, and frustration when customizing or repairing your lights.
Whether you want to create dazzling designs or fix broken connections, mastering this simple skill puts the power in your hands. In this guide, you’ll discover clear, easy steps to solder your LED light strings perfectly every time. Keep reading and turn your lighting projects into shining successes!

Credit: community.element14.com
Tools And Materials Needed
To solder LED light strings successfully, gather the right tools and materials first. This step ensures smooth work and good results. Preparing everything beforehand saves time and avoids mistakes. The following sections explain what you need for soldering LED lights.
Essential Soldering Equipment
A soldering iron is the main tool for this job. Choose one with adjustable temperature control. It helps prevent damage to LED wires. Use rosin-core solder made for electronics. Thin solder wire, around 0.5mm, works best for delicate connections. A soldering iron stand keeps the hot tip safe. Wire cutters and strippers prepare wires for soldering. Tweezers hold small parts steady. A damp sponge cleans the soldering iron tip during use.
Choosing The Right Led Lights
Pick LED strings suited for your project size and style. Check the voltage and current ratings to match your power source. Single-color or multi-color LEDs depend on your design needs. Look for pre-wired LEDs with space between bulbs. This makes soldering easier. Avoid cheap LEDs that might fail quickly. Quality LEDs ensure longer-lasting light strings.
Safety Gear And Precautions
Wear safety glasses to protect eyes from solder splashes. Use heat-resistant gloves to avoid burns. Work in a well-ventilated area to reduce fume inhalation. Keep a fire extinguisher nearby, just in case. Never touch the soldering iron tip. Turn off the iron when not in use. Follow these steps to stay safe while soldering.
Credit: hitlights.com
Preparing Led Light Strings
Preparing LED light strings is the first step for a successful soldering project. This stage ensures the lights work well and the wires are ready for a clean connection. Careful preparation helps avoid problems later.
Start by checking the lights and wires closely. Clean and organize them for smooth soldering. Each small action makes a big difference in the final result.
Inspecting And Testing Lights
Look at each LED bulb for cracks or damage. Test the string by plugging it in briefly. Notice any bulbs that do not light up. Mark or remove faulty bulbs to avoid issues during soldering. Testing early saves time and effort.
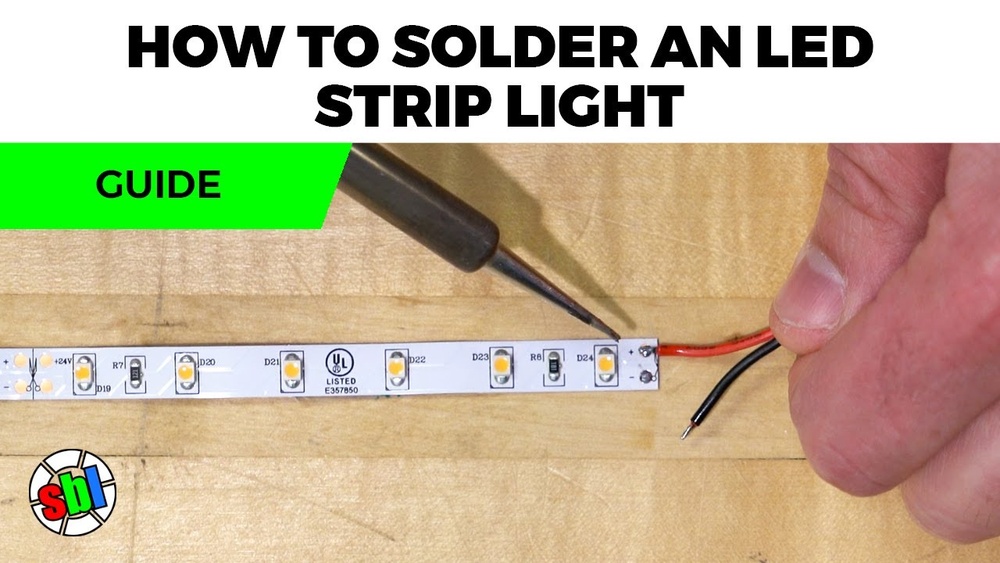
Stripping And Cleaning Wires
Use wire strippers to remove about half an inch of insulation. Expose the copper wire carefully without breaking strands. Clean the wires with rubbing alcohol or a soft cloth. Clean wires help solder stick better. Avoid bending wires too much to keep them strong.
Arranging Lights For Soldering
Lay the light string on a flat surface. Keep bulbs spaced out to reach each wire easily. Use tape or clips to hold wires steady. This setup stops wires from moving while soldering. Organizing lights clearly speeds up the work and improves solder joints.
Soldering Techniques
Soldering LED light strings requires careful techniques for strong and safe connections. Proper soldering improves electrical flow and prevents failures. Understanding the basics of soldering will help you work with wires easily and confidently.
Tinning The Wires
Tinning means coating wire ends with solder before joining them. Heat the wire with a soldering iron. Touch solder to the wire until it melts and covers the strands. Tinning protects the wire and makes joining faster and cleaner.
Joining Wires With Solder
Place the tinned wire ends side by side. Heat both wires with the soldering iron. Apply solder to the heated wires, not the iron tip. The solder should melt and flow evenly over the connection. Hold the wires steady until the solder cools and hardens.
Avoiding Common Mistakes
Do not use too much solder; it creates weak joints. Avoid moving wires before solder cools. Keep the soldering iron tip clean and hot. Do not overheat wires, which can damage LED components. Always work in a well-ventilated area for safety.
Securing And Protecting Connections
Securing and protecting connections is important for LED light strings. Proper protection stops wires from breaking or short-circuiting. It also helps keep your lights safe and working longer.
After soldering, the joints need extra care. Covering and sealing the connections prevents damage from movement, dust, and moisture. This step makes your LED project more reliable and durable.
Using Heat Shrink Tubing
Heat shrink tubing is a thin plastic tube. Slide it over the soldered joint before soldering. After soldering, move the tubing over the connection. Use a heat source to shrink the tube. It tightens around the wire and protects it well. Heat shrink tubing stops wires from touching each other. It also adds strength to the joint.
Applying Electrical Tape
Electrical tape is easy and cheap to use. Wrap it tightly around the soldered area. This stops wires from moving and shorting out. Use multiple layers for better protection. Choose tape made for electrical use. It resists heat and stays sticky for a long time. Electrical tape works well for quick fixes and small projects.
Ensuring Water Resistance
Water can damage LED light connections quickly. Use waterproof materials like silicone or liquid electrical tape. Apply a thin layer over the soldered joint. Let it dry completely before using the lights. You can also use waterproof heat shrink tubing. These steps protect the wires from rain or humidity. Water resistance is key for outdoor LED lights.
Testing And Troubleshooting
Testing and troubleshooting are key steps after soldering LED light strings. They ensure your work is safe and lights work well. These steps save time and avoid frustration later. Small mistakes can cause big problems. Finding and fixing them early helps your LED string shine bright.
Checking Continuity And Polarity
Continuity means the electrical path is complete. Use a multimeter to check it. Touch the probes to both ends of the wire. A beep means good continuity. No beep means a break in the wire or bad solder.
Polarity is the direction of current flow. LED lights only work one way. Check the positive (+) and negative (-) sides carefully. Wrong polarity stops the LEDs from lighting. Reverse the wires if needed.
Fixing Cold Solder Joints
Cold solder joints look dull or cracked. They cause weak or no connection. Heat the joint with a soldering iron. Add a small amount of solder. This melts old solder and creates a strong bond. Let it cool without moving the wire.
Test the joint again for continuity. A good joint shines and feels solid. Fixing cold joints stops flickering or dead spots.
Replacing Damaged Leds
Damaged LEDs do not light or glow dim. Cut out the broken LED carefully. Remove solder from the pads using a solder wick or pump. Place a new LED with the correct polarity.
Solder the new LED in place. Check the connection and test the string. Replacing damaged LEDs keeps the entire string working well.
Maintenance Tips For Led Strings
Keeping LED light strings in good shape helps them last longer and work better. Proper care avoids damage and saves money. Simple steps make a big difference.
Proper Storage Methods
Store LED strings in a dry, cool place. Avoid direct sunlight or heat. Wrap them loosely to stop wires from bending. Use a spool or a box to keep them neat. Proper storage stops tangles and breaks.
Regular Inspection
Check LED strings before each use. Look for broken wires, loose connections, or damaged bulbs. Replace any faulty parts quickly. Clean dust and dirt gently with a soft cloth. Regular checks prevent bigger problems.
Extending Lifespan
Use LED strings with the right power supply. Avoid overloading the circuit. Turn off lights when not needed. Keep them away from water or moisture. These steps help LED strings last longer and stay bright.

Credit: www.youtube.com
Frequently Asked Questions
How Do You Prepare Led Light Strings For Soldering?
First, strip about 1/4 inch of insulation from the wire ends. Twist the exposed wires tightly. Clean the LED leads to remove any oxidation. This preparation ensures a strong and clean solder joint for optimal electrical connection.
What Type Of Solder Is Best For Led Lights?
Use rosin-core solder with a 60/40 tin-lead ratio or lead-free solder designed for electronics. This type melts easily and provides excellent conductivity. Avoid acid-core solder as it can damage LED circuits.
How Can I Avoid Damaging Leds During Soldering?
Use a low-wattage soldering iron (around 25-30 watts). Limit soldering time to 2-3 seconds per joint. Work quickly and avoid overheating to prevent LED damage. Always handle LEDs by the edges to protect sensitive components.
Should I Test Led Strings After Soldering?
Yes, always test LED strings with a multimeter or power source. Check for proper continuity and light output. Testing ensures all connections are secure and the LED string functions correctly before final installation.
Conclusion
Soldering LED light strings is easier than it seems. Follow each step slowly and carefully. Use the right tools for a safe, strong connection. Check your work to avoid shorts or loose wires. Practice helps you improve your skills over time.
Enjoy your bright, custom LED creations with pride. Keep safety in mind throughout the process. Have fun bringing your ideas to light!