Have you noticed your hard wired smoke detector acting up or showing signs of wear? Replacing it might seem tricky, but it’s easier than you think—and it’s crucial for keeping your home safe.
In this guide, you’ll learn simple, step-by-step instructions to swap out your old smoke detector quickly and confidently. By the end, you’ll have peace of mind knowing your home is protected with a fresh, reliable device. Keep reading to discover how you can do this yourself without hassle or confusion.
:max_bytes(150000):strip_icc()/install-hardwired-smoke-detectors-1152329_FINAL-5233cb01c4f34ee1bae5860132624788.png)
Credit: www.thespruce.com
Safety Precautions
Safety is the top priority when replacing hard wired smoke detectors. Electrical work can be risky without proper care. Taking the right precautions helps avoid accidents and damage. Follow these simple steps before starting your replacement project.
Turn Off Power
Switch off the power at the circuit breaker. This stops electricity from flowing to the smoke detector. Double-check by testing the smoke detector or nearby lights. Never skip this step. It protects you from electric shock.
Gather Necessary Tools
Prepare all tools before you begin. Common tools include a screwdriver, wire stripper, and voltage tester. Having everything ready saves time and keeps you safe. Use tools in good condition to avoid slips or injuries.
Remove Old Smoke Detector
Removing the old hard-wired smoke detector is the first step in replacement. This task requires care to avoid damaging wires or the ceiling. Follow each step closely to ensure safety and a smooth process.
Turn off the power at the circuit breaker before starting. This prevents any risk of electric shock while handling the wiring.
Locate The Detector
Find the exact spot where the smoke detector is installed. Usually, it is on the ceiling or high on a wall. Check each room or hallway carefully to spot the device. Note its position before removal.
Disconnect Wiring
Remove the smoke detector cover by twisting or sliding it off. Look for the wiring connector attached to the back. Gently disconnect the wires by unplugging or loosening screws. Keep track of wire colors for reconnection later.
Detach From Ceiling
Locate the mounting screws or clips holding the detector to the ceiling. Use a screwdriver to remove screws carefully. Pull the smoke detector away from the ceiling once loose. Avoid pulling on the wires directly.
Prepare New Smoke Detector
Preparing your new smoke detector is an important step before installation. It ensures the device works well and fits your home system. Taking time now can prevent problems later.
Start by checking the detector’s compatibility with your existing wiring and setup. Then, test the unit to confirm it functions properly. These steps make the replacement process smoother and safer.
Check Compatibility
Make sure the new smoke detector matches your home’s wiring type. Hard wired detectors must fit the voltage and connection style. Look for labels or instructions that show compatibility. Using the wrong type can cause failures or hazards. Check if the detector supports battery backup. This keeps it working during power outages. Confirm the size and shape fit your mounting bracket. Proper fit avoids loose connections or damage.
Test The Unit
Before installation, test the smoke detector’s alarm and sensor. Press the test button to hear the alarm sound. This confirms the battery and speaker work. Use a smoke test spray or gently blow near the sensor. The alarm should activate quickly. If it does not, the unit may be faulty. Testing saves time and ensures safety after installation.
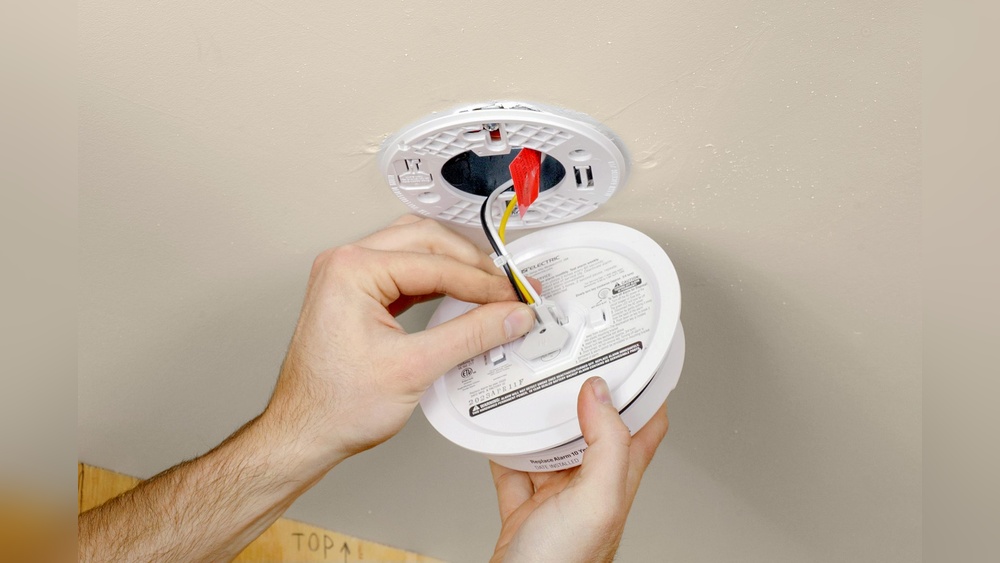
Install New Smoke Detector
Installing a new hard wired smoke detector is a crucial step for home safety. This process requires careful handling of wires and proper mounting. Follow these steps to ensure your smoke detector works correctly and keeps your home safe.
Connect Wiring
First, turn off the power at the circuit breaker. This prevents electric shock during installation. Match the wires from the ceiling to the wires on the smoke detector. Usually, black is live, white is neutral, and red or yellow is for interconnection. Twist the wire ends together and secure with wire nuts. Double-check the connections to avoid loose wires. Secure any extra wire inside the electrical box. Turn the power back on only after all connections are tight.
Mount To Ceiling
Place the mounting bracket on the ceiling box. Align the screw holes with the electrical box holes. Use a screwdriver to tighten the screws firmly. Attach the smoke detector unit onto the bracket by twisting it into place. Make sure it fits snugly and does not wobble. Test the detector by pressing the test button. A loud alarm sound means the installation is successful.
Restore Power And Test
Restoring power and testing your new hard wired smoke detector is crucial. It ensures the device works properly to keep your home safe. Follow each step carefully to confirm the installation is successful and the alarm functions as it should.
Turn On Circuit Breaker
Locate the circuit breaker panel in your home. Find the switch that controls the power to your smoke detector. Flip the switch to the “on” position. This restores electricity to the device. Check the smoke detector for any lights or sounds that show it has power.
Perform Function Test
Press the test button on the smoke detector. Hold it for a few seconds. Listen for a loud alarm sound. This confirms the detector is working. If no sound appears, check the power or wiring. Repeat the test after any adjustments. Testing keeps your home safe from fire hazards.

Credit: www.reddit.com
Maintenance Tips
Maintaining hard-wired smoke detectors is key to keeping your home safe. Regular upkeep ensures the device works correctly during emergencies. Small efforts can prevent bigger problems later.
Regular Testing
Test your smoke detectors once a month. Press the test button until you hear a loud beep. This check confirms the alarm is working. Never ignore a silent or weak sound. Replace or repair any faulty units immediately.
Battery Replacement
Change the backup battery at least once a year. Even hard-wired models rely on batteries during power outages. Use the correct battery type suggested by the manufacturer. Low batteries cause false alarms or no alarm at all.
Cleaning The Detector
Dust and dirt can block smoke sensors. Clean your detectors every six months using a vacuum or soft brush. Avoid spraying cleaners or water directly on the unit. Keep vents clear to ensure proper smoke detection.

Credit: www.youtube.com
Frequently Asked Questions
How Do I Safely Replace Hard Wired Smoke Detectors?
Turn off the power at the circuit breaker first. Remove the old detector carefully. Disconnect wires and connect new detector wires following the same configuration. Secure the new detector and restore power. Test the detector to ensure it works properly.
What Tools Do I Need For Replacing Smoke Detectors?
You will need a screwdriver, wire stripper, voltage tester, and wire connectors. A ladder may be necessary for ceiling-mounted detectors. Always use insulated tools to prevent electric shock during the replacement process.
Can I Replace Hard Wired Smoke Detectors Myself?
Yes, if you have basic electrical skills and follow safety precautions. Always turn off power before starting. If unsure, consult a licensed electrician to ensure proper installation and compliance with local codes.
How Often Should Hard Wired Smoke Detectors Be Replaced?
Replace hard wired smoke detectors every 10 years. Over time, sensors degrade and may fail to detect smoke. Regular replacement ensures optimal safety and compliance with safety standards.
Conclusion
Replacing hard wired smoke detectors keeps your home safe and sound. Follow each step carefully to avoid mistakes. Always turn off power before starting the work. Test the new detector to ensure it works well. Regular checks help keep your system reliable.
Stay safe by updating old detectors on time. Simple changes can protect your family from fire risks. Take your time and do the job right. Safety matters most, so don’t rush. Your home deserves the best protection every day.