Are you ready to boost your home’s security with the Nest Hello Video Doorbell? Setting it up might seem tricky, but don’t worry—you’re about to learn the simplest, step-by-step way to get it working perfectly.
Imagine seeing who’s at your door anytime, anywhere, right from your phone. This guide will walk you through everything you need, so you can start enjoying peace of mind and stay connected to your home like never before. Keep reading to make your front door smarter and safer in no time.
Unbox Your Nest Hello
Unboxing your Nest Hello video doorbell is the first step to better home security. It sets the tone for an easy and smooth installation. Take your time to carefully open the box and look at every item inside. This ensures you have everything you need before starting.
Check The Package Contents
Open the box slowly to avoid damaging any parts. Inside, you should find the Nest Hello doorbell itself. There will be a mounting plate and screws for installation. Also, check for the power connector and any adapters included. A quick start guide or manual is usually present too. Confirm all items match the list in the manual. Missing parts can delay your setup process.
Gather Necessary Tools
Before installation, collect the tools you will need. A drill with bits is helpful for mounting on walls. A screwdriver is necessary to secure screws tightly. Wire strippers might be required to prepare your home wiring. A voltage tester can ensure power is off for safety. Having these tools ready makes installation faster and safer. If you lack any tools, consider borrowing or buying them.
Credit: kdfoundation.org
Prepare Your Doorbell Wiring
Preparing your doorbell wiring is a key step before installing the Nest Hello Video Doorbell. This ensures safety and proper function. Take time to handle the wiring carefully. Follow each step to avoid damage or electrical issues.
Turn Off Power Safely
First, switch off power at the circuit breaker. This stops any electrical flow to the doorbell wires. Use a voltage tester to confirm no current is present. Never touch wires without checking power is off. Safety must come first.
Remove Old Doorbell
Unscrew the existing doorbell from the wall. Gently pull it away to expose the wiring. Take note of the wire colors and connections. Disconnect wires carefully to avoid damage. Keep the screws and parts for later use if needed.
Inspect Wiring Compatibility
Check if your current wiring works with Nest Hello. The doorbell needs a 16-24V AC power supply. Ensure wires are in good condition without frays. If wires are old or damaged, replace them before installation. Proper wiring ensures your video doorbell functions smoothly.
Install The Mounting Plate
Installing the mounting plate is an essential step for setting up your Nest Hello Video Doorbell. This plate holds the doorbell securely on your wall. Proper installation ensures the device works well and stays in place. Follow these steps carefully to install the mounting plate perfectly.
Choose The Best Location
Select a spot near your front door, around 4 feet high. This height captures visitors’ faces clearly. Avoid areas with direct sunlight or strong shadows. Check for a power source or existing doorbell wiring nearby. The location should have a clear view of your doorstep.
Use The Level Tool
Place the mounting plate against the wall. Use a level tool on top of the plate. Adjust it until the bubble is centered. A straight plate keeps the video doorbell aligned. This improves video quality and motion detection.
Secure The Plate With Screws
Mark screw holes on the wall through the plate. Drill small pilot holes if needed. Use the provided screws to fasten the plate tightly. Make sure the plate does not move or wiggle. A secure plate protects your doorbell from falling or damage.

Credit: www.youtube.com
Connect Nest Hello Doorbell
Connecting your Nest Hello Video Doorbell is a simple process. It involves attaching wires, mounting the unit, and restoring power. Each step ensures your doorbell works smoothly and keeps your home secure.
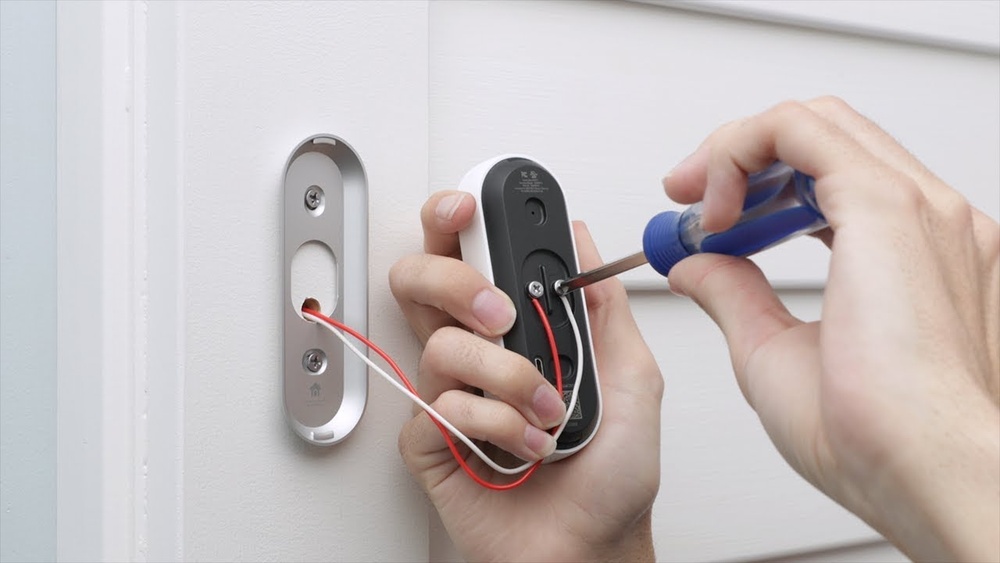
Attach Wires To Terminals
Start by turning off power at your circuit breaker. This keeps you safe while handling wires. Locate the two wires from your existing doorbell. Attach each wire to the terminals on the Nest Hello. Tighten the screws to hold wires firmly. Check that no wires touch each other. Loose wires can cause problems or short circuits.
Mount The Doorbell Unit
Choose the mounting plate that fits your door frame. Use the included screws to secure the plate. Make sure it is level for a clear camera view. Slide the Nest Hello doorbell onto the plate. You will hear a click when it locks into place. Confirm it is secure by gently pulling on it.
Restore Power
Turn the power back on at the circuit breaker. Wait a few moments for the doorbell to start up. Look for a solid light on the device. This means the Nest Hello is ready to connect. Follow the app instructions to complete setup and test the video feed.
Set Up The Nest App
Setting up the Nest app is the first step to use your Nest Hello Video Doorbell. This app connects your phone to the doorbell. It lets you see visitors and control settings easily. Follow these steps to get the app ready and link your device.
Download And Install App
Go to the App Store or Google Play Store on your phone. Search for the “Google Home” app. Tap the download or install button. Wait for the app to install fully. Open the app once it is ready.
Create Or Sign In To Account
Open the Google Home app. Tap on “Get Started” if you do not have an account. Follow the instructions to create a new Google account. If you already have an account, tap “Sign In.” Enter your email and password. This step connects your app to Google services.
Add Nest Hello Device
In the app, tap the “+” icon to add a new device. Choose “Set up device” and then “New devices.” Select your home location. The app will search for your Nest Hello doorbell. Follow the on-screen instructions to connect it to Wi-Fi. Finish the setup by naming your device.
Configure Doorbell Settings
Configuring your Nest Hello Video Doorbell settings is key to getting the best experience. These settings help customize how your doorbell works. You can control motion alerts, notifications, and face recognition features.
Adjusting these options ensures your doorbell fits your needs perfectly. Let’s explore how to set up each important feature step-by-step.
Adjust Motion Zones
Motion zones let you pick areas where motion triggers alerts. You can focus on your porch or driveway only. This reduces false alarms from cars or passing people.
Open the Nest app and select your doorbell. Tap on “Motion Settings.” Use the grid to mark the zones you want to monitor. Save your changes. This helps you get alerts only for important activity.
Set Notification Preferences
Notifications tell you when someone rings or moves near your door. You can choose when and how to get these alerts.
In the app, go to “Notifications.” Turn on alerts for rings, motion, or both. You can also set quiet hours to avoid disturbances at night. Adjust sound and vibration settings for your phone here too.
Enable Familiar Face Detection
This feature recognizes faces you know and alerts you differently. It helps identify friends or family at your door.
Go to “Familiar Faces” in the app. Turn on the feature and add people you trust. The doorbell learns over time and improves accuracy. This makes your alerts smarter and more useful.
Test Your Doorbell
Testing your Nest Hello Video Doorbell ensures it works perfectly. This step confirms clear video, good sound, and timely alerts. A well-tested doorbell keeps your home safe and connected. Let’s explore how to check each feature easily.
Check Video Quality
Start by viewing the live video feed on your phone. Look for clear images without blurriness. Test in different lighting, like daytime and nighttime. Make sure the camera adjusts well to light changes. Good video helps you see visitors clearly.
Verify Two-way Audio
Use the app to speak through your doorbell. Listen carefully for your voice on the doorbell’s speaker. Ask someone to respond from the doorbell side. Clear sound both ways means the audio works fine. This feature lets you talk to guests safely.
Test Motion Alerts
Walk near your doorbell to trigger motion detection. Check if your phone receives an alert quickly. Try waving your hand or walking at different speeds. Alerts must come on time and not miss any movement. Motion alerts keep you aware of activity outside.
Credit: www.esseg.eu
Troubleshooting Tips
Troubles with your Nest Hello Video Doorbell can disrupt your home security. Understanding common issues helps you fix them fast. This section gives simple tips to solve problems.
Follow these steps to keep your doorbell working smoothly and reliably.
Fix Connection Issues
Check your Wi-Fi signal near the doorbell. Weak signals cause video and notification delays. Move your router closer or use a Wi-Fi extender.
Restart your router and doorbell to reset the connection. Ensure the doorbell is connected to the correct network. Use the Nest app to verify the status.
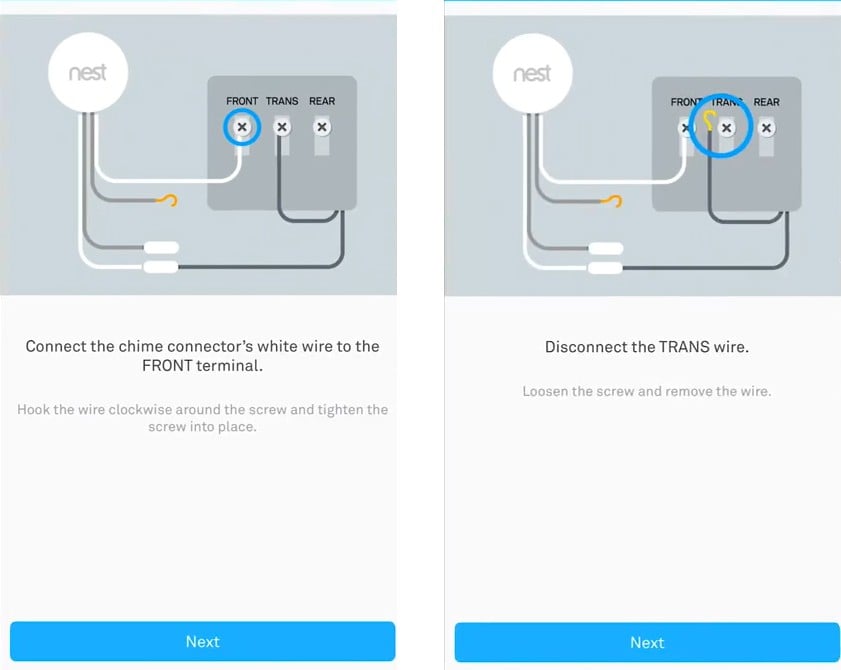
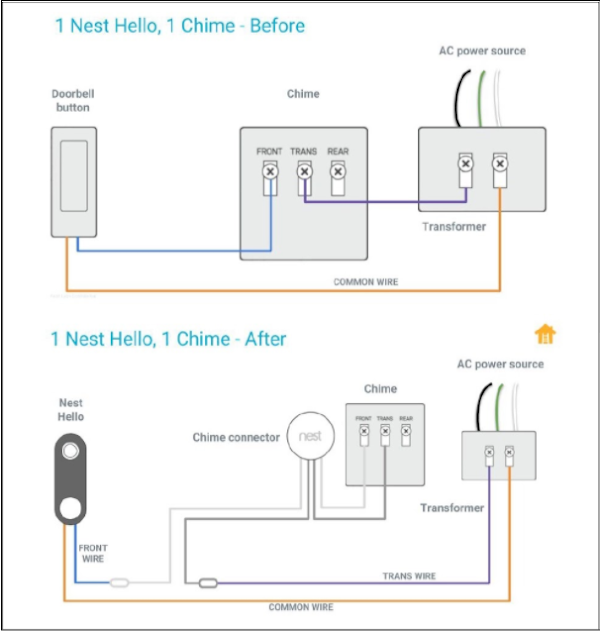
Resolve Power Problems
Power problems stop your doorbell from working. Check the doorbell’s wiring and transformer. Make sure the transformer meets the voltage requirements.
Inspect the wires for damage or loose connections. Replace any faulty parts to restore power. Use a multimeter to measure voltage if needed.
Update Firmware
Firmware updates improve performance and fix bugs. Open the Nest app and check for updates. Download and install updates as soon as they appear.
Keep your doorbell connected to Wi-Fi during updates. Restart the device if the update does not complete. Updated firmware ensures better security and features.
Frequently Asked Questions
How Do I Install Nest Hello Video Doorbell?
To install Nest Hello, first turn off power at the breaker. Mount the doorbell using the included tools. Connect the wires to the doorbell. Turn the power back on and complete setup in the Nest app.
What App Is Needed For Nest Hello Setup?
You need the Google Home app to set up Nest Hello. Download it from the App Store or Google Play. The app guides you through connecting the doorbell to Wi-Fi and configuring settings.
How Do I Connect Nest Hello To Wi-fi?
During setup, the Google Home app prompts you to select your Wi-Fi network. Enter your Wi-Fi password carefully. Ensure your router is nearby for a strong signal to avoid connection issues.
Can Nest Hello Work Without Professional Installation?
Yes, Nest Hello is designed for DIY installation. The app provides step-by-step instructions. Basic electrical knowledge helps, but many users can install it themselves safely and easily.
Conclusion
Setting up the Nest Hello Video Doorbell is simple and quick. Follow each step carefully to avoid any issues. Once installed, enjoy clear video and easy access to your door. Stay safe and know who is outside anytime. This doorbell adds convenience without complexity.
Take your time and check connections as you go. Soon, your home will feel more secure and modern. Small effort, big peace of mind.