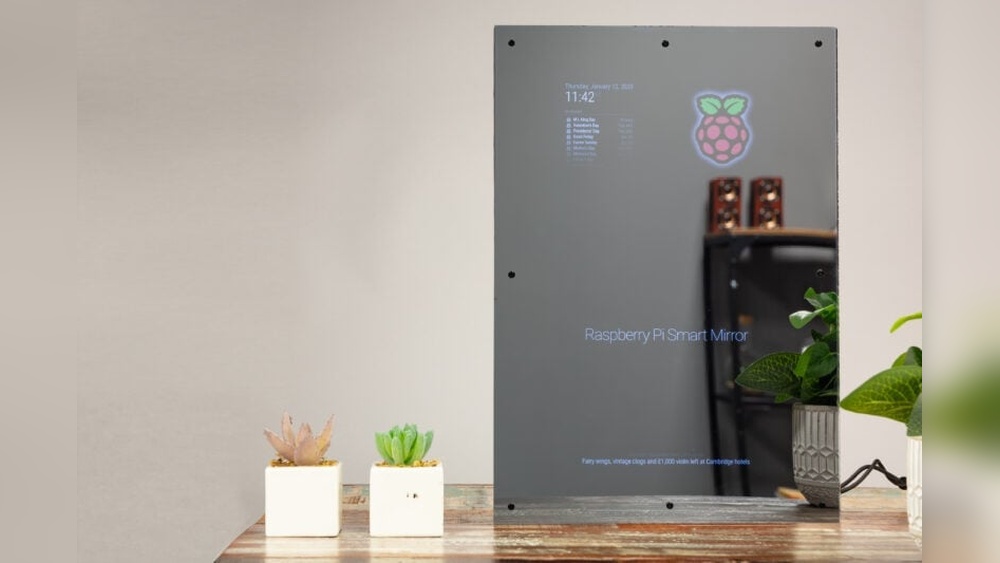
Imagine looking into your mirror every morning and not just seeing your reflection, but also catching the weather, news, and your daily schedule—all without lifting a finger. Sounds like something from the future, right?
Well, you can make this smart mirror yourself using a Raspberry Pi. In this guide, you’ll discover how simple and affordable it is to turn an ordinary mirror into a high-tech assistant that makes your daily routine smoother and more enjoyable.
Ready to impress yourself and your guests? Let’s dive into creating your very own smart mirror step by step.
Choosing The Right Raspberry Pi
Choosing the right Raspberry Pi is a key step in building a smart mirror. The model you pick affects speed, features, and compatibility. Some models handle tasks better than others. This guide helps you find the best fit for your project.
Comparing Raspberry Pi Models
The Raspberry Pi 4 is powerful and fast. It has up to 8GB of RAM and supports dual monitors. Great for smooth performance and running apps.
The Raspberry Pi 3 is less powerful but still works well. It has 1GB of RAM and built-in Wi-Fi. A good choice for basic smart mirrors.
The Raspberry Pi Zero is small and affordable. It uses less power but runs slower. Best for simple, low-cost projects.
Think about your budget and what features you need. More RAM and speed allow more apps and better multitasking.
Essential Accessories
You need a microSD card for the operating system. At least 16GB is recommended for storage.
A power supply with 5V and 3A output ensures stable power. Avoid using weak or cheap chargers.
A case protects the Raspberry Pi and keeps it cool. Some cases come with built-in fans.
Connect a display screen that fits your mirror size. Touchscreens add interactivity but cost more.
Other useful items include a keyboard, mouse, and Wi-Fi dongle if your Pi model lacks wireless support.

Credit: smartbuilds.io
Gathering Materials And Tools
Building a smart mirror with a Raspberry Pi starts with gathering the right materials and tools. Choosing the correct parts helps the project run smoothly. Each component plays a key role in the final look and function of the mirror.
Understanding what you need before starting saves time and avoids extra costs. The following sections break down the main items to prepare.
Mirror Types And Sizes
Select a mirror that suits your space and style. Two-way glass is best for smart mirrors. It lets the display shine through but still reflects like a normal mirror.
Choose a size that fits your wall and the display behind it. Common sizes range from small vanity mirrors to large wall mirrors.
Display Options
The display shows information like time, weather, and news. Use an LCD or LED monitor with HDMI input. A screen size close to the mirror size works well.
Make sure the display is bright enough to see through the glass. Also, consider low power screens for efficiency.
Frame And Housing
The frame holds the mirror and display together. You can buy a ready frame or build one with wood or metal. It should fit the mirror and screen tightly.
Leave space for cables and the Raspberry Pi. A clean, simple frame looks best in any room.
Required Tools
Gather basic tools to assemble your smart mirror. You will need a screwdriver, drill, and measuring tape. A utility knife helps with trimming materials.
Have some double-sided tape or mounting brackets for fixing parts. A soldering iron is optional but useful for wiring. Safety gear like gloves and goggles is recommended.
Setting Up The Raspberry Pi
Setting up the Raspberry Pi is the first step to create your smart mirror. This small computer controls the display and runs the software. You must prepare it carefully for the best results. Follow clear steps to get it ready. This ensures smooth performance of your smart mirror project.
Installing The Operating System
Start by downloading the Raspberry Pi OS from the official website. Use a tool like Raspberry Pi Imager to write the OS to a microSD card. Insert the card into the Raspberry Pi. Power on the device and follow the on-screen instructions. This sets up the basic system needed for your smart mirror.
Connecting To Wi-fi
Connecting to Wi-Fi lets your smart mirror access the internet. Open the Wi-Fi settings from the desktop or command line. Select your network and enter the password. Check the connection by opening a browser or pinging a website. A strong Wi-Fi connection helps your mirror show real-time information.
Enabling Ssh And Vnc
Enable SSH to control the Raspberry Pi remotely through the command line. This avoids the need for extra keyboard or screen. Enable VNC to access the desktop remotely with a graphical interface. Both tools make managing your smart mirror easier. Use Raspberry Pi Configuration or terminal commands to activate these features.
Installing Smart Mirror Software
Installing the smart mirror software is the next big step in your project. This software controls what your mirror displays. It gathers information like weather, news, and calendar events. Choosing the right software makes your smart mirror useful and fun.
Some software platforms are easy to install and customize. Others offer many features but need more setup. You can pick one based on what fits your needs and skills. Let’s explore some popular options and how to install them.
Popular Smart Mirror Platforms
MagicMirror² is the most popular platform. It is open-source and free. Many users like it for its flexibility and many modules. It runs well on the Raspberry Pi.
Another option is MirrorMirror. It is simpler but less flexible. Good for beginners who want a basic smart mirror.
There is also DakBoard. It shows calendars, weather, and photos. It needs less coding but may require an account.
Installation Steps
Start by updating your Raspberry Pi’s system. Use the command sudo apt update and sudo apt upgrade.
Next, install Node.js. MagicMirror² needs it to run. Download it from the official site or use a script.
Clone the MagicMirror² repository using Git. Use git clone https://github.com/MichMich/MagicMirror.
Go into the MagicMirror folder and run npm install. This installs all required packages.
After installation, start the app with npm start. Your mirror should show the default screen.
Configuring Modules
Modules show information like time, weather, and news. You can enable or disable modules in the config file.
Open the config/config.js file in a text editor. Here, you find all modules listed.
Change the settings for each module to fit your needs. For example, set your city for the weather module.
Add new modules by downloading them and adding their details to the config file. Restart the mirror to see changes.
Building The Mirror Frame
Building the mirror frame is a key step in creating your smart mirror. The frame holds all parts together and gives a clean look. It must be sturdy and fit the screen perfectly. This section guides you through assembling the frame, mounting the display, and securing the Raspberry Pi.
Assembling The Frame
Choose wood or plastic for a strong frame. Cut the pieces to match your screen size. Use nails or screws to join the edges. Make sure corners are tight and the frame is square. Sand the edges smooth for a neat finish. Paint or stain the frame if you want a polished look.
Mounting The Display
Place the display inside the frame carefully. Use double-sided tape or brackets to hold it firmly. The screen should sit flush with the front of the frame. Check that the display is centered and does not move. Leave space behind for cables and airflow. Avoid pressing too hard on the screen to prevent damage.
Securing The Raspberry Pi
Find a spot behind the display to attach the Raspberry Pi. Use screws or Velcro strips to fix it in place. Keep the ports accessible for power and connections. Ensure good ventilation to stop overheating. Organize cables neatly to avoid clutter and damage. Double-check that the Pi is stable and secure.
Customizing The Interface
Customizing the interface of your smart mirror makes it truly yours. It lets you add useful information and change how it looks. This section explains easy ways to personalize your smart mirror with a Raspberry Pi. You can add widgets, change the layout, and even use voice control.
Adding Widgets And Modules
Widgets show information like weather, news, or calendar events. You can choose which widgets to display on your smart mirror. Many smart mirror software options support different modules. Pick the ones you need and add them to your setup.
Common modules include time, date, weather, news feeds, and reminders. You can also add custom widgets for specific tasks. Adding widgets is simple and does not require deep coding skills. This step helps your mirror show the data you want every day.
Adjusting Layout And Appearance
Changing the layout lets you organize widgets for easy reading. You can move items around or resize them to fit your screen. Choose colors and fonts that match your style or room decor.
Many smart mirror platforms let you edit the CSS files. This changes the look without altering the main code. Keep the design clean and clear. A neat interface improves the mirror’s usability and your experience.
Integrating Voice Assistants
Voice assistants add hands-free control to your smart mirror. You can ask for weather updates, news, or control smart home devices. Popular assistants like Google Assistant or Amazon Alexa can work with Raspberry Pi.
Set up a microphone and speaker to enable voice commands. This makes your mirror more interactive and helpful. Voice control is perfect when your hands are busy or wet. It adds a modern touch to your smart mirror project.
Optimizing Performance
Optimizing the performance of your smart mirror is key to making it smooth and reliable. A well-tuned system uses less power, starts fast, and avoids common problems. This section covers simple steps to improve your smart mirror’s performance using a Raspberry Pi.
Managing Power Consumption
Power management helps your smart mirror run longer and stay cool. Choose a low-power Raspberry Pi model for energy efficiency. Turn off unused features like HDMI or Wi-Fi when not needed. Use a power supply with stable voltage to avoid crashes. Monitor power usage with simple tools to spot issues early.
Improving Boot Time
Faster boot means your mirror shows info quickly after turning on. Remove unnecessary startup programs to speed up boot time. Use lightweight software designed for Raspberry Pi. Keep your system updated for better performance. Consider using an SSD instead of an SD card for faster access.
Troubleshooting Common Issues
Smart mirrors may face freezes, slowdowns, or display errors. Check logs to find error messages. Reboot the Raspberry Pi to clear temporary problems. Confirm all cables and connections are secure. Update your software to fix known bugs. Reset configurations if problems persist.

Credit: www.youtube.com
Advanced Features
Advanced features make your smart mirror more useful and interactive. They add convenience and a modern touch. These features use the power of Raspberry Pi and extra tools. This section explains some popular advanced options to try.
Facial Recognition
Facial recognition lets the mirror recognize who stands before it. The mirror shows personalized information for each person. It can display weather, calendar events, or news based on the user. Raspberry Pi uses a camera and software to identify faces. This feature improves privacy and customizes the mirror’s content.
Home Automation Integration
Connect your smart mirror to home devices for smooth control. Use the mirror to switch lights on or off. Adjust the thermostat or check security cameras. Raspberry Pi can communicate with smart bulbs, sensors, and more. This integration turns the mirror into a central control hub for your home.
Gesture Controls
Gesture controls allow you to use hand movements to operate the mirror. Wave your hand to change music or scroll news. This lets you interact without touching the screen. The Raspberry Pi reads gestures using a camera or sensor. Gesture control keeps the mirror clean and easy to use.
Maintenance And Upgrades
Maintaining your smart mirror keeps it running smoothly. Regular care helps avoid problems and extends its life. Upgrades add new features and improve performance. This section covers key steps for maintenance and upgrades.
Software Updates
Keep your Raspberry Pi software up to date. Updates fix bugs and improve security. Check for updates often and install them promptly. Use the command line or update tools for easy upgrades. Updated software ensures your smart mirror works well and stays safe.
Hardware Upgrades
Hardware upgrades enhance your smart mirror’s abilities. Add more memory or a faster processor for better speed. Upgrade the display for clearer images. Replace old parts if they wear out. Choose compatible components to avoid issues. Hardware upgrades keep your mirror modern and efficient.
Cleaning And Care
Clean the mirror surface gently with a soft cloth. Avoid harsh chemicals that can damage the glass. Dust the Raspberry Pi and other parts regularly. Keep ventilation areas free from dust to prevent overheating. Proper care ensures clear display and long device life.

Credit: www.raspberrypi.com
Frequently Asked Questions
What Components Do I Need For A Raspberry Pi Smart Mirror?
You need a Raspberry Pi, a two-way mirror, an LCD screen, a frame, and power supply. Additional components include a microSD card, HDMI cable, and optional sensors like a motion detector.
How Do I Install The Smart Mirror Software On Raspberry Pi?
Download the MagicMirror² software from GitHub. Install it using the terminal with Node. js. Configure the modules via the config. js file for personalized features.
Can I Customize The Information Displayed On My Smart Mirror?
Yes, you can customize the modules. Choose weather, calendar, news, or clock displays. Modify settings in the config. js file to suit your preferences.
How Do I Power The Raspberry Pi Smart Mirror Setup?
Use a standard Raspberry Pi power adapter rated 5V/3A. Ensure the monitor and additional components have separate power sources if needed to avoid overload.
Conclusion
Building a smart mirror with a Raspberry Pi is simple and fun. You can customize it to show time, weather, and news. It saves space and adds tech to your home. Just follow the steps carefully and enjoy your new gadget.
This project helps you learn coding and electronics too. Give it a try and see what you create!