Setting up your Arlo Video Doorbell might seem tricky at first, but you’re closer to securing your home than you think. Imagine being able to see and speak to visitors right from your phone, no matter where you are.
This guide will walk you through every step, making the process simple and stress-free. By the end, you’ll have your doorbell up and running smoothly, giving you peace of mind and control over your front door. Ready to get started?
Let’s dive in.

Credit: www.arlo.com
Choose The Right Doorbell Location
Choosing the right location for your Arlo Video Doorbell is important. It affects how well the doorbell works and what it can see. A good spot helps capture clear video and keeps the doorbell connected. This step makes sure you get the best security and convenience.
Consider Field Of View
Place the doorbell where it can see visitors clearly. Avoid spots blocked by plants or walls. The camera should cover your front door and porch area. A wider view helps catch all activity near your entrance. Make sure the camera angle shows faces well.
Check Wi-fi Signal Strength
The doorbell needs a strong Wi-Fi signal to work properly. Test your Wi-Fi signal near the door. Move the router or add a Wi-Fi extender if the signal is weak. A good connection ensures smooth video streaming and quick alerts. Poor Wi-Fi can cause delays or missed events.
Assess Power Source Options
Decide how to power your Arlo Video Doorbell. Choose between battery power or wired connection. Battery power allows flexible placement but needs recharging. Wired power provides constant energy but needs existing doorbell wiring. Pick the option that fits your home setup and convenience.
Gather Necessary Tools
Setting up your Arlo Video Doorbell starts with gathering the right tools. Having everything ready makes the process smooth and saves time. Prepare your workspace before you begin. This helps avoid interruptions and keeps the setup easy.
Knowing what tools you need and how to use them safely is important. This section lists all required tools and covers key safety tips. Get ready to install your new doorbell quickly and safely.
List Of Required Tools
- Phillips screwdriver
- Flathead screwdriver
- Drill with drill bits
- Level tool
- Measuring tape
- Electrical tester
- Wire stripper or cutter
- Safety glasses
- Step ladder (if needed)
Safety Precautions
Turn off power at the circuit breaker before starting any work. This prevents electric shock. Use the electrical tester to confirm the power is off.
Wear safety glasses to protect your eyes from dust and debris. Be careful when using drills and sharp tools. If you need a ladder, make sure it is stable and on flat ground.
Follow all product instructions and local electrical codes. Ask for help if you feel unsure about any step. Safety first makes installation safe and simple.
Install The Mounting Bracket
Installing the mounting bracket is the first key step for your Arlo Video Doorbell. A properly fixed bracket keeps the doorbell stable and secure. Follow these simple steps to set up the bracket correctly. This ensures the doorbell captures clear video and works well.
Mark Drill Points
Hold the mounting bracket against your wall near the door frame. Use a pencil to mark the spots for drilling. These marks show exactly where the screws will go. Double-check the marks for level alignment. This helps the doorbell sit straight and look neat.
Drill Holes And Secure Bracket
Use a drill to make holes on the marked points. Choose a drill bit size that fits the wall anchors or screws. Insert anchors if you install on drywall or brick. Next, place the bracket on the wall and screw it firmly in place. Tighten the screws to avoid any movement. The bracket is now ready for the Arlo Video Doorbell.
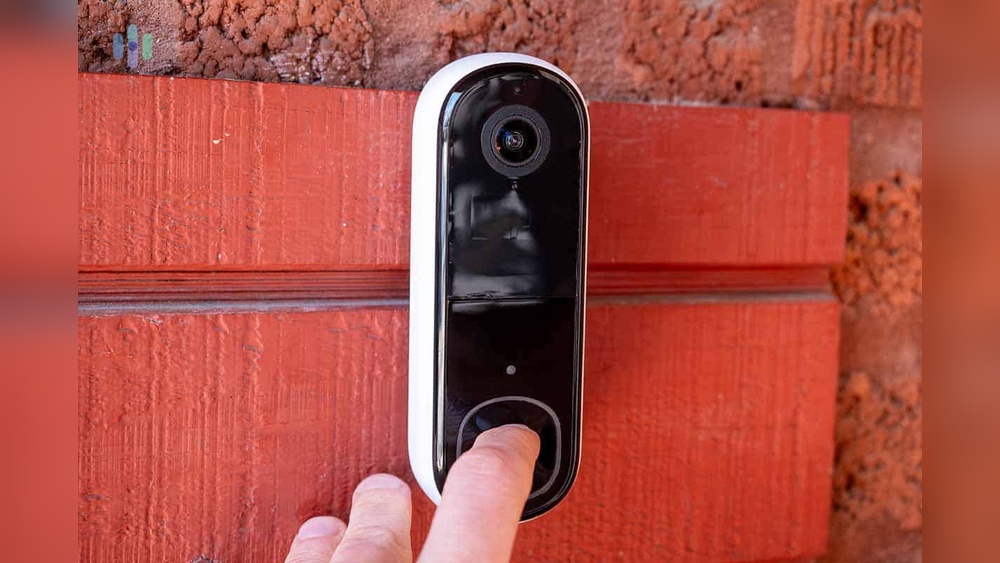
Connect The Doorbell
Connecting the Arlo Video Doorbell is a key step in setting up your security system. This process ensures the doorbell receives power and links to your home network. Proper connection helps the device work smoothly and capture clear videos. The connection method depends on your chosen setup: wired or battery. Follow each step carefully to avoid issues later.
Wired Vs. Battery Setup
The Arlo Video Doorbell supports both wired and battery power options. Wired setup uses existing doorbell wiring for constant power. It requires some electrical work but keeps the doorbell charged all the time. Battery setup is simpler and needs no wiring. You must recharge or replace the battery after some use. Choose wired for permanent power and battery for easy installation.
Attach Doorbell To Bracket
Start by attaching the mounting bracket to your wall. Use screws and anchors provided in the package. Make sure the bracket is level for proper camera angle. Next, connect the wires if you use wired setup. Slide the doorbell onto the bracket firmly until it clicks. Check that the doorbell sits tightly and does not move. This ensures stable video capture and button use.
Download And Configure The App
Setting up the Arlo Video Doorbell starts with downloading and configuring the app. The app helps you control the doorbell from your phone. It guides you through the setup process step-by-step. You will need the app to see video, get alerts, and adjust settings. Follow these steps to get started quickly.
Create Or Log Into Account
Open the app after download. You must create a new account or log in. Use your email and choose a strong password. This keeps your doorbell and video secure. If you already have an Arlo account, just sign in. The app saves your info for easy access later.
Add New Device
After logging in, tap the option to add a new device. Select the Arlo Video Doorbell from the list. The app will ask you to scan a QR code on the doorbell. This links your app to the doorbell. Follow the prompts on the screen to continue.
Connect To Wi-fi Network
Choose your home Wi-Fi network in the app. Enter your Wi-Fi password carefully. The doorbell needs a strong Wi-Fi connection to work well. The app will confirm when the doorbell connects. This step allows you to receive live video and alerts.
Customize Doorbell Settings
Customizing your Arlo Video Doorbell settings helps you get the most from your device. Tailor the features to fit your needs. Control notifications, motion zones, and privacy with simple steps. This makes your doorbell smarter and more useful every day.
Adjust Motion Detection Zones
Set specific areas for motion detection. This reduces false alerts from busy streets or sidewalks. Open the Arlo app, select your doorbell, and find motion settings. Draw zones on the screen where you want alerts. Save changes to track motion only in important spots.
Set Notification Preferences
Choose how and when you get alerts. Pick notifications for all motion, only people, or doorbell presses. Turn off alerts during certain hours or modes. This keeps your phone quiet when you don’t want interruptions. Customize sounds and vibration for easy recognition.
Enable Privacy Features
Protect your privacy with Arlo’s built-in options. Use privacy zones to block parts of the video from recording. Disable the camera temporarily if you need privacy at home. Manage who can see live video or recorded clips. These settings keep your footage safe and secure.
Test Your Video Doorbell
Testing your Arlo Video Doorbell after installation is essential. It ensures everything works well before relying on it daily. This step helps you catch problems early and fix them fast.
Follow the simple checks below to confirm your doorbell’s video, audio, and notifications function properly.
Check Video And Audio Quality
Start by viewing the live video feed on your phone or tablet. Make sure the picture is clear and bright. Test the night vision in low light to see if it works well.
Next, speak through the doorbell’s two-way audio. Check if you can hear the visitor clearly. Ask someone to speak from outside while you listen. Adjust volume settings if needed.
Verify Notifications
Press the doorbell button to trigger an alert on your device. Confirm you receive push notifications immediately. Test motion detection by walking near the doorbell.
Check notification sounds and vibration on your phone. Make sure alerts are not delayed or missing. This step confirms you won’t miss visitors or deliveries.
Troubleshoot Common Issues
If video lags or freezes, check your Wi-Fi signal strength near the doorbell. Move your router closer or use a Wi-Fi extender if needed. Restart the doorbell and app to refresh the connection.
For missing alerts, verify notification permissions on your phone. Ensure the Arlo app can send notifications. Check the battery level and replace if it’s low.
Reset the doorbell if problems persist. Follow the instructions in the user manual for a factory reset. Then, set up the device again from scratch.

Credit: www.youtube.com

Credit: www.youtube.com
Frequently Asked Questions
How Do I Install The Arlo Video Doorbell?
To install the Arlo Video Doorbell, first turn off power at the breaker. Mount the doorbell using the provided screws. Connect the wires to the terminals. Finally, restore power and complete setup in the Arlo app.
What App Do I Use For Arlo Doorbell Setup?
You use the Arlo app, available on iOS and Android. Download it, create or log into your account, then follow the step-by-step setup instructions for your video doorbell.
How Do I Connect Arlo Doorbell To Wi-fi?
Open the Arlo app and select your doorbell. Follow prompts to connect to your Wi-Fi network. Ensure your phone is near the doorbell for a strong signal during setup.
Can I Use Arlo Doorbell Without Existing Doorbell Wiring?
Yes, the Arlo Video Doorbell supports battery-only mode. You can install it without wiring, but battery life depends on usage and settings.
Conclusion
Setting up your Arlo Video Doorbell is simple and quick. Follow each step carefully for best results. Make sure your Wi-Fi connection is strong and stable. Test the doorbell after installation to ensure it works well. Enjoy the added security and convenience it brings.
Stay connected to your home anytime, anywhere. This small effort keeps your home safer every day. Ready for peace of mind? Your Arlo Doorbell is now ready to protect.