Are you looking to brighten up your space with LED string lights but unsure how to connect them safely and neatly? Wiring LED string lights together can seem tricky, but with the right steps, you can create the perfect glowing setup without any hassle.
In this guide, you’ll discover simple, clear instructions that make the process easy—even if you’re not an expert. Keep reading, and soon you’ll have your lights wired perfectly, transforming your room or outdoor area into a warm, inviting space you’ll love.
Credit: www.unitopledstrip.com
Choosing The Right Led String Lights
Choosing the right LED string lights is key for a safe and beautiful setup. The right lights save energy and last longer. Different types suit different spaces and uses. Also, power needs and connection limits matter. These factors affect how well the lights work together. Understanding these points helps you pick the best LED string lights for your project.
Types Of Led String Lights
LED string lights come in many styles. Some have tiny bulbs, others larger ones. You can find warm white, cool white, or colorful lights. Some strings have fixed bulbs, while others flash or change colors. Choose lights that match your style and purpose. Outdoor lights need to be waterproof. Indoor lights do not require this feature.
Voltage And Power Considerations
Check the voltage of your LED string lights. Common voltages are 12V or 24V for low-voltage lights. Some use standard 120V from wall outlets. Low-voltage lights use less power and are safer. Make sure your power source matches the lights. Overloading wires can cause heat or fire risks. Always follow the manufacturer’s power guidelines.
Length And Connection Limits
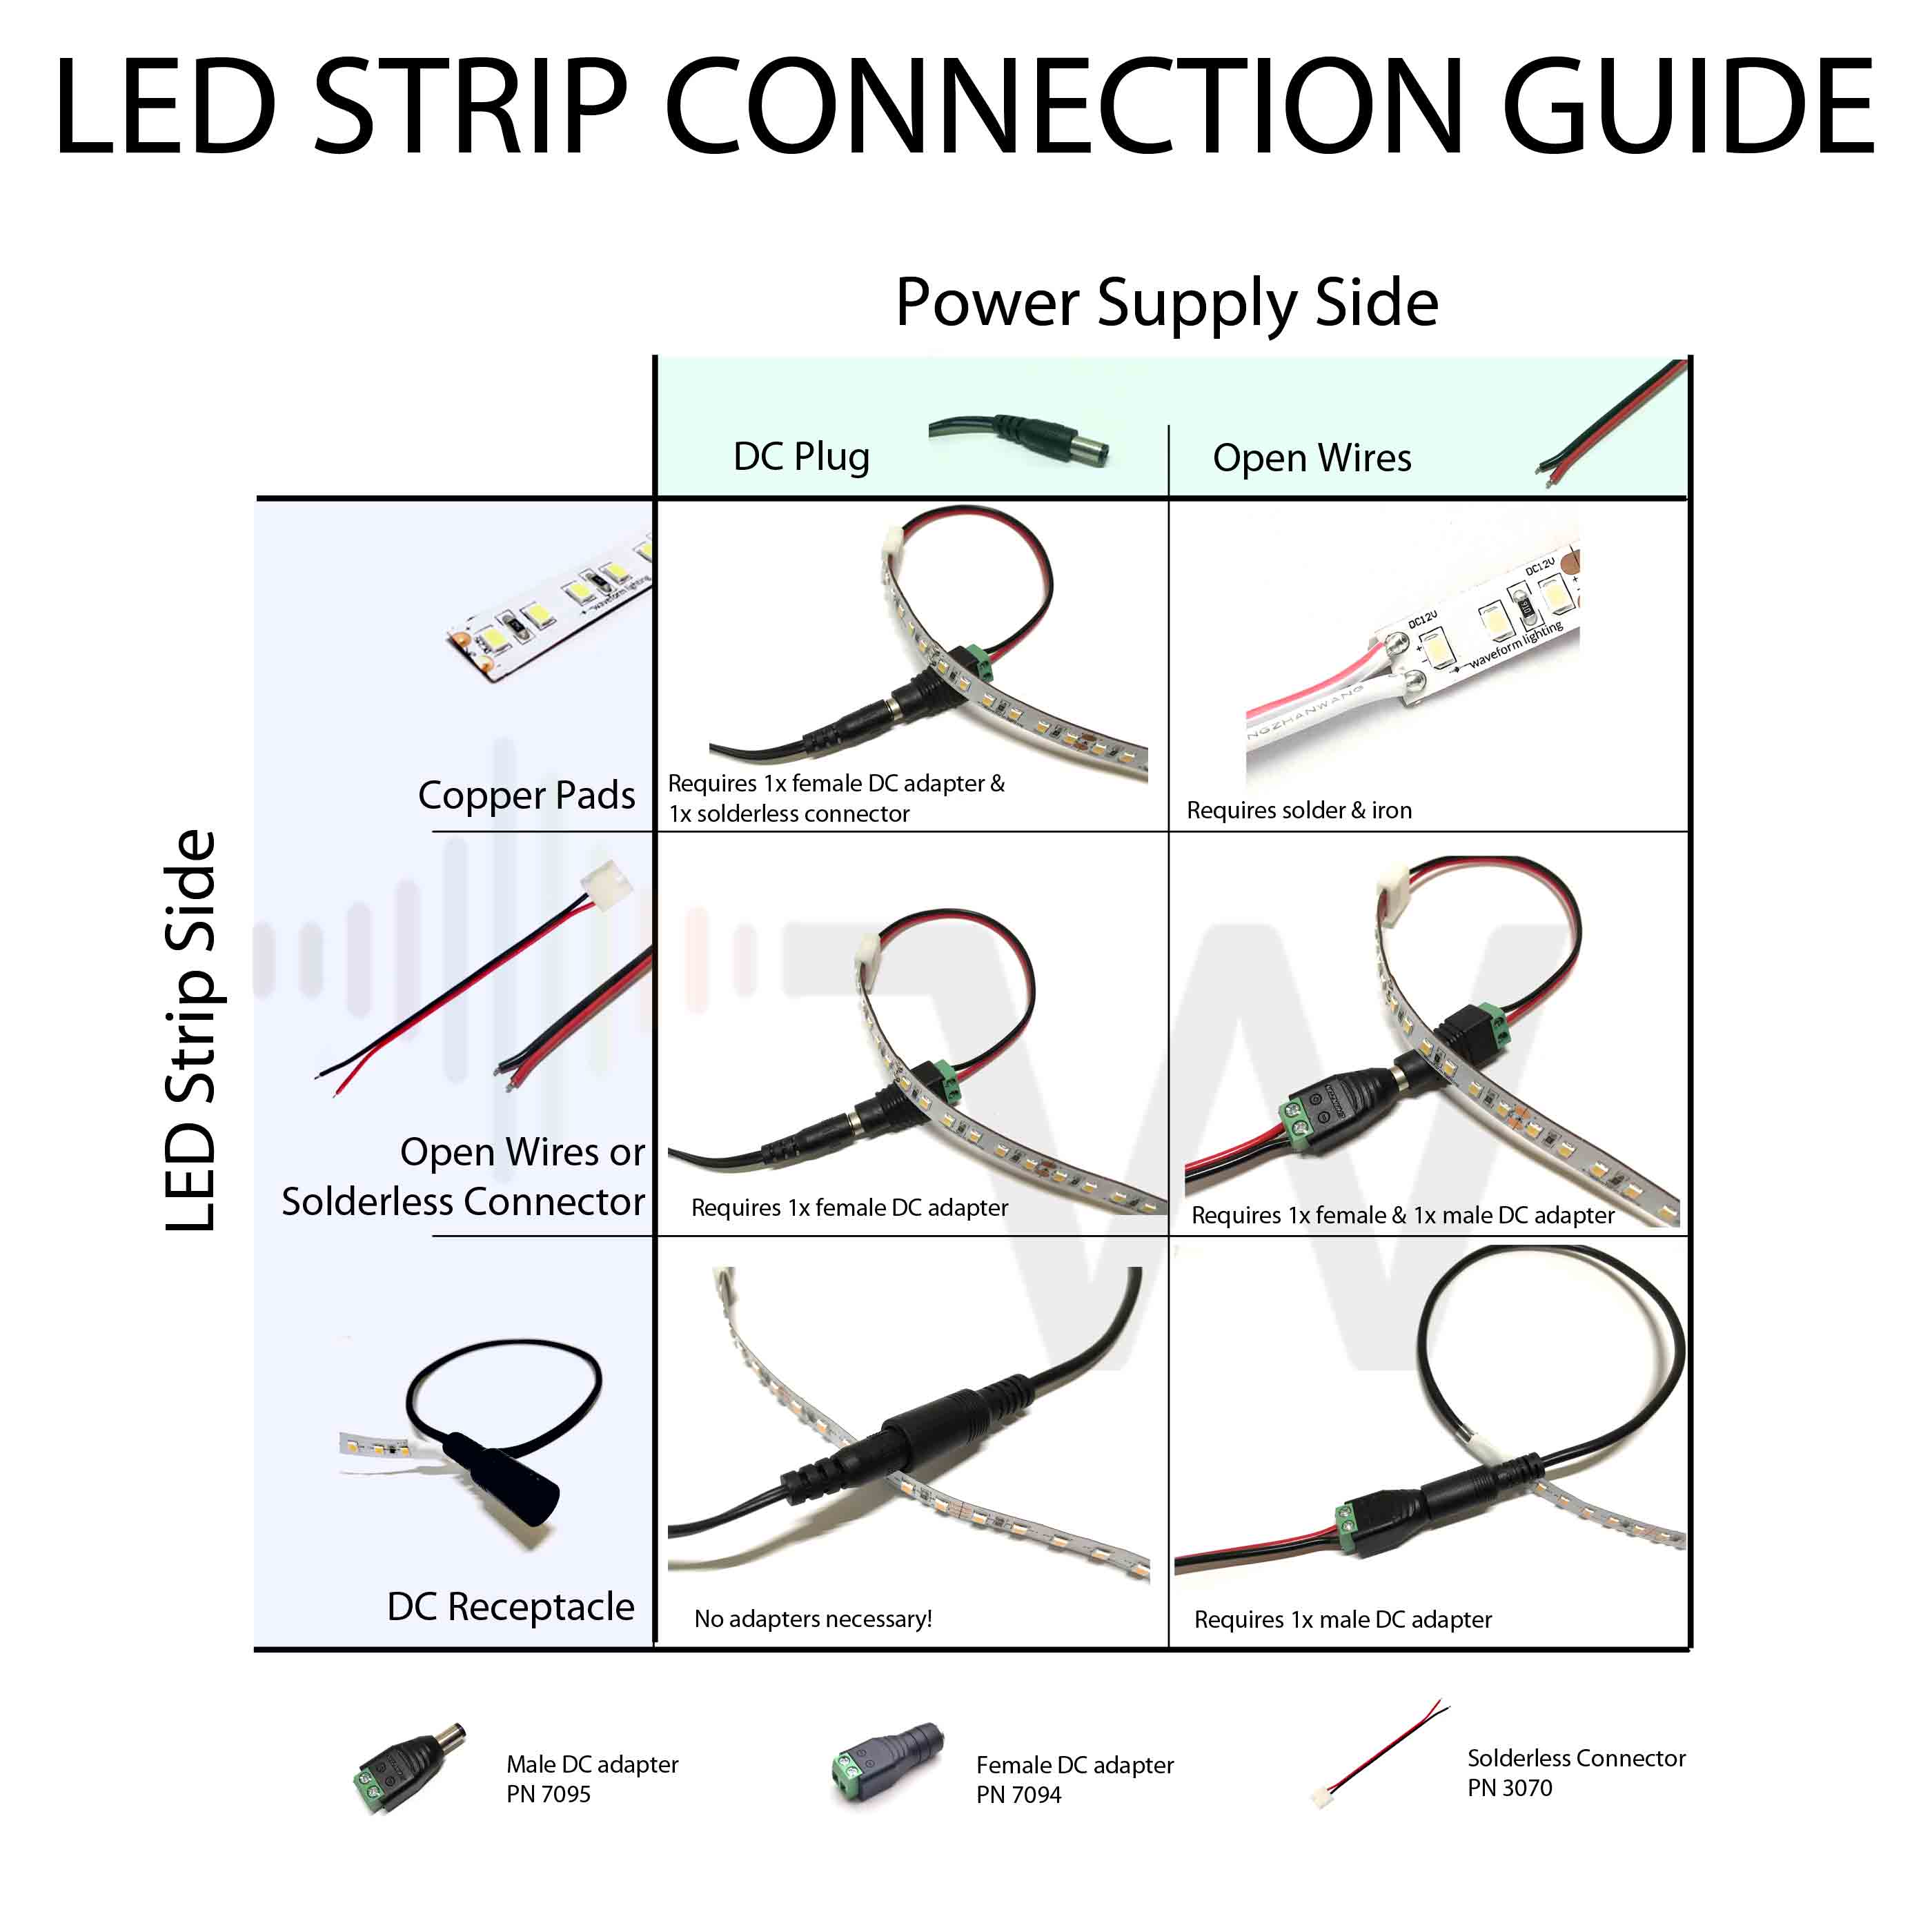
LED string lights have limits on how many can connect. Too many lights on one string cause voltage drop. This makes the lights dim or flicker. Each string has a maximum length or number of strings to connect. Read the label or instructions carefully. Stick to these limits for stable and bright lighting. Use connectors or extension cords made for LED lights.
Gathering Necessary Tools And Materials
Before wiring LED string lights together, gather all tools and materials. Proper preparation saves time and prevents mistakes. Having the right items makes the process easier and safer.
Each tool has a specific role. Some help cut and strip wires. Others secure connections or test the circuit. Understanding these tools helps ensure success.
Wire Cutters And Strippers
Wire cutters trim wires to the correct length. Strippers remove the plastic coating without damaging the wire. Use these tools to expose the copper inside. Clean cuts help create strong connections.
Electrical Tape And Connectors
Electrical tape insulates exposed wires. It prevents short circuits and protects against moisture. Connectors join wires securely. Choose connectors that fit your wire size and type. Proper insulation and connection keep lights working safely.
Multimeter For Testing
A multimeter checks electrical current and voltage. It helps find breaks or faults in the wiring. Test the connections before powering the lights. This step avoids damage and ensures the lights shine bright.
Preparing The Led Strings For Wiring
Preparing your LED string lights before wiring is an important step. It helps ensure safety and proper connection. This preparation makes your project easier and more reliable.
Start by checking each string carefully. Then, find the right wires to connect. Finally, strip the wire ends with care. Each step is key for good results.
Inspecting And Testing Each String
Look over each LED string for damage or broken bulbs. Test them by plugging in to see if all lights work. Replace any faulty bulbs or strings before wiring. This avoids problems later on.
Identifying Positive And Negative Wires
Find the positive (+) and negative (-) wires on each string. Usually, the positive wire is marked or a different color. Correct identification helps avoid wiring errors. Connect positive to positive and negative to negative only.
Stripping Wire Ends Safely
Use a wire stripper or sharp tool to remove insulation. Strip just enough to expose the wire, about half an inch. Avoid cutting the wire strands inside. Handle tools carefully to prevent injury and wire damage.
Connecting Led Strings In Series
Connecting LED string lights in series is a common method to link multiple strings. This setup allows electricity to flow through each string one after another. It is simple and useful for many lighting projects. Understanding this method helps you create longer light displays with fewer wires.
Wiring Steps For Series Connection
First, turn off the power source before starting any wiring. Connect the positive wire of the first LED string to the power supply’s positive terminal. Next, link the negative wire of the first string to the positive wire of the second string. Repeat this pattern for each additional string. Finally, attach the negative wire of the last string to the power supply’s negative terminal.
Use wire connectors or soldering to ensure strong connections. Secure all wires to avoid loose contacts. Double-check all connections before turning the power back on.
Pros And Cons Of Series Wiring
Series wiring uses less wire and is easy to set up. It keeps the current flow simple and steady across all strings. The voltage adds up with each string, so you need a power supply that matches the total voltage.
One downside is if one LED string fails, the whole series can stop working. Also, the brightness may decrease if too many strings are connected. Careful planning helps avoid these issues.
Testing The Series Connection
After wiring, test the connection before final installation. Turn on the power and check if all LED strings light up. Use a multimeter to measure voltage across each string. Make sure voltage is steady and matches expected levels.
If any string does not light up, check its wiring and connections. Fix any loose or wrong wires. Test again to confirm the series connection works correctly.
Connecting Led Strings In Parallel
Connecting LED string lights in parallel is a common and effective method. It allows each string to work independently. If one string fails, the others keep shining. This wiring style helps keep the brightness consistent across all lights.
Parallel wiring is simple to set up and offers many benefits. It also helps with power management and safety. Understanding how to wire LED strings in parallel is useful for many lighting projects.
Wiring Steps For Parallel Connection
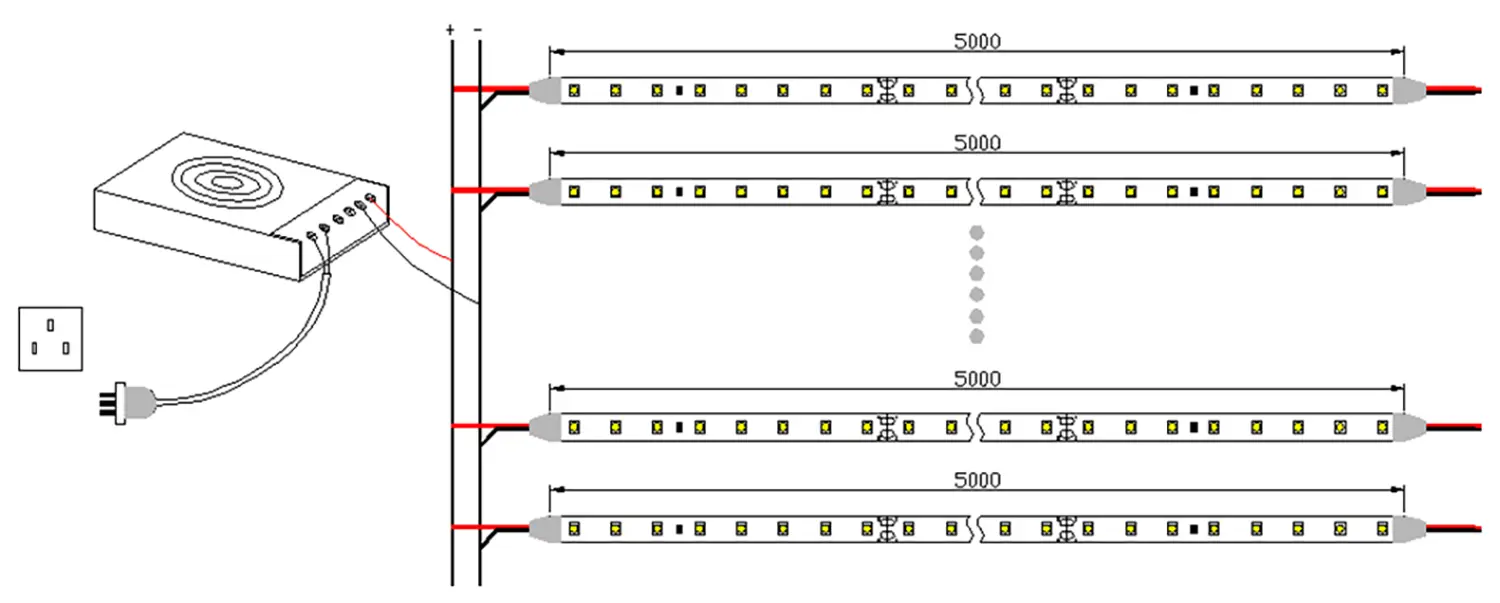
Start by turning off the power source. Identify the positive and negative wires on each LED string. Connect all the positive wires together in one group. Do the same with all the negative wires. Use wire connectors or solder the wires securely. Make sure no wires touch each other. Finally, connect the grouped wires to the power supply. Turn on the power to test the lights.
Advantages Of Parallel Wiring
Each LED string gets the same voltage. Lights stay bright and even across the entire setup. One string can fail without affecting others. Adding more strings is easy without changing the main setup. This method reduces the risk of overloading the power source. It offers better control over the lighting system.
Ensuring Even Power Distribution
Use the same wire size for all connections. Keep wire lengths similar to avoid voltage drop. Check connections for tightness and no corrosion. Avoid mixing different LED types in one circuit. Use a power supply that matches the total voltage and current needs. Regularly inspect the setup to maintain even power flow.
Securing And Insulating Connections
Securing and insulating connections is vital for wiring LED string lights safely. Proper insulation stops short circuits and electric shocks. It also keeps connections strong and long-lasting. This step ensures your lights work without flickering or damage.
Using Electrical Tape And Heat Shrink Tubing
Wrap electrical tape tightly around wire joins to cover exposed metal. This prevents sparks and keeps wires together. Heat shrink tubing offers extra protection. Slide it over the connection and use heat to shrink it. This forms a strong, waterproof seal that lasts.
Preventing Moisture And Corrosion
Moisture can cause wires to rust and fail. Use waterproof connectors or sealants on all joins. Cover connections with silicone or waterproof tape. This blocks water and humidity from reaching metal parts. Dry, clean connections last longer and stay safe.
Organizing Wires Safely
Keep wires neat and untangled to avoid damage. Use cable ties or clips to secure wires along surfaces. Avoid sharp bends that can break wires inside. Organized wiring makes future repairs easier and prevents hazards.
Testing And Troubleshooting The Setup
Testing and troubleshooting are key steps after wiring LED string lights. These steps help ensure the lights work safely and correctly. Faults can cause some lights to flicker or not light at all. Checking the setup carefully saves time and avoids damage.
Checking For Loose Connections
Loose connections often cause lights to fail. Look at each joint and connection point. Wiggle the wires gently to find weak spots. Tighten any loose screws or clips. Make sure all wires fit snugly in their terminals. Loose wires can create flickering or no light at all.
Using A Multimeter To Diagnose Issues
A multimeter helps find electrical problems in the lights. Set the multimeter to the continuity test mode. Touch the probes to both ends of the wire or LED. The meter shows if electricity flows correctly. No reading means a break or fault exists. This tool helps spot broken wires or bad LEDs fast.
Replacing Faulty Leds Or Wires
Sometimes parts need replacement to fix the setup. Identify which LED or wire is damaged by testing. Remove the faulty LED carefully without harming others. Use the same type of LED for replacement. Replace broken wires with similar gauge wire. Proper replacement restores full function to the lights.
Credit: www.ledsupply.com
Safety Tips For Wiring Led Lights
Wiring LED string lights can brighten any space. Staying safe during this process is very important. Following safety tips prevents accidents and electrical problems.
Avoiding Overloading Circuits
Do not connect too many LED strings to one outlet. Overloading can cause overheating and fires. Check the maximum wattage the circuit can handle. Use multiple outlets or power strips if needed. Spread the load evenly for safe wiring.
Proper Use Of Power Sources
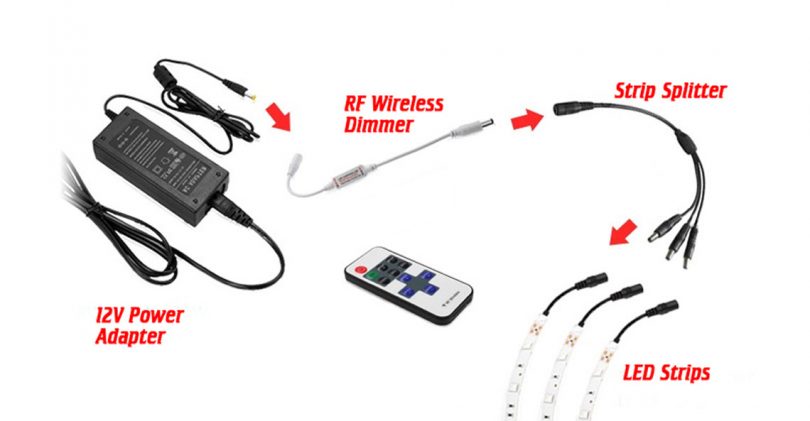
Always use power sources designed for LED lights. Check the voltage matches the LED string’s requirements. Avoid using damaged or old adapters. Use only certified power supplies to prevent electrical faults. Turn off power before connecting or disconnecting lights.
Handling Electrical Components Carefully
Handle wires and connectors with clean, dry hands. Avoid pulling or bending wires sharply. Use insulated tools to prevent shocks. Do not touch exposed wires or terminals. Secure connections tightly to avoid loose contacts.
Credit: www.waveformlighting.com
Frequently Asked Questions
How Do I Connect Multiple Led String Lights Safely?
To connect LED string lights safely, use connectors designed for your light type. Avoid overloading circuits and check voltage limits. Always follow manufacturer guidelines to prevent electrical hazards and ensure stable connections.
Can I Wire Led String Lights End To End?
Yes, you can wire LED string lights end to end if the manufacturer allows it. Ensure the total wattage does not exceed the recommended limit to avoid overheating and damage.
What Tools Are Needed To Wire Led String Lights?
Common tools include wire strippers, electrical tape, connectors, and a multimeter. These help strip wires, secure connections, and test voltage for safe and efficient wiring.
How To Troubleshoot Led String Lights Not Working After Wiring?
Check all connections for tightness and proper contact. Inspect for damaged wires or bulbs. Use a multimeter to verify power flow and replace faulty components promptly.
Conclusion
Wiring LED string lights together can brighten any space simply. Follow safety rules and double-check connections every time. Use the right tools and parts to avoid problems. Keep wires neat to prevent tangles and damage. Enjoy the warm glow your work creates at night.
Small steps lead to beautiful, lasting light displays. Try different setups to find what fits best. Stay safe, and have fun lighting up your world.