Looking to boost your home security with a smart video doorbell? Installing the Tapo Video Doorbell is easier than you might think.
Imagine being able to see and talk to visitors right from your phone, no matter where you are. In this guide, you’ll find simple, step-by-step instructions that anyone can follow. By the end, you’ll have your doorbell up and running smoothly, giving you peace of mind and control over your front door.
Ready to get started? Let’s dive in and make your home safer today.
Preparing For Installation
Preparing for installation is the first step to ensure a smooth setup of your Tapo Video Doorbell. This phase helps you avoid delays and surprises during installation. By organizing everything beforehand, you can complete the process faster and with less stress.
Follow these steps carefully to get ready for your new doorbell. Each part is important for a successful setup.
Checking Package Contents
Open the box and check every item inside. The package should include the doorbell, mounting plate, screws, anchors, and a user manual. Make sure the power adapter and any included cables are present. Missing parts can stop your installation. Confirm you have all these before moving ahead.
Gathering Required Tools
Collect all tools needed for installation. You will need a drill, screwdriver, and a level for proper mounting. A pencil helps mark drill spots. Keep a ladder nearby if mounting is high. Having tools ready saves time and helps avoid extra trips.
Verifying Wi-fi Compatibility
Check if your Wi-Fi supports the doorbell. The Tapo Video Doorbell works best with 2.4 GHz Wi-Fi networks. Confirm your router broadcasts this frequency. Ensure the Wi-Fi signal is strong near your door. Weak signal can cause connection issues. Test your Wi-Fi speed and strength before installation.

Credit: www.youtube.com
Setting Up The Doorbell
Setting up the Tapo Video Doorbell is simple and quick. This part guides you through the basic steps to get your doorbell ready for use. Follow each step carefully to ensure smooth installation and operation.
Charging The Battery
Start by charging the doorbell’s battery fully. Use the provided USB cable and plug it into a power source. A full charge usually takes a few hours. You will see a light indicator showing the charging status. Wait until the light changes to confirm the battery is ready.
Installing The Tapo App
Download the Tapo app from the App Store or Google Play. The app controls your doorbell and lets you view video feeds. Search for “Tapo” in the store and tap install. Open the app once it is installed. The app is free and easy to use.
Creating Or Logging Into Account
Open the Tapo app to create a new account or log in. Enter your email and set a password if creating an account. If you already have an account, just enter your login details. This step connects your doorbell to your phone for remote access.
Mounting The Doorbell
Mounting the Tapo Video Doorbell is a crucial step. It ensures your doorbell works well and captures clear video. Proper installation keeps the device secure and helps it detect motion accurately.
Follow these steps carefully for the best results. The right location and secure mounting will improve your home security.
Choosing The Installation Location
Select a spot near your front door, about 4 to 5 feet off the ground. This height allows the doorbell to capture visitors’ faces clearly. Avoid placing it in direct sunlight or where rain hits directly. Check for a strong Wi-Fi signal to keep video streaming smooth.
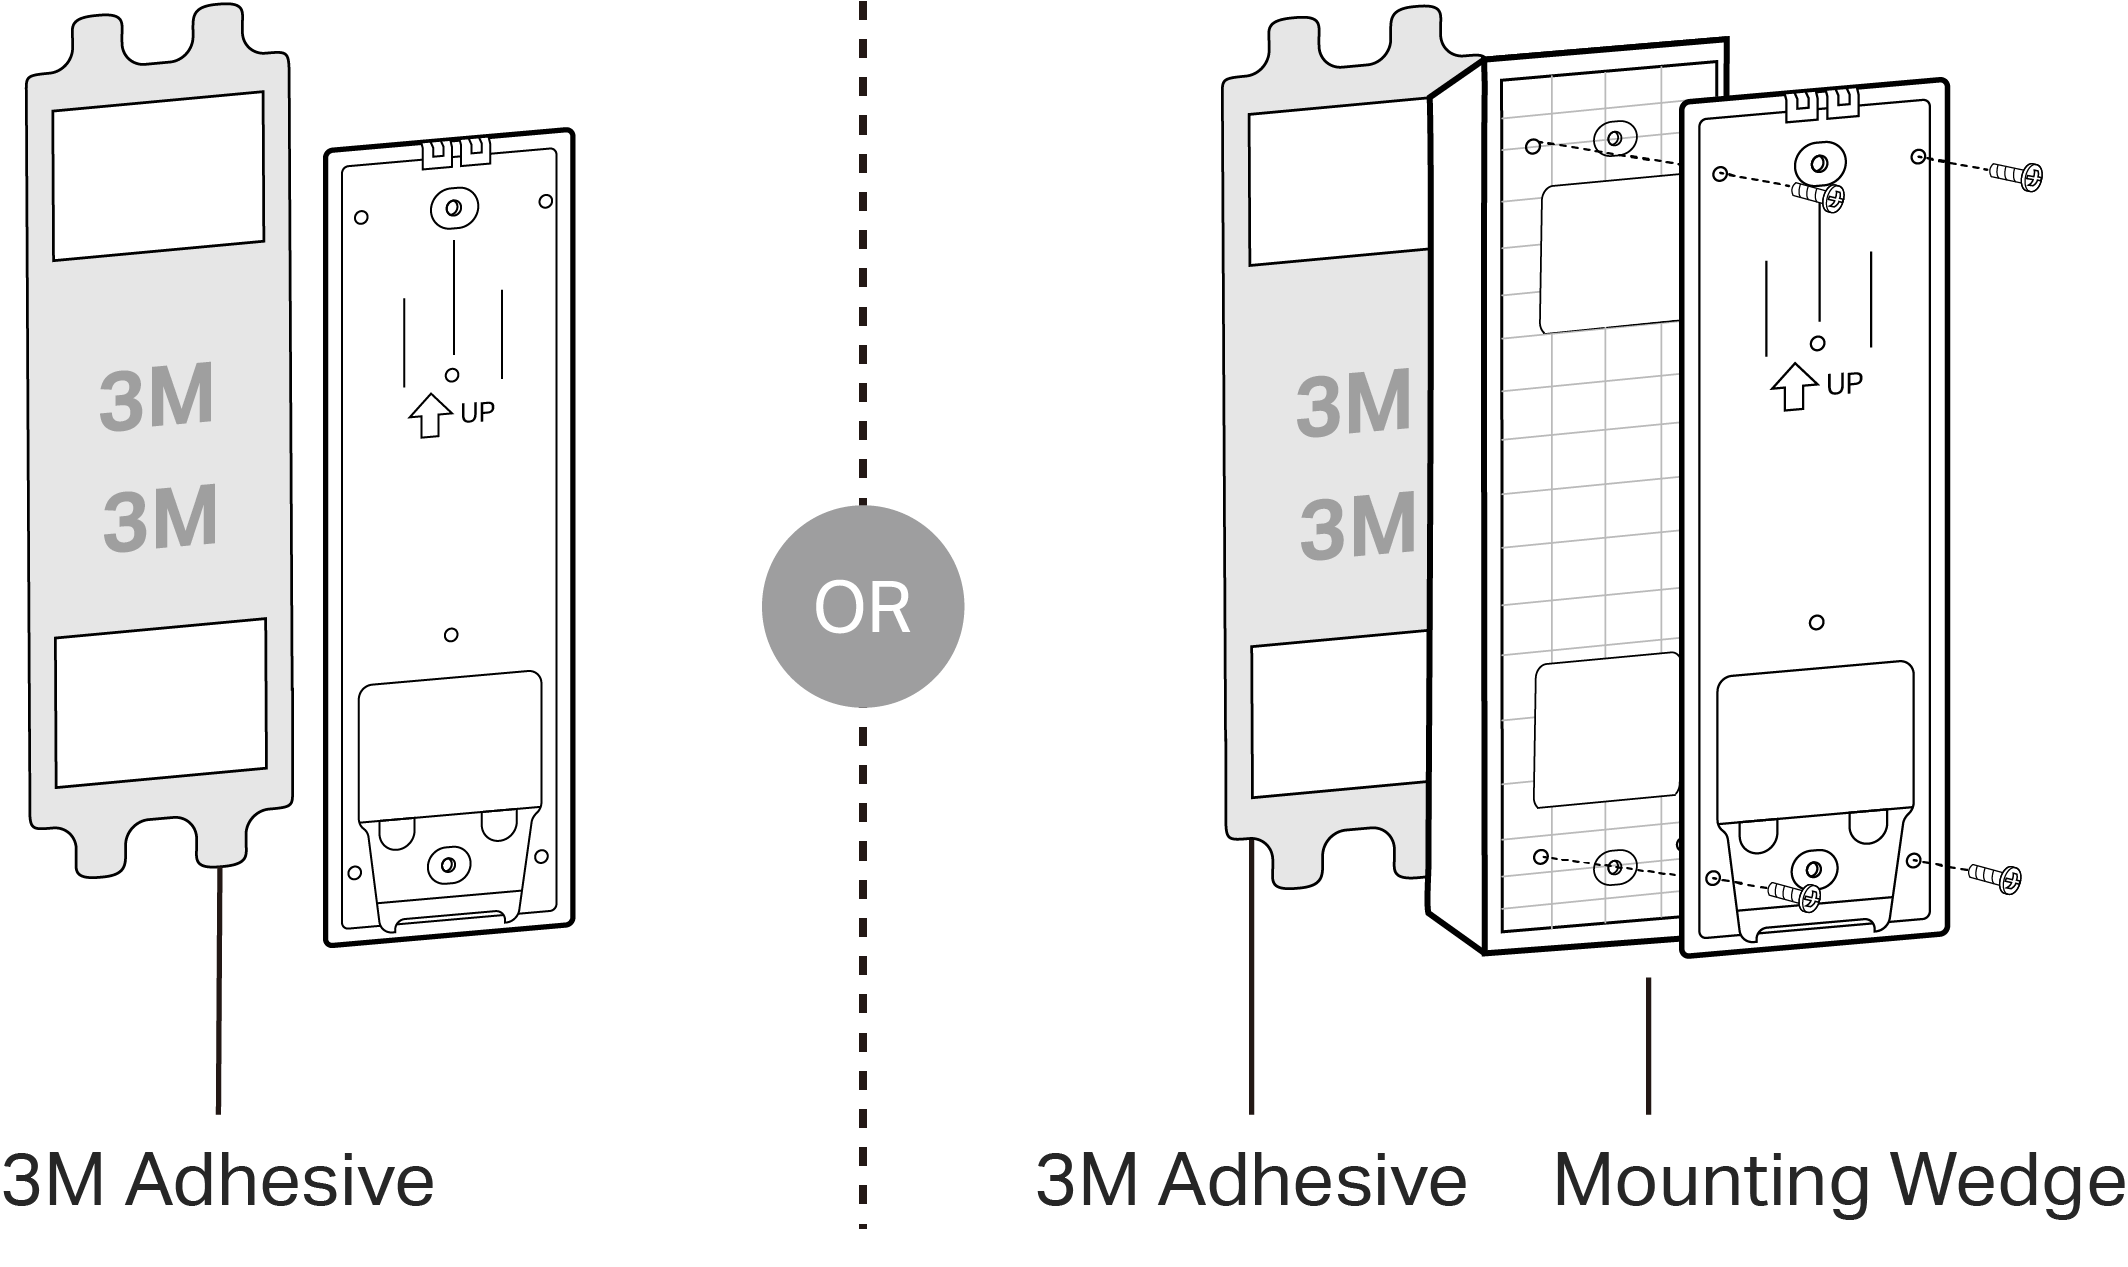
Marking Mounting Points
Use the mounting bracket as a guide. Hold it against the wall at your chosen spot. Mark the holes with a pencil for drilling. Make sure the marks are level and spaced correctly. Double-check before drilling to avoid mistakes.
Attaching The Mounting Bracket
Drill holes at the marked points using a proper drill bit. Insert wall anchors if you mount on drywall or brick. Align the bracket with the holes and screw it tightly. The bracket must be firm to hold the doorbell securely. Avoid loose screws that could cause movement.
Credit: www.tapo.com
Connecting The Doorbell
Connecting the Tapo Video Doorbell is the key step after installation. This process links your doorbell to your home network. It allows you to control and monitor your doorbell through your phone. Follow these simple steps to connect your doorbell smoothly.
Pairing With The Tapo App
First, download the Tapo app from the App Store or Google Play. Open the app and create an account or log in. Tap the “+” icon to add a new device. Select the Tapo Video Doorbell from the list. Follow the on-screen instructions to enter pairing mode. Press the doorbell button to start pairing. The app will detect the doorbell and connect automatically.
Configuring Wi-fi Settings
Next, choose your home Wi-Fi network in the app. Enter your Wi-Fi password carefully. The doorbell needs a strong Wi-Fi signal for smooth operation. The app will send the settings to the doorbell. Wait a few moments as the device connects to the Wi-Fi. Successful connection will show a confirmation message in the app.
Testing The Connection
After configuration, test the doorbell connection. Press the doorbell button and check the app for notifications. Use the live view feature to see the camera feed. Listen to the audio to confirm two-way communication. If all functions work, your doorbell is ready to use. Reconnect or reset if any issues occur during testing.
Finalizing Setup
Finalizing the setup of your Tapo Video Doorbell is an important step. It ensures the device works well and meets your needs. The last steps include securing the doorbell, adjusting camera views, and setting notification preferences. These actions help you get the best experience from your doorbell.
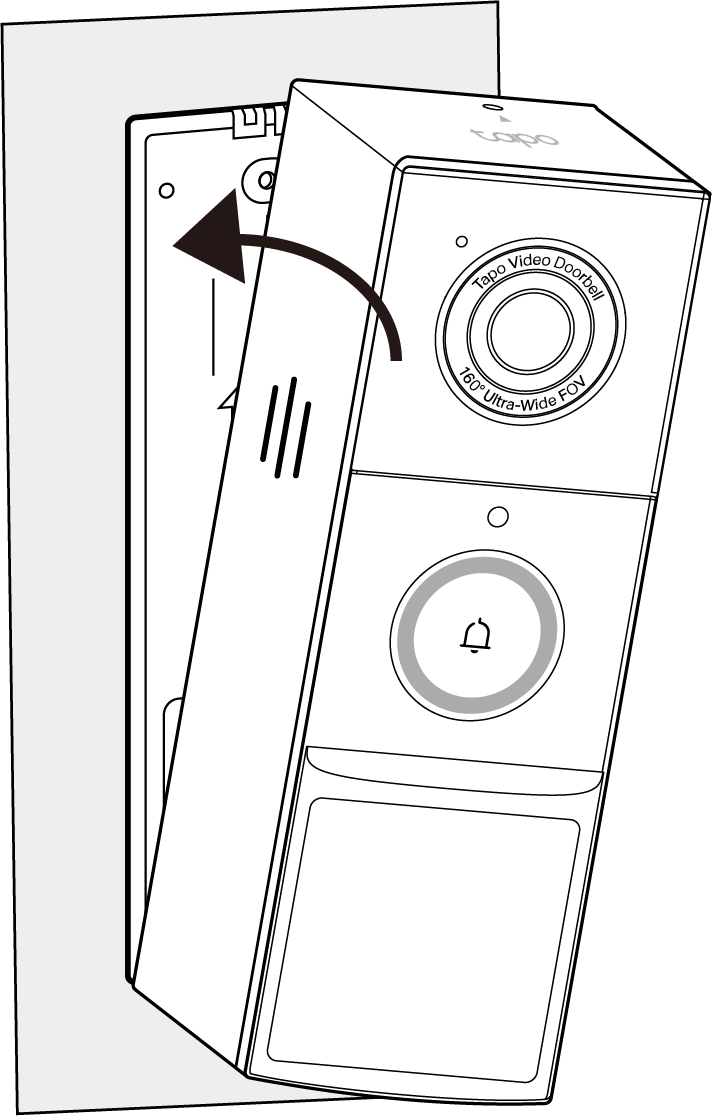
Securing The Doorbell Unit
Start by firmly attaching the doorbell to its mount. Use the screws provided in the package. Tighten them enough to prevent the doorbell from moving or falling. Check the stability by gently shaking the unit. A secure doorbell helps avoid damage and theft.
Adjusting Camera Angles
Next, adjust the camera angle for a clear view of your doorstep. Tilt the camera up or down until you see the desired area. Test the view on your phone app. Make sure the camera covers all important spots without blind zones.
Customizing Notification Preferences
Finally, customize how you get alerts on your phone. Open the Tapo app and find the notification settings. Choose to receive alerts for motion, ringing, or both. Set quiet hours if you want to avoid notifications at night. Tailoring notifications keeps you informed without distractions.
Troubleshooting Tips
Installing the Tapo Video Doorbell is simple, but you may face some common problems. These troubleshooting tips help fix issues fast. They improve your experience and keep the doorbell working well.
Resolving Connection Issues
Check your Wi-Fi signal near the doorbell. Weak signals cause disconnection. Move the router closer if possible.
Restart the doorbell and your router. This refreshes the connection. Use the Tapo app to reconnect the device.
Ensure your network uses 2.4 GHz, not 5 GHz. The doorbell works best on 2.4 GHz Wi-Fi bands.
Battery Life Optimization
Charge the battery fully before first use. This helps the battery last longer.
Lower the motion detection sensitivity. It reduces how often the doorbell records, saving power.
Turn off notifications you don’t need. Fewer alerts mean less battery use.
App Update Recommendations
Keep the Tapo app updated. Updates fix bugs and add new features.
Check app permissions. Allow access to your location and notifications for smooth operation.
Clear cache if the app runs slowly. It improves performance and responsiveness.
Credit: www.tapo.com
Frequently Asked Questions
How Do I Install The Tapo Video Doorbell Step-by-step?
First, charge the doorbell fully. Next, mount the bracket on your wall. Connect the doorbell to Wi-Fi using the Tapo app. Finally, attach the doorbell to the bracket and test its functions.
What Tools Are Needed To Install The Tapo Video Doorbell?
You need a drill, screwdriver, level, and screws included in the package. A smartphone with the Tapo app is essential for setup and configuration.
Can I Install The Tapo Video Doorbell Without Professional Help?
Yes, the installation is user-friendly and designed for DIY setup. The detailed manual and app guidance make it easy for beginners to install.
How Do I Connect The Tapo Video Doorbell To Wi-fi?
Open the Tapo app, select the doorbell, and follow the Wi-Fi setup prompts. Ensure your phone is near the doorbell during this process for smooth connection.
Conclusion
Installing the Tapo Video Doorbell is simple and quick. Follow the steps carefully for the best results. You can enjoy better home security in no time. The device helps you see visitors from anywhere, anytime. Make sure to test the doorbell after installation.
Stay safe and keep your home connected with ease. This guide helps you feel confident during setup. Ready to protect your home? The Tapo Video Doorbell makes it easy.