
Your home’s safety depends on smoke detectors working properly. But do you know how to wire smoke detectors the right way?
If you want to protect your family and property, understanding this simple yet crucial task can make all the difference. In this guide, you’ll learn step-by-step how to wire smoke detectors so they alert you quickly in case of danger.
Keep reading to find out how you can take control of your home’s safety right now.
:max_bytes(150000):strip_icc()/install-hardwired-smoke-detectors-1152329-08-7adda3e3f25b408ca859f1f792f626e3.jpg)
Credit: www.thespruce.com
Choosing Smoke Detectors
Choosing the right smoke detectors is key for home safety. The correct type helps detect fire early. It gives you time to act and stay safe.
Types Of Smoke Detectors
Two main types of smoke detectors exist: ionization and photoelectric. Ionization detectors react faster to flaming fires. Photoelectric detectors spot smoldering fires better. Some models combine both technologies for full protection.
Battery Vs. Hardwired Models
Battery smoke detectors are easy to install. They work even during power outages. Hardwired models connect to your home’s electrical system. These usually have battery backup for extra safety. Hardwired units often link multiple detectors together.
Best Locations For Installation
Install smoke detectors on every floor of your house. Place them inside bedrooms and outside sleeping areas. Avoid kitchens and bathrooms to reduce false alarms. Mount detectors on ceilings or high on walls. Keep them away from windows and vents.
Gathering Tools And Materials
Before wiring smoke detectors, gather all necessary tools and materials. Having everything ready saves time and avoids interruptions. It also helps keep the work safe and smooth. Knowing the right tools and supplies is the first step in proper installation.
Essential Wiring Tools
Start with basic wiring tools. Wire strippers help remove insulation cleanly. A screwdriver set is key for securing connections. Use a voltage tester to check live wires safely. Needle-nose pliers assist in bending and holding wires. These tools make wiring easier and more accurate.
Safety Equipment Needed
Safety comes first during electrical work. Wear insulated gloves to protect from shocks. Safety glasses shield eyes from dust and sparks. Use a dust mask to avoid inhaling particles. A sturdy ladder ensures safe access to ceilings. Proper safety gear reduces risks and keeps you protected.
Additional Supplies
Besides tools, gather extra materials. Electrical tape helps secure wire connections. Wire nuts join wires safely inside boxes. Smoke detector mounting brackets hold units firmly. Use cable clamps to organize and secure wires. Having these supplies ready improves installation quality and safety.
Preparing For Installation
Preparing for the installation of smoke detectors is an important step. It ensures safety and a smooth setup process. Taking time to prepare helps avoid mistakes and saves time. Below are key steps to get ready before wiring your smoke detectors.
Turning Off Power
Always turn off the power at the circuit breaker before starting. This prevents electric shock and protects your tools. Use a voltage tester to confirm the power is off. Never assume the power is cut without checking.
Planning Detector Placement
Choose locations that cover all key areas in your home. Install detectors in hallways, bedrooms, and near kitchens. Avoid placing them near windows or vents. Proper placement ensures early smoke detection and safety.
Marking Installation Points
Use a pencil to mark where each detector will go. Measure carefully to keep detectors at the right height. Mark drill points to make holes for mounting easy. Clear markings help avoid mistakes during installation.
Wiring The Smoke Detectors
Wiring smoke detectors is an important step for home safety. It helps the devices work together and alert you quickly during a fire. Proper wiring ensures all detectors receive power and communicate alarms properly. Follow simple steps to connect wires, link multiple units, and secure everything safely.
Connecting The Wires
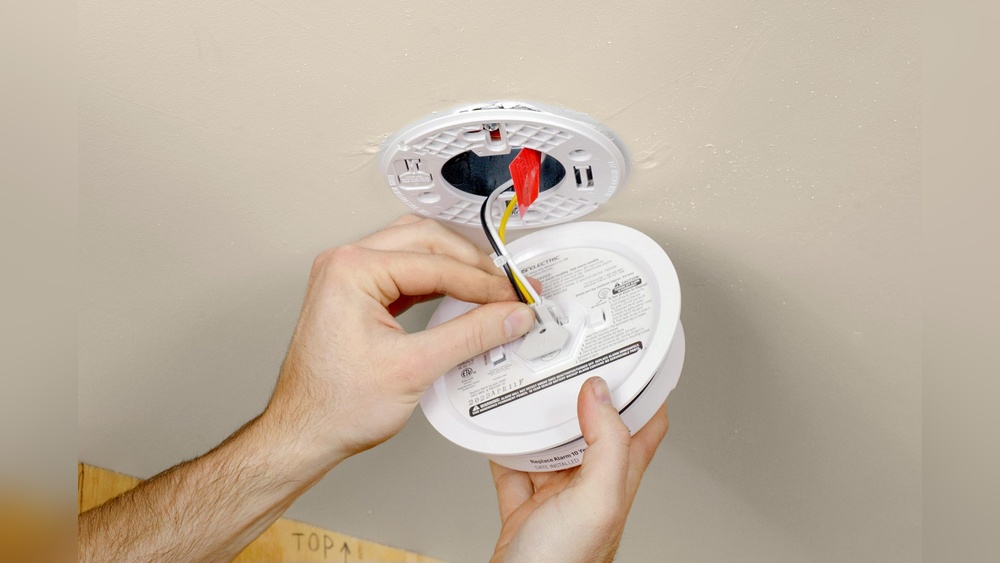
Start by turning off the power at the breaker. Use a voltage tester to confirm no electricity flows. Identify the wires: usually black for live, white for neutral, and a green or bare wire for ground. Connect the black wire from the power source to the black wire on the detector. Join the white wires together and attach the ground wires to the green screw or wire. Use wire nuts to twist wires tightly and cover exposed metal.
Linking Multiple Detectors
Link detectors using the interconnect wire, often red or orange. This wire carries the alarm signal between units. Connect the interconnect wire from one detector to the next. This setup allows all detectors to sound together if one senses smoke. Make sure each detector’s interconnect wire is securely attached. This step is key for whole-home safety.
Securing Connections Safely
Double-check all wire connections for tightness. Loose wires cause faults or failure. Use electrical tape around wire nuts for extra security. Place wires neatly inside the electrical box to avoid damage. Close the detector’s cover firmly. Turn the power back on and test each detector to confirm proper operation.
Mounting The Detectors
Mounting smoke detectors correctly is vital for your safety. A properly mounted detector can sense smoke early and alert you. This section explains the steps to mount smoke detectors securely. Follow the instructions carefully to ensure your home stays protected.
Attaching The Base
Start by choosing the right spot on the ceiling or high on the wall. Use a pencil to mark the screw holes of the detector base. Drill holes in the marked spots. Insert wall anchors if needed for a firm hold. Secure the base to the surface using screws. Make sure the base is tight and does not move.
Installing The Detector Unit
Align the smoke detector unit with the base. Twist or snap the detector onto the base as per the model’s design. Check that the unit fits snugly and locks in place. Connect the wires if your detector requires hardwiring. Ensure connections are secure and no wires are loose.
Testing The Installation
Press the test button on the smoke detector. Listen for a loud alarm sound. This confirms the detector works correctly. Test each detector in the system. Replace batteries if the alarm is weak or does not sound. Regular testing keeps your smoke detectors ready.

Credit: www.support.getzooz.com
Maintaining Your Smoke Detectors
Maintaining your smoke detectors is key to keeping your home safe. Smoke detectors can stop working if not cared for. Regular upkeep ensures they work well and alert you in time. Simple steps keep them ready to protect your family.
Regular Testing
Test your smoke detectors every month. Press the test button until the alarm sounds. This checks the battery and the sensor. If the alarm does not sound, replace the battery or the unit. Regular testing helps spot problems early.
Replacing Batteries
Change the batteries at least once a year. Some smoke detectors use 9-volt or AA batteries. Use fresh batteries for best performance. Low batteries cause false alarms or no alarms. Mark your calendar to remember battery changes.
Cleaning Tips
Dust and dirt can block smoke sensors. Clean your smoke detectors twice a year. Use a vacuum cleaner or soft brush to remove dust. Avoid using water or cleaning sprays. Clean detectors work better and last longer.
Troubleshooting Common Issues
Troubleshooting common issues with smoke detectors helps keep your home safe. Problems can cause false alarms or stop detectors from working. Fixing these issues early saves you from bigger risks.
Dealing With False Alarms
False alarms can be annoying and stressful. Dust or insects inside the detector often cause them. Clean the smoke detector regularly with a soft brush or vacuum.
Steam from showers or cooking smoke may trigger false alarms. Move the detector away from kitchens or bathrooms if possible. Use a detector with a hush button to silence false alarms quickly.
Fixing Wiring Problems
Wiring issues can stop smoke detectors from working or cause constant beeping. Check for loose or disconnected wires in the detector and junction box. Turn off power before inspecting wires.
Look for damaged or corroded wires. Replace any that look worn out. Tighten all wire connections to ensure good contact. Use wire nuts to secure connections safely.
When To Call A Professional
Complex wiring or frequent issues need professional help. Electricians can test and repair wiring safely. Call a professional if you see sparks, burning smells, or damaged wires.
Never ignore repeated false alarms or dead detectors. A professional will ensure your system works correctly and keeps you safe.

Credit: www.youtube.com
Frequently Asked Questions
How Do I Wire Multiple Smoke Detectors Together?
To wire multiple smoke detectors, connect them in series or parallel using interconnect wires. This allows all alarms to sound simultaneously when one detects smoke.
What Tools Are Needed To Wire Smoke Detectors Safely?
You need a voltage tester, wire strippers, screwdrivers, electrical tape, and wire nuts. Always turn off power before starting any wiring work.
Can I Wire Smoke Detectors Without Professional Help?
Yes, if you follow local codes and manufacturer instructions. Ensure you have basic electrical knowledge and turn off power to avoid hazards.
Where Should Smoke Detectors Be Wired In A Home?
Install smoke detectors on ceilings or high on walls, near bedrooms and living areas. Wire them to the home’s electrical system with battery backup for reliability.
Conclusion
Wiring smoke detectors is key to home safety. Follow the steps carefully to avoid mistakes. Always turn off power before starting any work. Test each detector after installation to ensure it works. Proper wiring helps detectors alert you early during fires.
Stay safe by checking detectors regularly and replacing batteries. Your effort can protect lives and property. Simple actions make a big difference. Keep your home secure and worry less. Safety starts with the right setup.