Imagine looking into your mirror and seeing more than just your reflection. What if your mirror could show you the weather, news, or even your daily schedule?
Building a smart mirror with a Raspberry Pi lets you do just that. You don’t need to be a tech expert to create one. In this guide, you’ll discover simple steps to turn an ordinary mirror into a high-tech helper.
Ready to impress yourself and anyone who visits? Keep reading, and you’ll have your own smart mirror up and running in no time.
Choosing The Right Raspberry Pi
Choosing the right Raspberry Pi is the first step in building a smart mirror. The Raspberry Pi acts as the brain of your project. It controls the display, runs the software, and connects to the internet. Picking the right model ensures smooth performance and a better user experience. Consider the power, speed, and features you need for your smart mirror.
Comparing Raspberry Pi Models
The Raspberry Pi 4 is a popular choice for smart mirrors. It has a fast processor and up to 8GB of RAM. This model handles multiple apps and tasks easily. The Raspberry Pi 3 is cheaper but slower. It works for basic smart mirrors with fewer features. The Raspberry Pi Zero is small and low-cost but has limited power. It suits simple projects without heavy processing needs.
Selecting Accessories And Peripherals
Choose a good quality touchscreen or monitor for clear display. A compatible power supply is essential to avoid shutdowns. Add a case to protect the Raspberry Pi from dust and damage. Consider a microSD card with enough space for your software. A Wi-Fi adapter or Ethernet cable helps with internet connection. USB keyboard and mouse may help during setup. Pick accessories that match your project size and budget.
Gathering Materials And Tools
Building a smart mirror with a Raspberry Pi starts with gathering the right materials and tools. Having everything ready makes the project smoother and faster. This section covers the essential parts and some optional upgrades for your smart mirror.
Essential Components
You need a Raspberry Pi board, preferably model 3 or 4. A microSD card with at least 16GB storage is required for the operating system. A two-way glass or acrylic sheet acts as the mirror surface. A monitor or LCD screen fits behind the glass to display information.
Power supply for the Raspberry Pi is necessary. HDMI cable connects the Pi to the monitor. A frame or enclosure holds everything in place. Basic tools like a screwdriver and double-sided tape help with assembly.
Optional Upgrades
Add a motion sensor to activate the mirror when you approach. A microphone and speaker allow voice commands and responses. A camera can enable facial recognition or video calls. Wi-Fi dongle or Ethernet cable ensures internet access if not built-in.
LED lights enhance the look and provide extra lighting. Temperature and humidity sensors add useful environmental data. These upgrades improve functionality but are not required to start the project.
Setting Up The Software
Setting up the software is a key step to build your smart mirror with Raspberry Pi. This process makes your mirror smart and interactive. It involves installing the right operating system and configuring the MagicMirror framework.
Following these steps carefully will help your smart mirror show useful information. From weather updates to calendar events, your mirror will become a helpful daily tool.
Installing The Operating System
Start by downloading the Raspberry Pi OS from the official website. Use a tool like Balena Etcher to flash the OS image onto a microSD card. Insert the microSD card into your Raspberry Pi and power it on.
Complete the initial setup by connecting to Wi-Fi and updating the system. Run the command sudo apt-get update && sudo apt-get upgrade in the terminal. This step ensures your system has the latest features and security patches.
Configuring Magicmirror Framework
MagicMirror is the main software that drives your smart mirror’s display. Open the terminal and install Node.js by typing curl -sL https://deb.nodesource.com/setup_14.x | sudo -E bash - followed by sudo apt-get install -y nodejs.
Next, clone the MagicMirror repository using git clone https://github.com/MichMich/MagicMirror. Navigate to the MagicMirror folder and install its dependencies with npm install.
Customize the mirror by editing the config.js file found in the config folder. You can add modules like weather, news, and clock here. Finally, start the mirror using npm start. Your smart mirror will now display all configured information.

Credit: www.youtube.com
Designing The Mirror Frame
Designing the mirror frame is a key step in building a smart mirror with Raspberry Pi. The frame holds the mirror and the screen in place. It also affects the look and feel of your smart mirror.
Choosing the right materials and style will make your smart mirror both strong and attractive. Focus on size, shape, and ease of access to the Raspberry Pi and cables.
Selecting Mirror Types
The mirror type affects how well you see the display behind it. Two popular options are two-way glass and acrylic mirrors. Two-way glass offers a clear and sharp reflection. It lets the screen light pass through easily.
Acrylic mirrors are lighter and less expensive. They are easier to cut and shape. But acrylic may scratch or warp over time. Choose a mirror type that fits your budget and style.
Building Or Buying A Frame
You can build a custom frame using wood or metal. Wood is easy to work with and looks warm. Metal frames are strong and modern but harder to cut.
Buying a ready-made frame saves time. Many stores sell frames in common sizes. Pick one that fits your mirror and screen perfectly.
Make sure the frame has enough space for the Raspberry Pi and cables. Also, plan how to open or remove the frame for updates or repairs.
Assembling The Hardware
Assembling the hardware is a crucial step in building your smart mirror with Raspberry Pi. This phase brings all parts together to form the device. Proper assembly ensures the mirror works well and looks neat.
Mounting The Screen Behind The Mirror
Start by choosing a screen that fits your mirror size. Use a two-way glass or acrylic mirror for the best effect. Place the screen directly behind the mirror surface. Make sure the display faces outward and is centered.
Secure the screen using brackets or double-sided tape. Avoid gaps between the screen and mirror. This keeps the display clear and bright. Handle the screen carefully to prevent damage.
Connecting Raspberry Pi And Peripherals
Attach the Raspberry Pi to the back of the screen or frame. Use screws or Velcro strips for a firm hold. Connect the screen to the Raspberry Pi via HDMI cable. This link sends the visual data to the screen.
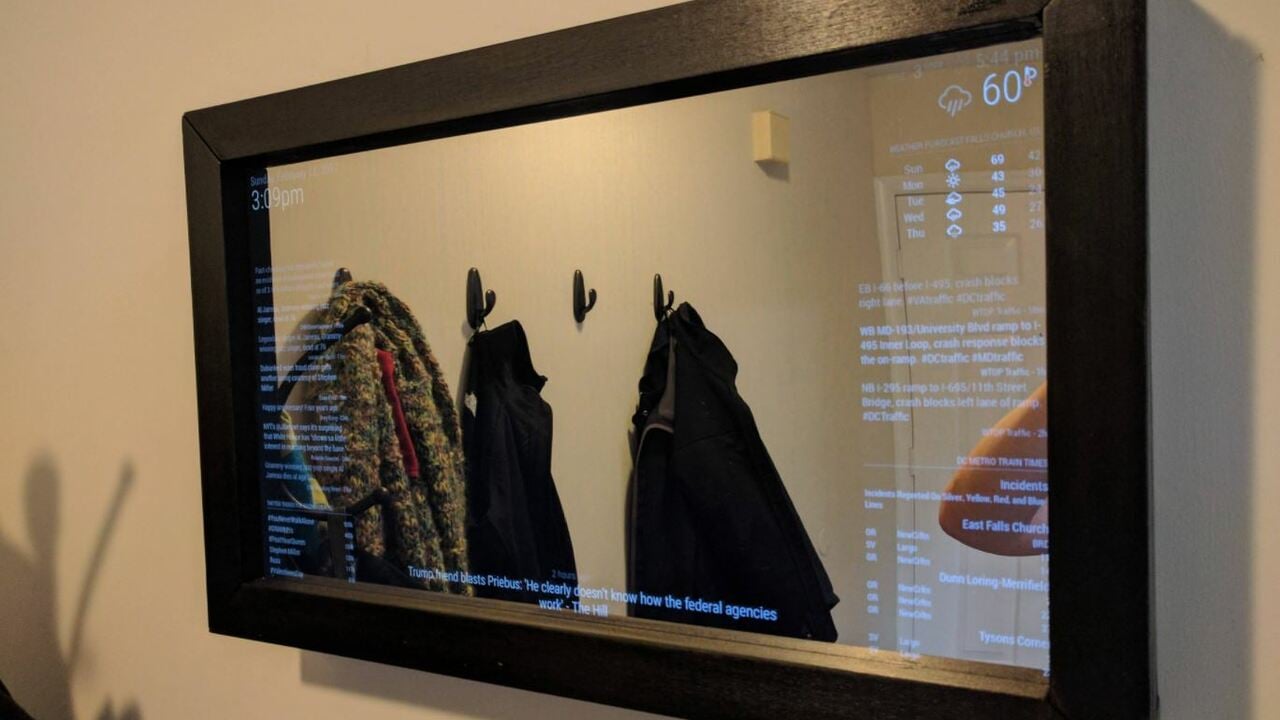
Plug in peripherals like a keyboard or mouse for setup. USB ports on the Pi handle these connections. Finally, connect the power supply to the Raspberry Pi. Test the setup by powering it on and checking the display.
Credit: all3dp.com
Customizing Display Modules
Customizing the display modules is key to making your smart mirror truly useful. It lets you show the information you want at a glance. You can add weather updates, news headlines, calendar events, and notifications. These features turn a simple mirror into a helpful daily assistant.
Choosing the right modules and arranging them well improves the mirror’s look and function. The software for Raspberry Pi allows easy customization. You can pick what to show and where to show it. Let’s explore how to add weather and news widgets, and how to integrate calendar and notifications.
Adding Weather And News Widgets
Start by selecting weather and news modules from the available options. These modules pull data from the internet and display it in real-time. Weather widgets show temperature, humidity, and forecasts. News widgets list headlines from chosen sources.
Configure these modules in the software by entering your location and preferred news sites. Customize the size and position on your mirror screen. Keep the design simple for quick reading. Update intervals can be set to refresh data regularly.
Integrating Calendar And Notifications
Calendar integration helps you track events and appointments easily. Connect your Google or other calendars with the smart mirror software. Events will then appear on the screen automatically.
Notifications from emails or messages can also show up on your mirror. Set permissions carefully to protect your privacy. Choose which notifications to display and how long they remain visible. This keeps you informed without distraction.
Optimizing Performance And Security
Optimizing the performance and security of your Raspberry Pi smart mirror is key. A fast, secure mirror improves your daily experience. It ensures smooth operation and protects your data. Focus on boot times and network safety to get the best results.
Improving Boot Times
Faster boot times let your smart mirror start quickly. Begin by disabling unnecessary startup services. This reduces the load on the Raspberry Pi. Use lightweight software to keep the system running smoothly. Clean up old files to free storage space. Regular updates also help the device run efficiently. Consider using a faster SD card for better read and write speeds.
Securing Network Connections
Secure your smart mirror’s network to protect privacy. Always use strong, unique passwords for Wi-Fi access. Enable WPA3 or WPA2 encryption on your router. Avoid using public or open networks with your device. Set up a firewall to block unwanted connections. Keep your Raspberry Pi’s software updated to fix security holes. Consider using a VPN for an extra layer of protection.
Troubleshooting Common Issues
Building a smart mirror with Raspberry Pi is exciting but can bring some issues. Troubleshooting helps fix common problems quickly. It saves time and keeps your project on track.
Below are solutions to common display and software issues. These tips help you get your smart mirror running smoothly.
Fixing Display Problems
Start by checking all cable connections. Loose or damaged cables often cause screen issues.
Ensure the display power supply works well. A weak power source can make the screen flicker or stay black.
Adjust the screen resolution in the Raspberry Pi settings. Wrong resolution might cause cut-off or blurry images.
Try rebooting the Raspberry Pi. This simple step can clear many display glitches.
Resolving Software Errors
Check for updates in your smart mirror software. Updates often fix bugs and improve performance.
Review the code for any typing mistakes or missing files. Small errors can stop the software from running.
Use the terminal to run the software and watch for error messages. They help identify what went wrong.
Restart the software after fixing errors. This confirms the changes worked.
Expanding Smart Mirror Features
Expanding your smart mirror’s features makes it more useful and fun. You can add new functions that fit your daily needs. Small upgrades can create a big difference in how you interact with your mirror.
Voice Control Integration
Voice control lets you operate the mirror without touching it. This feature adds convenience, especially when your hands are busy. Using a microphone and voice recognition software, the mirror listens to your commands.
Popular tools like Google Assistant or Amazon Alexa work well. They help you check the weather, news, or reminders by speaking. This hands-free control makes the smart mirror feel more modern and smart.
Adding Smart Home Connectivity
Connecting your smart mirror to other smart devices in your home improves control. You can use the mirror to manage lights, thermostats, or security cameras. This central control saves time and keeps things simple.
Smart home platforms like Home Assistant or SmartThings integrate easily with Raspberry Pi. They let your mirror communicate with various devices and sensors. This feature turns your mirror into a hub for your smart home system.

Credit: www.instructables.com
Frequently Asked Questions
What Materials Are Needed For A Raspberry Pi Smart Mirror?
You need a Raspberry Pi, a two-way mirror, monitor, frame, power supply, and software like MagicMirror. Optional sensors can enhance functionality.
How Do I Install Software On A Raspberry Pi Smart Mirror?
Download and install MagicMirror software via terminal. Follow setup instructions to configure modules and personalize your display easily.
Can I Customize The Display On A Smart Mirror?
Yes, you can add widgets like weather, news, calendar, and clock. Customize layout and themes using MagicMirror’s configuration files.
What Power Supply Is Recommended For Raspberry Pi Smart Mirrors?
A stable 5V 3A power adapter is ideal. It ensures consistent performance and prevents unexpected shutdowns during use.
Conclusion
Building a smart mirror with Raspberry Pi is a fun project. It lets you add useful features to your home. You can see weather, news, and time at a glance. The steps are simple and clear to follow. This project helps you learn about coding and electronics.
Try customizing your mirror to fit your needs. Small changes make it unique and personal. Enjoy your new smart mirror every day. Keep experimenting and improving your skills. This is just the start of many cool projects.