Are you ready to give your bathroom a fresh new look or fix that loose towel rack? Knowing how to take off a bathroom towel rack is easier than you think—and it can save you time and money.
Whether you want to replace it, repaint the wall, or just clean behind it, this simple task doesn’t have to be frustrating. In this guide, you’ll discover clear, step-by-step instructions that anyone can follow. By the end, you’ll feel confident handling this small home improvement like a pro.
Let’s get started and make your bathroom makeover smooth and stress-free!
Tools Needed
Removing a bathroom towel rack requires some basic tools. Having the right tools makes the job faster and easier. Most tools are common and easy to find.
Gathering all tools before starting saves time. It helps avoid interruptions during work. Here are the essential tools needed to take off a bathroom towel rack.
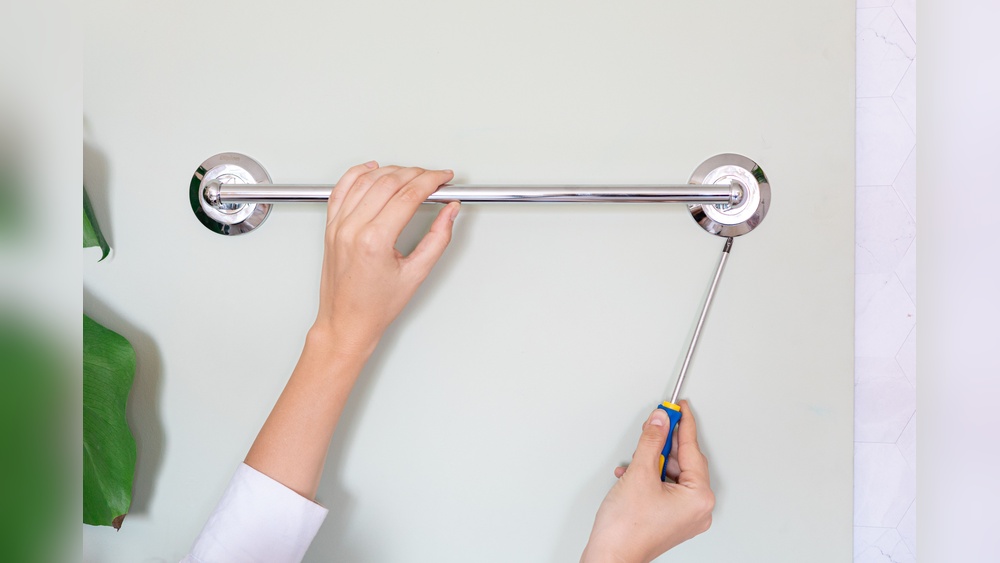
Screwdriver
A screwdriver is a must-have tool. Most towel racks use screws for mounting. Check if the screws need a flathead or Phillips screwdriver. Use the correct type to avoid stripping screws.
Drill
A drill may be needed if screws are stuck. It helps remove screws quickly and with less effort. Use a drill with the right bit size for the screws.
Pliers
Pliers come in handy for gripping and twisting. They help remove stubborn screws or anchors. Needle-nose pliers work well for tight spaces.
Putty Knife
A putty knife helps to gently pry off the rack. It works well if the rack is glued or painted over. Use it carefully to avoid wall damage.
Stud Finder
A stud finder locates wall studs behind the rack. It helps avoid unnecessary damage to the wall. Use it to identify where screws are anchored.
Safety Glasses
Safety glasses protect your eyes from dust and debris. Always wear them during removal work. Safety is important even for small tasks.
:max_bytes(150000):strip_icc()/how-to-remove-towel-bar-5221017-02-25716e1d19134b538fd87e85c8acbfa0.jpg)
Credit: www.thespruce.com
Locate Mounting Points
Locating the mounting points is the first step to remove a bathroom towel rack. These points hold the rack firmly against the wall. Knowing where they are helps you remove the rack safely without damage.
Most towel racks have visible mounts or hidden covers that hide the screws. Identifying these spots saves time and effort during removal.
Check For Visible Screws
Look closely at the ends of the towel rack. Some racks have screws you can see easily. These screws attach the rack to the wall.
Use a flashlight if the area is dark. Tight screws need a screwdriver to loosen them.
Look For Cover Plates
Some towel racks have cover plates hiding the screws. These plates snap or slide off. Gently pry them with a flat tool.
After removing the cover, the screws become visible. Then, you can unscrew them carefully.
Use A Stud Finder
If no screws are visible, use a stud finder. It detects wooden studs behind the wall. The rack may be screwed into these studs.
Mark the stud locations to find where the mounting points are. This helps avoid drilling in the wrong spot.
Remove Screws
Removing screws is the key step to take off a bathroom towel rack. Screws keep the rack firmly attached to the wall. Taking them out frees the rack so you can remove it easily.
Some screws are easy to see. Others hide behind covers or parts of the rack. Knowing where and how to find these screws helps you avoid damage.
Unscrew Visible Screws
Look closely at the towel rack for any visible screws. They are often at the ends or under the rack bars. Use a screwdriver that fits the screw head well. Turn the screwdriver counterclockwise to loosen and remove each screw.
Keep the screws safe for later use or replacement. Removing visible screws usually releases most of the rack from the wall. Check the rack for any parts still holding it in place.
Handle Hidden Screws
Some towel racks hide screws under plastic covers or metal plates. Gently pry off these covers with a flat tool or your fingernail. Look carefully for screws underneath.
Use the correct screwdriver to remove hidden screws. Avoid forcing parts off to prevent wall damage. Removing hidden screws fully frees the rack for removal.

Credit: www.reddit.com
Detach The Rack
Detaching a bathroom towel rack is a simple task with the right steps. This part of the process focuses on safely removing the rack from the wall. You will need basic tools and a little patience.
Gather Your Tools
Start by collecting the tools needed. Usually, a screwdriver or a drill works well. A putty knife might help if the rack is glued or caulked. Keep a cloth nearby to clean any dust.
Locate The Screws Or Mounting Brackets
Look for screws holding the rack in place. These are often hidden under caps or behind the rack ends. Check carefully to avoid damage. Identifying the mounting system helps remove the rack smoothly.
Remove The Screws Carefully
Use the screwdriver to turn screws counterclockwise. Do this slowly to avoid stripping the screw heads. Keep the screws safe if you plan to reuse the rack or install a new one.
Gently Pull The Rack Away From The Wall
After removing screws, pull the rack gently. Avoid sudden force that may damage the wall. If the rack feels stuck, check for extra adhesive or nails.
Clean The Wall Surface
Once the rack is off, clean the wall surface. Remove any dust, old adhesive, or paint chips. This prepares the wall for patching or new installation.
Patch Wall Holes
After removing a bathroom towel rack, small holes often remain on the wall. These holes need to be patched to restore a smooth and clean surface. Properly patching these holes helps the wall look neat and ready for painting or new fixtures.
Use simple tools and materials to fix the holes. This process takes little time and improves your bathroom’s appearance.
Fill Small Holes
Start by cleaning the holes. Remove any loose paint or debris. Use a putty knife to apply spackling paste or wall filler. Press the filler firmly into the holes to fill them completely. Smooth the surface with the knife so it is even with the wall. Let the filler dry as per the instructions on the package.
Sand And Paint
Once the filler dries, use fine sandpaper to smooth the patched areas. Sand until the surface feels even and blends with the rest of the wall. Wipe away dust with a damp cloth. Apply paint that matches your bathroom wall color. Use a small brush or roller for best results. Let the paint dry and apply a second coat if needed.
Prevent Wall Damage
Removing a bathroom towel rack can damage your wall if you are not careful. Walls often have paint or tiles that can chip or crack easily. Protecting the wall helps keep your bathroom looking neat and clean. Small steps can stop big problems.
Use The Right Tools
Choose a screwdriver or drill that fits the screws perfectly. A wrong tool can slip and scratch the wall. Keep tools ready before you start. This makes the removal smooth and safer for your walls.
Remove Screws Slowly
Turn screws gently and slowly. Fast or rough movements can pull paint or drywall off. Take your time. Let the screws come out with little force.
Cover The Wall Around The Rack
Place painter’s tape around the rack edges. This tape protects paint from scratches. It also marks the area you need to work on. Tape makes cleanup easier after the rack is gone.
Fill Holes Immediately
Use wall putty or spackle to fill holes left by screws. This stops moisture from entering and causing damage. Smooth the surface with a putty knife. Let it dry before sanding or painting.
Handle Tiles With Care
If your towel rack is on tiles, avoid using metal tools directly on them. Tiles can crack or chip easily. Use plastic tools or protect edges with tape. Work slowly and gently to keep tiles intact.

Credit: www.reddit.com
Frequently Asked Questions
How Do I Remove A Bathroom Towel Rack Safely?
First, locate and unscrew the mounting brackets using a screwdriver. Gently pull the rack away from the wall. Use a putty knife to remove any adhesive residue. Be careful not to damage tiles or drywall during removal.
What Tools Are Needed To Take Off A Towel Rack?
You will need a screwdriver, putty knife, and possibly a drill. A level and wall anchors may help during reinstallation. Keep a towel or cloth handy to clean any dust or debris.
Can I Remove A Towel Rack Without Damaging The Wall?
Yes, by carefully unscrewing and gently prying the rack off. Use a putty knife to remove adhesive without scraping too hard. Patch any small holes with spackle and sand smooth for a clean finish.
How Do I Deal With Wall Anchors After Removing A Towel Rack?
Remove wall anchors by pulling them out with pliers or pushing them in. Fill holes with wall filler or spackle. Sand the area smooth and repaint if needed for a seamless look.
Conclusion
Removing a bathroom towel rack can be simple and quick. Gather the right tools first. Unscrew the rack carefully to avoid damage. Keep all parts safe if you plan to reuse them. Clean the wall area after removal for a neat look.
Taking your time helps prevent mistakes. This small project saves money and improves your space. Enjoy your updated bathroom without the old rack.