Are you running out of space or just want to clear old footage from your Nest Doorbell? Knowing how to delete videos quickly and easily can save you time and keep your device running smoothly.
In this guide, you’ll learn simple steps to remove unwanted videos from your Nest Doorbell, so you can stay organized and focused on what matters most. Keep reading to find out how to take control of your video storage without any hassle.

Credit: www.androidheadlines.com
Accessing Nest Doorbell App
Accessing the Nest Doorbell app is the first step to manage your videos. The app stores all your recorded footage. It lets you view, save, or delete videos easily.
Opening the app and finding your video history is simple. The process takes just a few steps. This guide helps you get started quickly.
Logging Into Your Account
Open the Nest app on your smartphone or tablet. Enter your email address linked to your Nest account. Type in your password carefully. Tap the “Sign In” button to access your account. If you forget your password, use the reset option.
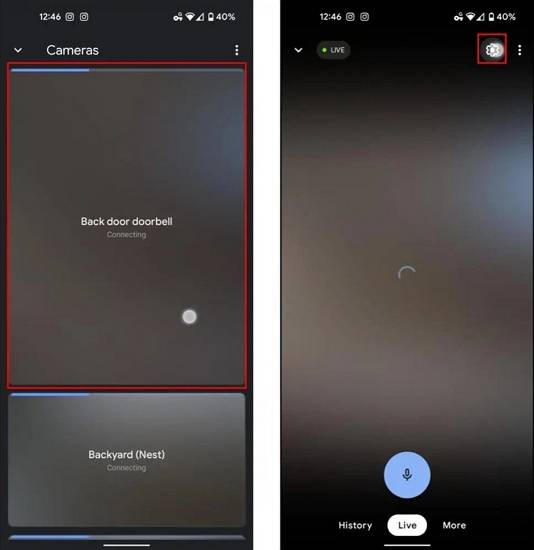
Navigating To Video History
After login, find the Nest Doorbell device on the main screen. Tap the device to open its settings. Look for the “Video History” or “Event History” tab. This section shows all your recorded videos. Scroll through the timeline to find specific clips. You can watch, download, or delete videos here.
Locating Videos For Deletion
Deleting videos on your Nest Doorbell starts with finding the right clips. The Nest app saves many videos daily. Searching through all can feel hard and slow. Organizing videos by date or event helps to find what you want faster. This section explains how to locate videos for deletion using simple tools in the app.
Using Date And Time Filters
The Nest app lets you filter videos by date and time. Choose a specific day to see all recordings from that day. This feature helps to narrow down videos quickly. You can select a time range too, such as morning or evening. This way, you avoid scrolling through hours of footage. Use the calendar and clock icons to set your filters. It saves time and makes deletion easier.
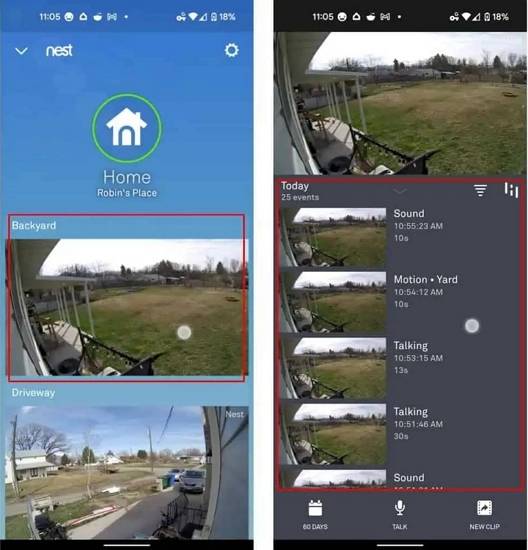
Searching Specific Events
Events like motion or sound triggers are marked in the app. You can search for these specific events to find important videos. The app groups videos by event types, making it simple to locate key moments. Tap on the event tab to see all related clips. This method helps you delete unneeded videos while keeping important ones. It keeps your storage clean and organized.
Deleting Individual Videos
Deleting individual videos from your Nest Doorbell is simple. It helps save space and keeps your video history organized. You can remove videos you no longer need directly from the app. Follow clear steps to select and delete each video safely.
Selecting A Single Video
Open the Nest app on your phone or tablet. Go to the video history section. Scroll through the list to find the video you want to delete. Tap on that video to open it in full view. This allows you to check the video before deleting it. Make sure it is the right one.
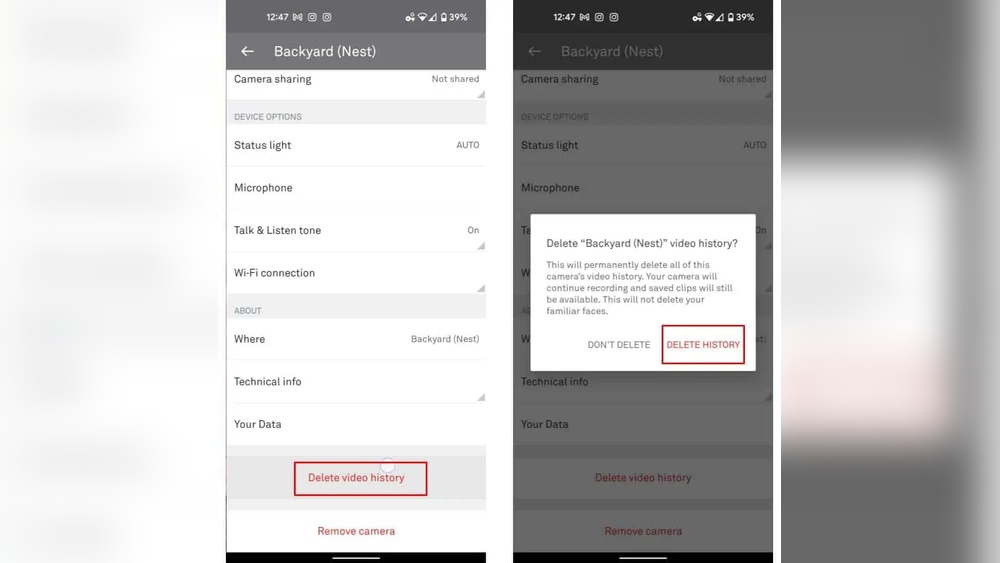
Confirming Deletion
After selecting the video, look for the delete option. It usually appears as a trash can icon or a delete button. Tap on it to start the deletion process. The app will ask you to confirm this choice. Confirm by tapping “Delete” again to remove the video permanently. This step prevents accidental deletion.
Credit: recoverit.wondershare.com
Bulk Deleting Multiple Videos
Deleting videos one by one from your Nest Doorbell can take a lot of time. Bulk deleting helps clear many clips quickly. This saves space and keeps your app tidy. Follow simple steps to select and delete multiple videos at once.
Selecting Multiple Clips
Open the Nest app on your phone. Go to the video history section. Tap and hold on the first video you want to delete. Checkboxes will appear next to each clip. Tap all clips you want to remove. Make sure to select only the videos you no longer need.
Batch Deletion Process
After selecting the videos, look for the delete icon or trash bin. Tap this icon to start deleting. The app will ask for confirmation. Confirm to delete all selected videos. The process will remove them in one go. This method saves time and keeps your storage clear.
Managing Storage Settings
Managing storage settings on your Nest Doorbell helps control how videos are saved and deleted. It affects the space used and how long your videos stay available. Proper settings keep your device running smoothly and your important videos safe.
Adjusting storage settings lets you decide how long videos are kept. This way, you avoid running out of space and keep only the videos you need.
Adjusting Video Retention Period
You can change the video retention period in the Nest app. This setting controls how many days your videos stay saved. Shorter periods free up space faster. Longer periods keep videos available for more time.
Choose a retention period that matches your storage needs. For example, select 3, 5, or 30 days. Nest automatically deletes videos older than this period.
Using Continuous Video Recording Options
Nest Doorbell offers continuous video recording with Nest Aware subscription. This saves all video footage, not just motion events. You can review any moment from the last days based on your plan.
This option uses more storage but provides complete coverage. You can adjust recording settings to balance storage and video availability. Turn it off to save space and keep only important clips.
Troubleshooting Deletion Issues
Deleting videos on your Nest Doorbell should be simple. Sometimes, you might face trouble removing them. This section helps solve those problems quickly. Follow these tips to fix common issues with video deletion.
Common Errors And Fixes
One common error is the video not deleting after tapping the delete button. Check your internet connection first. A slow or unstable connection can stop the deletion process.
Another issue is the app freezing or crashing during deletion. Close the app completely and reopen it. Try deleting the video again.
Sometimes, the Nest app may show the video, but it is already deleted from the cloud. Refresh the app by pulling down on the screen. This updates the video list.
If the video is part of a subscription plan, ensure your plan is active. Expired plans may restrict video management. Renew your plan to regain full control.
When To Contact Support
Persistent problems need expert help. Contact Nest support if videos still won’t delete after trying fixes. They can check your account and device status.
Report issues like repeated app crashes or error messages. Provide details about your device and app version. This helps the support team diagnose problems faster.
Support can guide you through advanced troubleshooting. They can also fix account-related issues that block video deletion.
Credit: recoverit.wondershare.com
Frequently Asked Questions
How Do I Delete Videos From My Nest Doorbell?
Open the Google Home app, select your Nest Doorbell, and tap on the video history. Choose the video you want to delete and tap the trash icon. Confirm deletion to remove the video permanently.
Can I Recover Deleted Nest Doorbell Videos?
No, once you delete videos from the Nest Doorbell app, they are permanently removed. There is no option to recover deleted videos, so ensure you want to delete before confirming.
Why Can’t I Delete Videos On Nest Doorbell?
You may not delete videos if you have no active Nest Aware subscription or if the video is stored on a linked Google account. Ensure you have the right permissions and subscription.
How Long Are Nest Doorbell Videos Stored?
Videos are stored for 30 days with a Nest Aware subscription. Without a subscription, videos are not saved and cannot be deleted later.
Conclusion
Deleting videos on your Nest Doorbell is simple and quick. You can clear space and keep your recordings organized. Just follow the steps carefully to avoid losing important clips. Regularly managing videos helps your device work smoothly. Now, you have control over what stays and what goes.
Keep your Nest Doorbell storage tidy and easy to handle. This way, your security system stays effective and ready.